Affordable Mickey Mouse Party

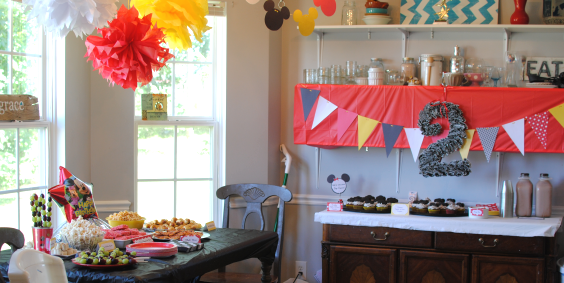
My youngest turned 2 not too long ago and we decided on a Mickey theme for her party. It took me some time to figure out what theme to go with because she’s not at the age where she drools over certain characters and has a fit because she wants the latest and greatest of a certain toy collection. I’m thankful for that, but it created some difficulty when deciding on a party theme.

Then it hit me one morning…

She brought me the remote and said “turn on Mickey Mouse Howhouse” (That’s what she calls it). She does this almost every morning. How could I have not thought of this before? That’s all it took and I began to run with the theme idea. It’s the most fun I’ve  had planning a party in a while.

Sure, she may not remember any of it, but I’ll have pictures to remind her. 😉 I put the entire thing together on a budget. I’m almost always on a budget so most store-bought party items aren’t really an option. Plus, isn’t it always better to have one-of-a-kind things? I think so anyways.

I’ll share my ideas and give you a general idea of what I did. If there are more questions, I may end up doing separate posts for those items. Here we go!

These super simple tissue pom poms cost me a whopping $3! I bought each color separately at different stores in packs of 8 or 10 sheets. The 10-sheet packages make better poms poms, but they are harder to find. For a buck, you can create a nice hanging decoration for above your table!

This could be the decor that I was most proud of. I found much inspiration for ideas on Pinterest and ended up going with this design. I bought the straw wreath at Goodwill and the red ribbon at Walmart for around $1. The black is actually an old t-shirt that I cut up and wrapped around. The buttons were $1.

The ears are circles that I cut out of a cardboard box and covered with more t-shirt. I then pinned them to the wreath.

And of course the little signs are just printed up and taped to scrapbook paper to spiff it all up!

Scrapbook paper and fancy Disney font make a cute little sign as guests exit.

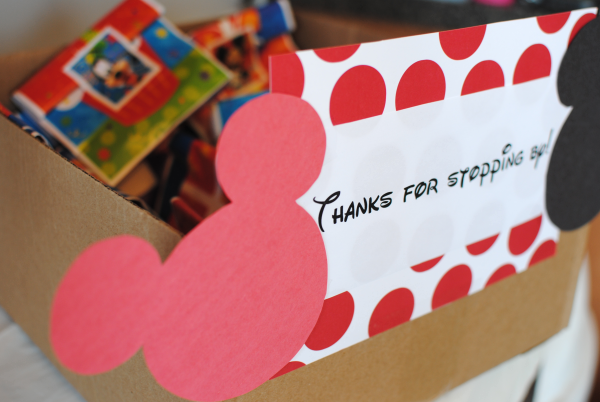
A cardboard box I had on-hand made a great goodie bag container. I just printed up a cute note and attached some Mickeys that I cut out of construction paper!

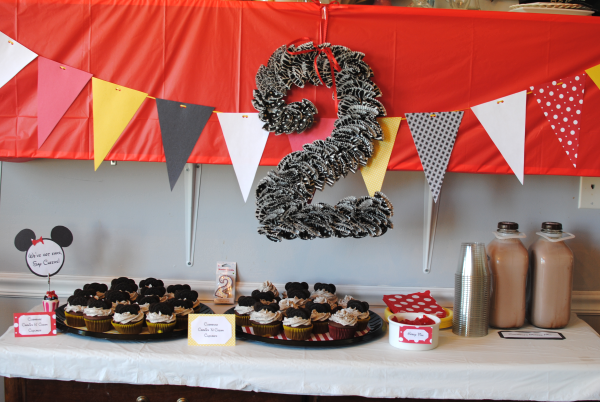
The flags are simply pieces of cut out scrapbook paper. I punched holes in each of them to run some ribbon through and hung them on top of a table cloth. The big 2 you see is (believe it or not) a 2 that I cut out of cardboard and then glued CUPCAKE WRAPPERS to! Hung with a cute little ribbon over the Mickey treats and it made for a cute party backdrop.

With scrapbook paper, I cut out little Mickey heads and punched holes in them to make Mickey Garland! I hung this all over the house including the chandelier. It doesn’t get any easier (or cheaper!) than that!

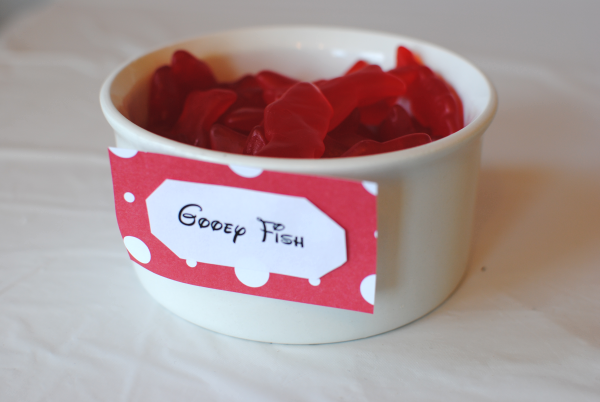
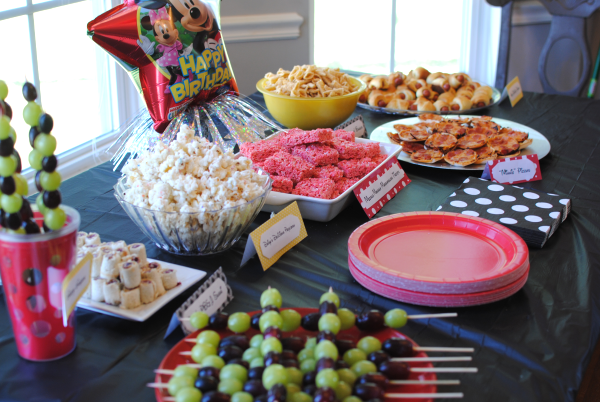
No party would be complete without snacks! If you know a lot about Mickey Mouse Clubhouse, than you’ve probably seen them fishing for Gooey Fish. Swedish Fish make great substitutes for those. Using scrapbook paper, I was able to create cute little name signs for all the food.

As a side note- if you haven’t heard of Gooey Fish from Mickey Mouse Clubhouse, don’t feel bad. Apparently I know WAY too much about the show! lol

Pigs in a blanket make the perfect Hot Diggity Dogs and snack for hungry kiddos at your Mickey party! Once again, this is a cheap snack that everyone will loves. Especially kids!

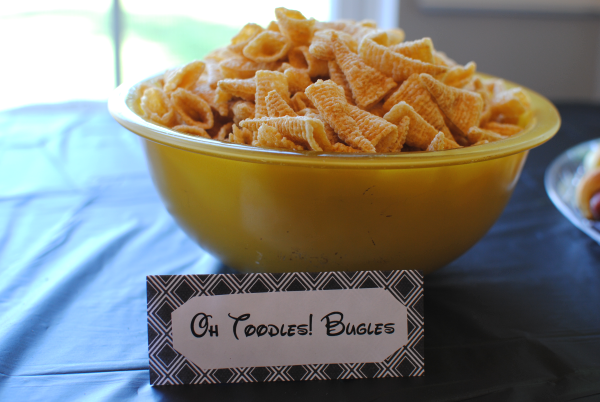
I threw some Bugles in a bowl and called them Oh Toodles! Bugles.

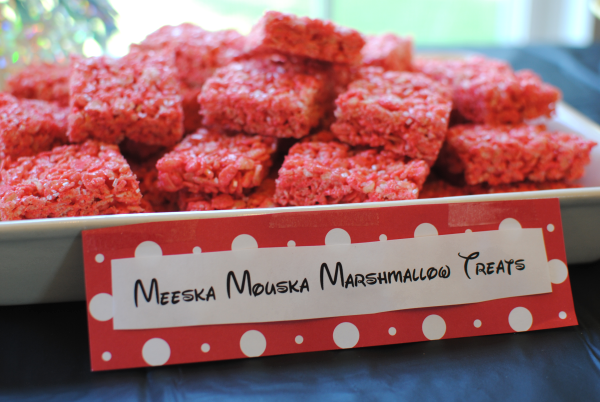
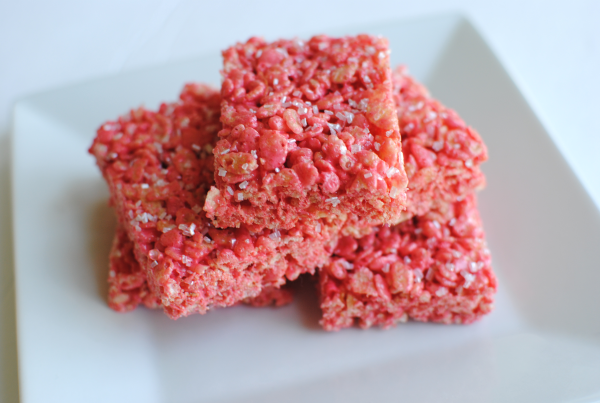
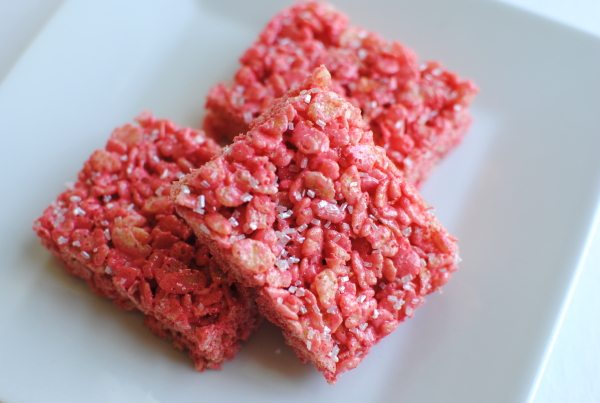
Getting a little more creative with the names of the foods, these are Meeska Mouska Marshmallow Treats. AKA Strawberry Rice Krispie Treats. Tasty!

The name of this snack wasn’t as creative, but the popcorn was DE-lish! Birthday Cake popcorn made with actual cake mix. It’s divine and costs pennies to make!

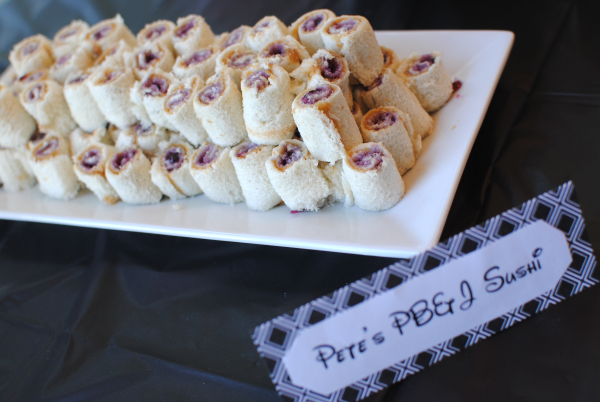
I had only just learned of the PB&J Sushi when I was gathering my menu for this party. I just had to include these. They were a HUGE hit. I found the recipe here. They were so easy, but seemed like they took a lot of work. I love those type of snacks!

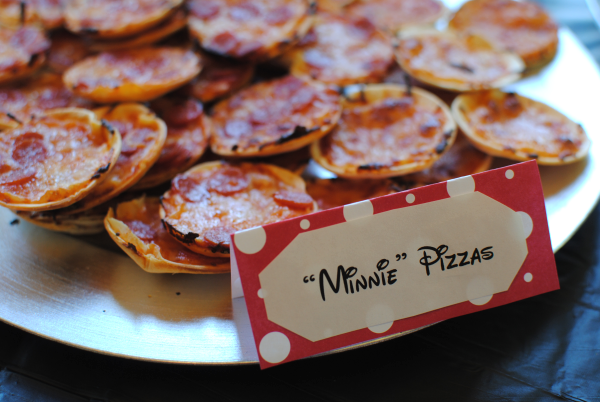
These “Minnie” Pizzas were also a big hit. I started making each of them with a big pepperoni and 2 small ones on the top, but it became a little tedious and my time was running thin. I’m glad I opted out of making them all that way. They weren’t around long enough to admire!

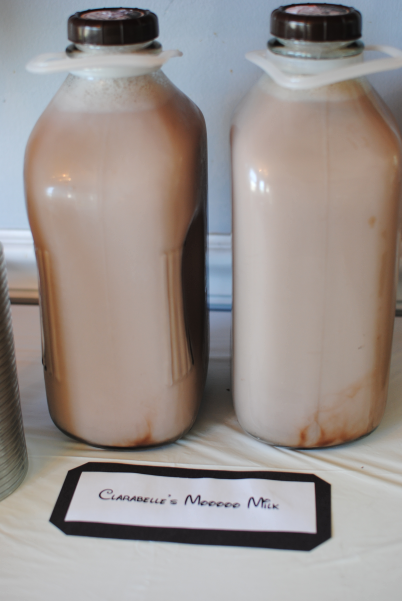
I had these super cool milk jugs from a local dairy to put chocolate milk in. We called it Clarabelle’s Moooooooo Milk!

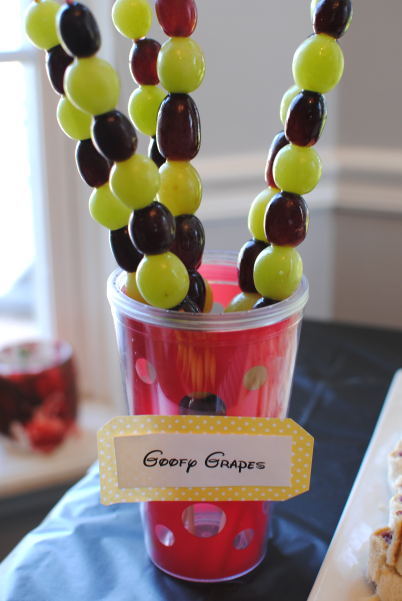
Whowouldathunk (yes, this is totally a word y’all) that grapes could make such a pretty presentation? Skewers did the trick to make these just right for individual servings. Must I say it? They were a hit!

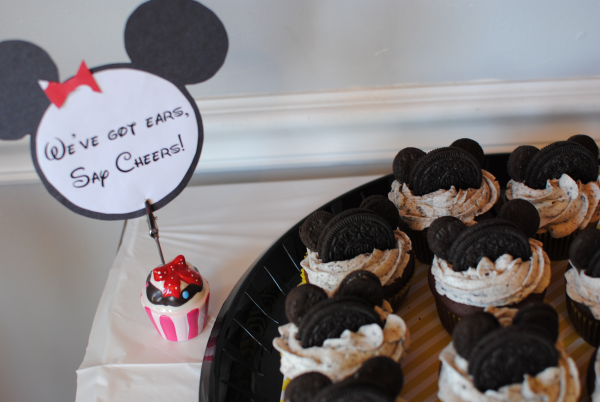
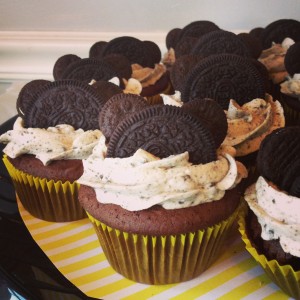
The cupcakes were Cookies ‘N Cream Cupcakes and they were really tasty. Different size Oreos made for cute little Mickey heads as toppers. I hid a Oreo and a dollop of marshmallow cream inside each cupcake, too!

I printed off the little sign and attached it to one of my construction paper Mickey heads. The cupcake holder was $1 at Michael’s. Love that store.

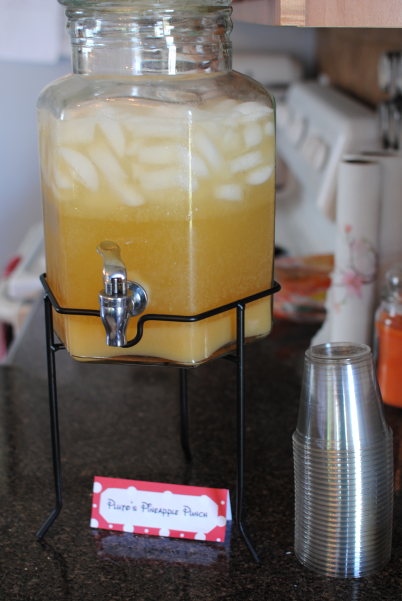
Pluto’s Pineapple Punch was nothing more than Ginger Ale and Pineapple Juice and ice. So easy and tasty at the same time.

Mickey party success! What do you think?

Are you planning a Mickey party soon? I’d love to hear your ideas or suggestions!


Like this post? SHARE it!

Related Posts Plugin for WordPress, Blogger...

Amazon Deals For Your Kitchen 6/17

One of my most favorite places to grab deals on things for my kitchen (appliances, utensils, supplies, etc.) is Amazon. Not just because I can use my Swag Bucks to get gift cards there, but also because they usually have the lowest prices that you’ll find on most anything. I can’t tell you how many times I go out to buy something and get to a store only to say I’ll get that at Amazon instead. You just can’t deny it!

I thought it might be helpful to round up a few of my favorite deals on kitchen gadgets and things in case you’re looking for one!

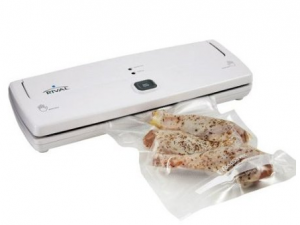
This Rival Step Vacuum Sealer W/Bag Starter Kit is normally $79.99 marked down to just $29.99!

Normally $39.95, Amazon has a Chefman Rubberized Cordless Immersion Blender and Bonus Measuring Cup for $19.95! (As a side note, this picture shows cords which is odd because it’s cordless. I’m guessing they have two different versions and used pictures from the other maybe?

Or if you’re among those enjoying the mustache trend right now, check out these Fred and Friends MUST Munchstaches Cookie Cutters for $2.73. Great item to add to your order if you need to reach $25 for free shipping.

Or if you need some summer reading materials, there are tons of FREE Amazon eBooks! Check those out.

Please note that Amazon prices can change in a flash so jump on any deal that you are interested in!


Like this post? SHARE it!

Related Posts Plugin for WordPress, Blogger...

Cilantro Salsa Burgers

It’s summer time and there’s no stopping the men and their grills. Am I right? It’s a right of passage. And can we really complain? The chance to sit back and relax while watching someone else do all the cooking for once? I think I’ll take that deal.

During the summer we try to grill at least once a week. It’s nice for the whole family to get outside and enjoy summer nights playing together while daddy gets dinner ready. Memories are being made. Of course, grilling goes hand in hand with a very simple (yet taken seriously) dish, burgers. The oh-so-meaty, versatile, and flavorful burger. My husband would consider himself a connoisseur of burgers. And he has a right to. His most favorite food of all time and he’s eaten his way in burgers across the country.

One of the ingredients in most burger recipes is the binder, an egg. Have you ever used mayonnaise instead? It’s very tasty! A simple ingredient that can take your burger from boring to bam.

Hellmann’s is celebrating their 100th anniversary! Can you believe that they have been around that long? You know that a product is good when it’s been around for that many years and people still enjoy it today. As part of Hellman’s 100th celebration, they are helping to provide 1 MILLION meals to Feeding America to fight against hunger nationwide. They are also teaming up with celebrity chef Mario Batali (I’m a fan!) to showcase classic Hellmann’s recipes with a modern twist.

In fact, they have a contest going right now to give YOU a chance to win a trip to New York City with a seat at the World’s Longest Picnic Table celebrating Hellmann’s 100th anniversary. You simply have to make Mario’s twist on Hellmann’s classic recipes your own. The Create A Recipe With Mario facebook app has more details about the contest. These are simple and classic recipes, it would be a cinch to enter!

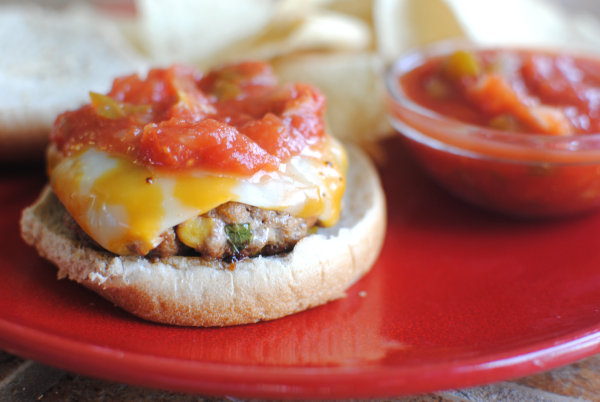
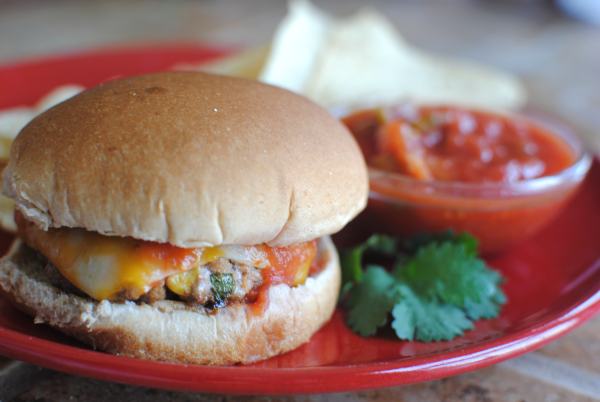
I was stoked to give it a try so I created these Cilantro Salsa Burgers.

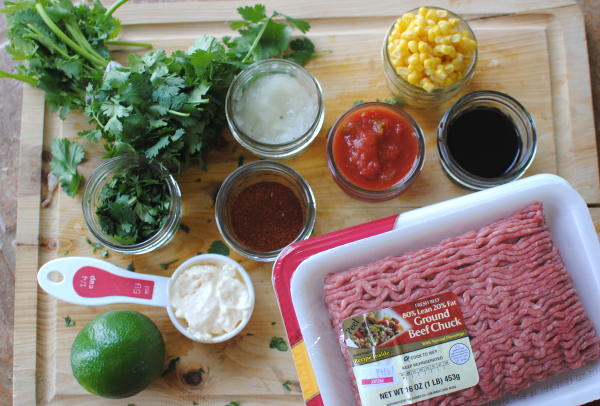
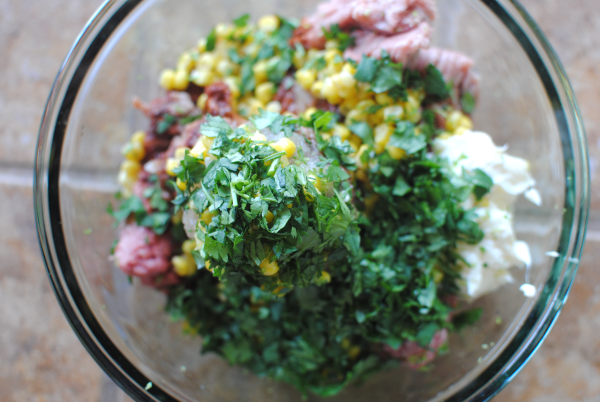
Theses are the ingredients. I have to admit that I’ve never considered putting salsa on my burger, but I love trying new things so I was all for it. The cilantro and lime really bring a new and spin on your every day burger. This is a refreshing burger to say the least!

Getting your hands dirty is the best part! Or the worst, depending on who you are. I consider this fun and blissful. 🙂

Mario used ground chuck for his burger, but I used ground turkey to make them a tad bit more healthy.

Viola! Easy peazy lemon sqeezey. My husband gave his burger stamp of approval so you can be sure they are good. I hope that you’ll give these a try. And I also hope that you’ll enter Hellmann’s 100th Anniversary Contest to win the trip to New York City by creating your own twist.

Cilantro Salsa Burgers
Recipe Type: Burger, Main Dish
Cuisine: Grilling, Meat, American
Author: Pennywise Cook
A simple yet tasty burger recipe made with salsa, corn, and cilantro!
Ingredients
  • 1 lb Ground Chuck
  • 1 lb Lean Ground Turkey
  • 1/2 Onion, Peeled and Grated (makes for good juice)
  • 3 tbsp Worcestershire Sauce
  • 1/4 c Hellmann’s Mayonnaise
  • 1 tbsp Chili Powder
  • 1/4 c Cilantro, Chopped fine
  • 2/3 c Whole Kernel Corn
  • Zest of 1 Lime
  • Juice of 1 Lime
  • Salt and Pepper to Taste
  • 1 c Salsa (for topping burgers)
  • 8 Hamburger Buns
  • Sliced Cheese (optional)
Instructions
  1. Heat a skillet or grill to medium high heat.
  2. Combine all ingredients except for the salsa. Shape into patties.
  3. Grill to desired temperature.
  4. Top with 2 tbsp salsa each and serve!
Notes

For the corn, you can use canned if you like. Just make sure to drain it well. You could also use frozen, just be sure to thaw it. And of course, fresh will work too!

This is a sponsored post written by me on behalf of Hellmann’s and Yummly. All opinions expressed are 100% my own.


Like this post? SHARE it!

Related Posts Plugin for WordPress, Blogger...

Strawberry Rice Krispie Treats

It’s only the first week out of school and I’m finding my snack stash to be a little on the low side. Sure I’ve bought the same as usual like I’ve always done throughout the year, but then it dawned on me….she’s home now.

When Addie would have been learning to spell small words, she is now asking for a Pop-Tart. When she would have been learning to add simple addition problems, she is now asking for a peanut butter and jelly sandwich. And when Addie would have been out burning off energy on the playground, she is now asking for a piece of candy or popsicle. It’s a never-ending viscous cycle.

She comes to me and asks for something to eat.

I say no.

She comes back 3 minutes later.

I say no.

And the process continues. Am I the only one experiencing this? I feel bad sometimes, like I’m depriving her of her basic needs! But I have to remind myself that she just ate lunch 15 minutes ago and that her main reason for snacking is boredom. I, myself, have that same issue so I can relate. But do as I say, not as I do!

So as I’m telling you all of this, I’m realizing that it’s not exactly a great way to relate my life to these super tasty treats. But I digress and will now tell you about this awesome new discovery that I made!

So I told you earlier this week that I put together a super cool Mickey Mouse party for my now 2 year old. I had so much fun planning this party, it’s ridiculous. This idea came to me when I was figuring out the color scheme.

I wanted RED Rice Krispie Treats. I was thinking what can make things red? Food coloring? Yes, but it’s weird sometimes when things are an unexpected color, but don’t taste any different. (Anybody remember the green ketchup years ago?) Kool-Aid? Maybe. J-ELLO! That’s it!

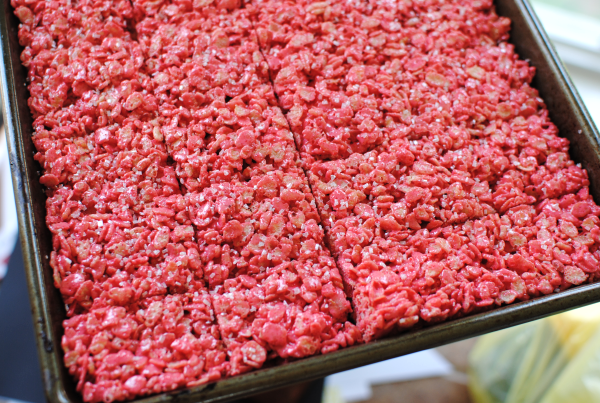
The rest is history y’all. I whipped up a batch of the original Rice Krispie Treats, but added a box of sugar-free Strawberry J-ELLO to the melted marshmallows before adding them to the Rice Krispies! They turned out delish. They remind me of the Crunch Berries in Cap ‘N Crunch cereal!

You should have seen me when I realized the possibilities. You can make them any flavor that you’d like! Simply add the box of J-ELLO to your melted marshmallows before mixing them with the Rice Krispies. Done deal.

And for the record, I was a teensy bit saddened that they didn’t end up red. I should’ve known that red and white make pink, DUH. Either way, I was very happy with the way they turned out.

Strawberry Rice Krispie Treats
Recipe Type: Snack, Dessert
Author: Pennywise Cook
This simple trick can get you several different tasty flavors of marshmallow treats!
Ingredients
  • 3 Tbsp Butter
  • 4 Cups Mini Marshmallows
  • 6 Cups Krispy Rice Cereal
  • 1 Pkg Sugar-Free Strawberry J-ELLO Mix (or any flavor you like)
Instructions
  1. In a large saucepan, melt butter over low heat. Stir in marshmallows and until melted.
  2. Add package of J-ELLO and mix until disolved. Remove from heat.
  3. Add the Rice Krispies and stir until well coated.
  4. Place into a well-greased jellyroll pan or casserole dish and let set.
  5. Cut into squares and enjoy!


Like this post? SHARE it!

Related Posts Plugin for WordPress, Blogger...

How I Get FREE Starbucks

This is a genuine smile on my face y’all. Coffee makes me quite happy. I wouldn’t consider myself to be an expert on coffee, but I can usually tell if it’s a good cup or bad cup. You’d think that I would be one of those who enjoyed their coffee dark and bold.

I’m not.

I enjoy my coffee light and airy. And with lots of cream and sugar (not the real stuff; the Equal in all of its artificial glory). A single cup of heaven! Well, maybe 2 or 3 cups of heaven…

Since moving over here to Pennywise Cook last year, I haven’t shared with you guys the power of Swag Bucks. This is in fact, my secret to getting my free Starbucks gift cards. Starbucks is not the only gift card you can get your hands on when you redeem your Swag Bucks. You can grab a gift card to Target, O’Charley’s, even get CASH through Paypal with your Swag Bucks.

Love to shop at Amazon? Turn your Swag Bucks into FREE purchases at Amazon by redeeming for a gift card.

Let me give you the 411 on how it all works…

What ARE Swagbucks?
Swag Bucks is online community where you earn digital dollars called “Swag Bucks” which you can redeem for all kinds of things including merchandise and gift cards.

What do I have to do to earn these Swag Bucks?

  • Searching– this is by far the easiest way to earn. Simply login to the Swagbucks website and use their search bar to input your inquiry. They’ll give you responses from Google and from Ask.com. So if you use those search engines already, then it won’t be much of a change. During random searches that you perform, you will win Swag Bucks! They will ask you to input a special code from an image to confirm your win. Then they will automatically add them to your account. You can look up at your number and it will blink red.
  • Redeem Coupons– They have a section where you can print off coupons. For every coupon that you redeem at the store, you will earn 10 Swag Bucks. Just keep in mind that it can take up to 8-12 weeks for the Swag Bucks to post to your account.
  • Signing up for Daily Deal Sites– Swag Bucks will give you some for signing up through them for Daily Deal Sites or for making purchases. You must be a new user. The fine print will tell you the requirement to receive Swag Bucks.
  • Daily Poll– You can earn 1 Swag Buck each day for voting in the Daily Poll. Woohoo! 😉 Not much, but every little bit counts.
  • Games– Play games through Swagbucks and they will randomly award you during the games.
  • No Obligation Special Offers (NOSO)– Click through a bunch of offers that you may or may not want to participate in and each day you can earn 1 more Swag Buck for doing so. Once per 24 hour period!
  • Special Offers– These require a purchase usually at some point. Some may be free trials and other may require payment right away. This is guaranteed Swag Bucks.
  • Swag Bucks TV– This one is fairly new. Watch videos to earn Swag Bucks. Videos must actually finish in order to earn and multiple videos are required. There is a progress meter to keep up with your earning progress through videos.
  • Tasks– Perform simple little tasks for Swag Bucks such as giving them questions, finding business reviews and more to earn a little Swagbucks.
  • Trade-In– Trade in old electronics and they will give you Swag Bucks in return. This is a nice way to recycle and to earn something in return.
  • Surveys– Take surveys that you qualify for to earn Swag Bucks. Some earn more than others. Of course, it’s free to do this.

On my site, you’ll find my Swidget. Here you’ll easily be able to do a quick search (with the possibility of earning Swag Bucks!) without having to change windows or leave Pennywise Cook.

When I was expecting Britton, I stocked up on diapers by doing the Amazon gift card thing. I got over $50 in diapers for FREE! That same year, I did a lot of my Christmas shopping through Amazon with my Swagbucks. It has really been a blessing.

Fridays are MEGA Swag Bucks Day! That means that you can earn double or even triple the normal amount just by doing what you already do. It’s at random but totally worth trying it out. I always do a few searches just to see how many I can score. So be SURE to get to swaggin’ on Fridays y’all!

Ok, so what are you waiting for? If you aren’t yet signed up with Swag Bucks, then you NEED to do so HERE.


Like this post? SHARE it!

Related Posts Plugin for WordPress, Blogger...

Summer is a Piece of Cake!

Welp, Memorial Day has come and gone which means WELCOME SUMMER! Wahoo! I got to sleep in this morning until about, oh, 7:15. That’s good right? The kids slept in, but me? No. I’m still stuck in let’s get going, get your shoes on, eat your breakfast mode. I’m hoping that nonsense will wear off soon. I’ve got to at least work up to sleeping to 8:00, don’t ya think?

My youngest turned 2 this weekend! It’s hard to believe that she is already 2. Her favorite show is Mickey Mouse Clubhouse, so naturally that became the theme of her party. I had a TON of fun putting it together. Don’t worry, I have a post all about it coming up.

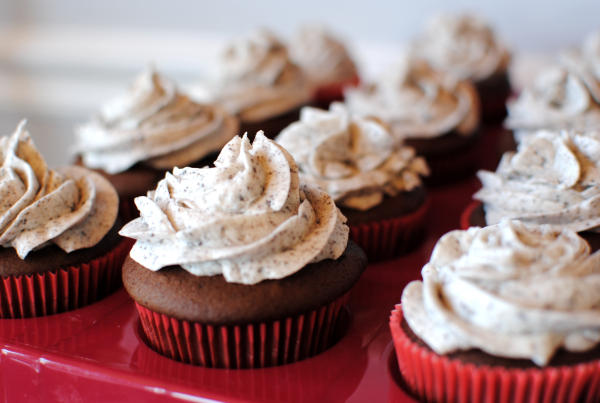
I wanted to share with you my Cookies N Cream Cupcakes. While I didn’t put together a step by step with these, they were really simple. I used Devil’s Food Cake Mix for the cupcakes. Only, I added a sweet surprise. Before baking, I placed a chocolate sandwich cookie in the bottom of each liner and then a dollop of marshmallow cream on top. THEN I plopped cake batter in. So they baked up with a cookie and filling inside!

For the frosting, I made a simple buttercream (no shortening in this one) and added about 1/2 cup of crushed chocolate sandwich cookies to the mix. Then piped it on and voila! These were so incredibly tasty. The cookie inside became soft after a while which I thought I wouldn’t like, but I found them to be even tastier that way.


Of course, I had to Mickeytize them for the party. Here’s a sneak peek of the Mickey fun! More on that later…

I think summer is one of the best times to create cool cakes. Not just because most of us have a little more time on our hands, but because the kids can help out! That is, if they can tear themselves away from the TV and video games…

Betty Crocker has got some really cute ideas for summer cakes. And you know that Betty Crocker likes to make things easy for us moms. There are some really cute cake ideas on the Betty Crocker website. I LOVE the Watermelon Cake. I think I’ll be trying that one out this summer. Considering that most of my family doesn’t like really watermelon, maybe they’d like it in cake form? I also find the butterfly cake to be adorable. It looks a little complicated, but Betty Crocker even provides a template for making it. How helpful!

Have you seen the cupcakes made in ice cream cones yet? It’s a popular pin on Pinterest right now. Check out the infographic that Betty Crocker put together about how to easily put those cuties together.


Have you made the ice cream cone cupcakes before? I haven’t yet braved them so I’d love to hear your thoughts!

I made these In The Garden Cupcakes last year. They were a blast to make. You can find out how to make them here.

I’m full of inspiration for making cakes this summer now! You can find more summer cake inspiration from Betty Crocker!

This is a sponsored post written by me on behalf of Betty Crocker. All opinions expressed are 100% my own.


Like this post? SHARE it!

Related Posts Plugin for WordPress, Blogger...

Crockpot Chicken Tortilla Soup

Today is my daughter’s last day of school. I can already hear the words “I’m booooooored mom”. You’d think that we live in a box without any toys, coloring books, or that all addicting boob tube contraption they call a TV. My goal is to do whatever I possibly can to try and keep those words from seaping out of my kiddo’s mouth.

So we’ll plan playdates, trips to the splash pad, fun at the Y, and anything and everything else that I can come up with to combat bordem.

Dinner sometimes plays second fiddle in the summer around here. The sun is out later and we’re outside enjoying our days which means either mom has to miss out on the fun to cook or mom has to get creative. So creative I’ll get! This recipe is one that I put together in a pinch and is super simple to make.

Who doesn’t like making dinner in the crockpot? Most of the ingredients in this recipe are from cans which also makes for easy prep. This reminds me of a 7 can soup with a little twist. One ingredient that I’ve always kinda been leary of, is canned chicken. I don’t use it that often because, well, it’s called canned chicken. It smells a lot like tuna to me in the can which most of the time turns me off. But every now and then I’ll place it in a recipe that makes the chicken transform with the other flavors. And sometimes it actually tastes great. Hey, don’t knock it ’til ya tried it! If you’re not too keen on the canned chicken idea, use leftover rotisserie chicken or something along those lines if you’d like.

I love the crunch of the crispy tortilla strips on top at the very end. If you’re lucky enough, you’ll find some colorful ones like I did!

 It’s your turn: Do your kids get bored during the summer? Or do they enjoy the freedom?

Crockpot Chicken Tortilla Soup
 
Recipe Type: Soup, Main Dish, Crockpot
Author: Pennywise Cook

A few cans and seasonings and you’re on your way to a tasty Chicken Tortilla Soup!
Ingredients
  • 1 onion, chopped
  • 2 tsp garlic, minced
  • 1 (14 oz) can vegetable broth- could also use chicken
  • 1 (15.5 oz) can black beans, drained & rinsed
  • 1 (15.25 oz) can whole kernel corn, drained
  • 1 (12.5 oz) can chunk chicken breast, drained
  • 1 (10.5 oz) can cream of celery soup
  • 1 (10 oz) can rotel
  • 1 rotel can of water
  • 1 tsp coriander
  • 1/2 tsp cumin
  • 1 tsp chili powder
  • salt & pepper to taste
  • 1 c. tortilla strips for topping
Instructions
  1. Place all ingredients into crockpot and cook on high for 4-6 hours or low for 6-8 hours.
 
Notes

– The first time I made this, I sauted my onion and garlic before placing it in the crockpot. You can do this first if you are going to be cooking your soup for less time. If not, they should soften up enough while cooking.
– If you would rather, you can use chicken broth in place of the vegetable broth
– If you have leftover chicken, you can use that in place of the canned chicken
– Finally, if you prefer, you can use more broth in place of the water in the rotel can. I found it tastes just as good with the water.


Like this post? SHARE it!

Related Posts Plugin for WordPress, Blogger...

Hot Boiled Peanuts: It’s a Southern Thang

Sometimes you feel like a nut…

And sometimes you feel like a boiled nut.

My husband and I are doing the Daniel Fast right now. We’re on day 11 of 21 right now. If you’re not familiar with the Daniel Fast, I’ll sum it up by telling you some of the guidelines.

  • No meat, dairy, sugar or artificial sweeteners, leavened bread, or caffeine
  • You can have all vegetables, fruits, nuts, beans, and whole grains
  • No fried foods
  • Only water to drink
  • It’s based on the book of Daniel in the Bible and 2 of his fasting experiences
  • It’s not only physical, but meant to be a spiritual experience

The first time that Daniel did this fast was for 10 days. The second time was for 21 days. We’ve done the 10-day before without issue so we’ve challenged ourselves to try the 21-day. It’s gone really well so far. Considering that my husband is a cheeseburger and french fry kinda guy, it’s VERY surprising how he gets along with this type of fast. Praise God!

And me? What do I do about my sweets you say? Well let’s just say that bananas and raisins are my best friend these days. Remember my Peanut Butter Choco-Banana Ice Cream? I can actually eat that on this fast! But I have to eat it out of a bowl instead of a cone. Darn…

But I digress…

We’ve also been eating a lot of nuts lately. Almonds and peanuts mostly. You can get these HUGE, I mean HUGE bags of salted and roasted peanuts (in-shell) at Sam’s Club for around $5. It’s amazing how much peanuts will fill you up while providing you with energy.

If you’re from the south or have visited the south before, you’ve probably heard of folks offering Boiled Peanuts. There are signs just about everywhere once you get into Alabamer (yes, Alabamer) and Misippi (yes, Misippi). No need to pronounce words correctly around here, we’re too busy enjoying our boiled peanuts. I wish I could insert an audio clip of how I say boiled for y’all. Words like coil, boil, toilet all come out of my mouth a little on the Paula Deen side. Oh who am I kidding? It sounds a LOT like Paula Deen says boil. 🙂

So with all the nuts we’ve been eating, I wanted a little change in the nut department. So I though why not boil them?

Since the Hamptom Farms peanuts that I bought were already salted, I knew I didn’t need to salt them again. And I didn’t want them swimming in a bunch of oil (once again, just imagine a little Paula Deen accent). So I used water!

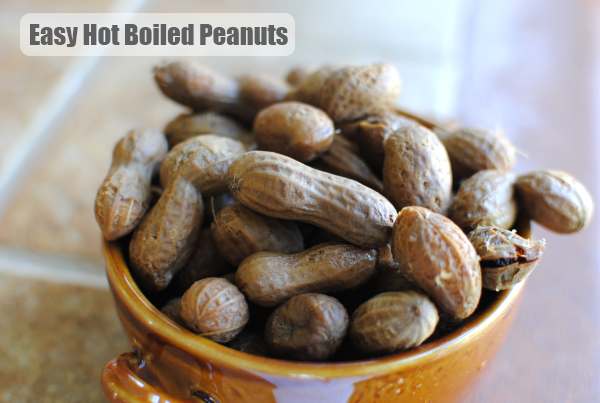
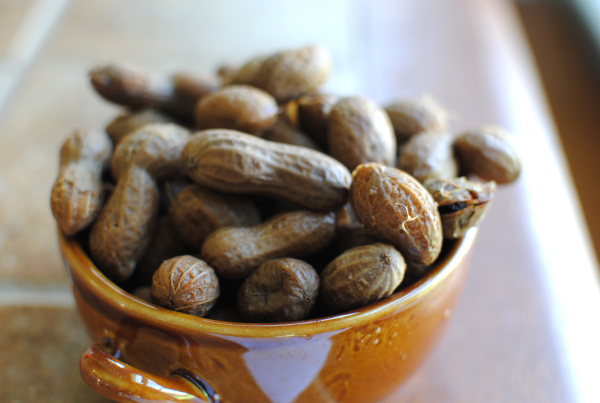
1 big pot full of water, a huge amount of salted and roasted peanuts, and 5 hours later you have hot boiled peanuts good enough to make you slap yo mama! It honestly didn’t get any easier than that.

And we didn’t even have to make a trip down to Alabamer!

Hot Boiled Peanuts: It’s a Southern Thang
 
Recipe Type: Snack, Appetizer
Author: Pennywise Cook

There is nothing to making hot boiled peanuts just like they make on those road-side stands in the south!
Ingredients
  • Any amount of in-shell roasted and salted peanuts
  • Water- to cover the entire amount of peanuts
Instructions
  1. Place the amount of desired peanuts into a large pot.
  2. Cover with water.
  3. Bring to a boil, then lower the temp to a simmer.
  4. Cover and let simmer for 4-5 hours or until the shells begin to give a little and the peanuts inside are soft.
 
Notes

You can of course get peanuts that aren’t salted already, just be sure to salt your water when boiling them.
Your water will evaporate throughout the boiling process, be sure to continue adding more hot water in order to keep the peanuts covered.


Like this post? SHARE it!

Related Posts Plugin for WordPress, Blogger...

Homemade Strawberry Belgian Waffles

It is MAY! Where in the wide world of sports did March and April get off to? I remember thinking wow, it’s already March and then BOOM it’s  May. I’m mostly caught off-guard because both of my girl’s birthdays are in May which means that mommy has a lot of work to do. My oldest’s birthday is next week and I decided not to procrastinate this year by asking her cake preference a week before instead of, oh, the night before.

These are Mom Of The Year qualities, you know.

She chose My Little Pony with a Rainbow Dash emphasis. For those of you who don’t know about these girly things, just know that I have a lot on my plate next week.

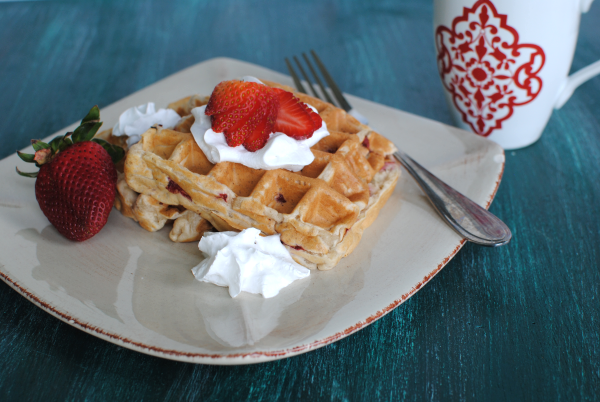
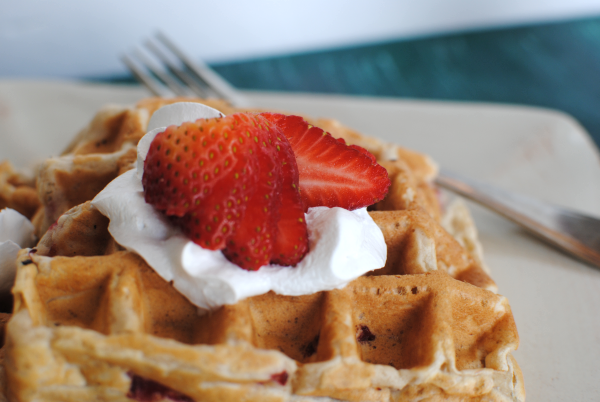
There’s probably a chance that you’d like to know about those big, fluffy waffles up there. I could tell you many stories about when my mom used to make these for me. Without exaggerating, I probably ate 4 of these in one sitting when I was younger.

I could do the same now, but I try to practice self-control.

My mom always made them from a box. Do not get me wrong, that is normally the very method that I would use. However, since I do have a tendency to eat a redonkulous amount of them, I wanted to make sure and healthify them up just a bit.

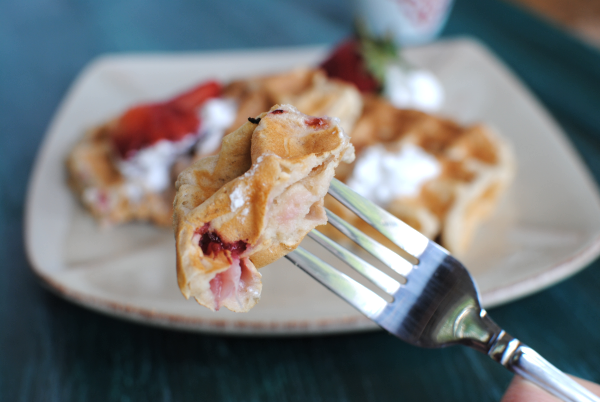
These Homemade Strawberry Belgian Waffles contain no butter, oil, or eggs. You could use soy milk or almond milk in place of the milk and you’d have them dairy free! They aren’t artificially made to taste like strawberries like some boxed mixes might work. They are literally made with fresh strawberries which give them a more natural flavor.

I almost called these Strawberry-Banana Belgian Waffles because I used bananas instead of the oil/butter/egg, but the banana taste didn’t come through as much as I was expecting. Even the strawberry taste didn’t become as potent as I would have liked. But if you’re brave and don’t mind a little sugar, you can add a tsp of sugar to the strawberries before adding them to the batter and I’m sure that it will bring out the strawberry flavor a little more.

I think my favorite part about Belgian waffles as opposed to regular waffles is the fact that they are super fluffy.

I love fluffy food.

Does that sound weird? I’m sure it does, but I don’t care. I like whipped cream, cotton candy, mousse of all kinds, lighter-than-air angel food cakes. You name it, if it’s an ounce away from losing it’s gravity and joining the angels, then I probably enjoy eating it. The key to eating them, at least in my opinion, is to top them with fresh (or sliced and sweetened) strawberries and then give them a few squirts of Reddi Whip. I’m not sure that I could be in the presence of a Belgian waffle that didn’t contain whipped cream. That’s just the way that I was taught to eat them. I wonder what the Belgians think of me…

My waffle iron makes 2 of these at a time. With the amount of batter that I mixed up, I got 4 total. To help you know how many of these you’ll get out of 1 batch. I’d recommend doubling the recipe if you have a hungry bunch.

Believe me, they won’t eat just one.

Recipe adapted from Vegan Heartland.

Homemade Strawberry Belgian Waffles
 
Recipe Type: Breakfast
Author: <span class=”mceItemHidden”><span class=”mceItemHiddenSpellWord”>Pennywise</span> Cook- Adapted from Vegan Heartland</span>

Serves: 4
Strawberries add a summery flavor to sweet and tasty belgian waffles! You’d never know these were healthy. There are only about 150 calories per waffle!
Ingredients
  • 1 c flour (I used about 1/4 c whole wheat)
  • 1/4 tsp salt
  • 2 tsp baking powder
  • 1 tbsp maple syrup (I used sugar free)
  • 1/4 c mashed banana (about 1 banana)
  • 3/4 c skim milk
  • 1 tsp vanilla extract
  • 1/2 c fresh strawberries, finely chopped
Instructions
  1. In a small bowl, stir together flour, salt, and baking powder until combined. Set aside.
  2. In a separate mixing bowl, combine maple syrup, banana, milk, and vanilla. Mix on low until fluffy.
  3. Slowly add the dry ingredients to the wet and mix well.
  4. Then gently fold in the strawberries.
  5. Cook according to your waffle iron’s directions.
  6. Optional) Top with fresh strawberries and Reddi Whip!
 
Notes

– If you wanted to bump up the nutrition, you could also add some flax to these. I used about a 1/4 c whole wheat flour in mine.

– You can use pretty much any type of milk in place of the dairy milk if you’d like. Even coconut milk. It’s just a matter of your preference!

– These don’t have a strong strawberry taste (what’s in a name anyways?), so if you want to bump that up, add about a tsp of sugar to the strawberries. OR you could add the strawberries in the at the beginning and let them mix in well with the wet ingredients. The flavor would disperse a little more there. (I will be trying this myself)

– Or if you have any other suggestions for these, I’d love to hear! They are a work in progress. 🙂


Facts (per waffle not including toppings): 147 calories, 40 carbs, 0 grams fat, 5 grams protein, 417 gram sodium, 3 grams sugar.


Like this post? SHARE it!

Related Posts Plugin for WordPress, Blogger...

5 Reasons Bad Things Happen to Good People

Iridescent
Creative Commons License photo credit: Squire of Cydonia

With all of the recent tragedies including the Sandy Hook Elementary Shootings and the Boston Marathon Bombings, I couldn’t help but want to dig into scripture. The Bible has a way of comforting, even when the words aren’t always what you expected.

In the past few months, I’ve also been given my fair share of personal trials and I can’t help but wonder why do bad things happen to good people? This is the result of my journey through scripture and why God says we are called to go through the hard times. I pray that this will not come off as inconsiderate, but as encouragement to get you through hard times.

1) To Get Us to Pray

Rejoice in our confident hope. Be patient in trouble, and keep on praying.

– Romans 12:12

There’s nothing that brings us closer to God than prayer. After all, this is our time to make our concerns known to Him and to give thanks for our blessings. While trials can sometimes blur our vision of the good, behind the scenes God is delighted when we lean on Him.

We have a tendency to pray more intensely when we are in trouble, crying out to the Lord for help. Sometimes even in desperation. He wants us to be desperate for Him. It’s our chance to be reminded of hope.

When we’ve neglected to pray during times of joy and happiness, sometimes it takes a bad situation to bring us to our knees and cry out to the Lord.

2) To Remind Us of His Suffering

Dear friends, don’t be surprised at the fiery trials you are going through, as if something strange were happening to you. Instead, be very glad—for these trials make you partners with Christ in his suffering, so that you will have the wonderful joy of seeing his glory when it is revealed to all the world.

– 1 John 4: 12-13

Jesus Christ is not just our Savior, he was a physical man. Just like we don’t deserve some of the bad things that come our way, Jesus was undeserving of His suffering. The verse above actually encourages us to be glad! (I’m sure you’re thinking yeah right) Our trials make us partners with Christ. Have you ever considered that?

Your bad “stuff” gives you only a small glimpse of what He went through for us. This puts your suffering in comparison with His. Anybody second guessing anxiety about a bad hair day right now? Sometimes when I am in the middle of a hard time, I’m drawn to remember the cross. Everything else is but a shadow beneath it.

3) To Fulfill God’s Purpose

And we know that God causes everything to work together for the good of those who love God and are called according to his purpose for them.

– Romans 8:28

How many times have you been going through a hard time and someone say God has a plan. And you think, well why in the world is losing my job part of God’s plan? Or did God really plan for my dog to die this young? Or may it’s something bigger or something very tragic. How can we possibly wrap our heads around something so horrible being something that God has planned for our lives?

The verse above says that And we know that God causes everything to work together for the good of those who love God… Everything excludes nothing. It is ALL a part of his master plan for each of our lives and according to His purpose, though it may be hard to see at the time. It could be days, months, even years before we can look back and see why we were put through that trial in our life. In all things, He has control.

4) To Give Us Endurance

Consider it a sheer gift, friends, when tests and challenges come at you from all sides. You know that under pressure, your faith-life is forced into the open and shows its true colors. So don’t try to get out of anything prematurely. Let it do its work so you become mature and well-developed, not deficient in any way.

– James 1:2-4

I found that the word endurance means bearing hardship; staying power. We’ve addressed that when we have hard times that we are called to prayer, to be reminded of His suffering, and to carry out God’s will. Each of these things work together to get us through our own sufferings. What happens when we come through difficulty? We make it to the other side! Praise God!

I’m sure that you’ve heard the saying what doesn’t kill you makes you stronger. This might just be exactly what was meant by the verse above. But did you realize that adversity could actually make us well-developed? With each challenge, God says to consider it a gift. An obstacle overcome gives us another badge on our spiritual Brownies vest. (Do they wear vests?) Our endurance through one difficulty prepares us for another. We build knowledge and maturity that strengthens our faith.

The thesaurus has the words patience, perseverance, and courage listed as synonyms for endurance. I’m not sure that you can have any one of these without each other. We should be comforted to know that what we are going through will have a reward in the end and make us a better person.

5) For His Glory

Then call on me when you are in trouble, and I will rescue you, and you will give me glory.

– Psalm 50:15

Perhaps one of the most important reasons that we are called to go through trials and tribulations in this life is for God’s glory. After all, this was the precise reason that we were created. And what an honor it is to have such a purpose.

Bag things happen. It’s a part of life and the evil that exists in this world. Though God did not create evil (man and free-will did), He can rescue us from it. And yet the only thing that we must give in return is praise and glory to our gracious Savior. This alone thrills Him. Isn’t that amazing?

We aren’t called just to glorify Him in the bad, we are to glorify Him at all times. Through sickness and health, for richer and poorer, until we go to be with our precious Father.

Once we realize that our purpose in life is to glorify Him, it doesn’t matter if we’re having a joyful, encouraging day or a down and dreary day. We should not neglect to bring Him honor with our praise, especially through our trials and tribulations.

_________________________________________________

If you’re reading this today and are going through something challenging in your life. I’d love to pray for you. You can leave a comment here with your prayer request or feel free to email me. You don’t even have to tell me what for if you’re not comfortable.


Like this post? SHARE it!

Related Posts Plugin for WordPress, Blogger...