Oatmeal in Your Coffeemaker?! + $10 Giveaway!

breakfast

I’d love to tell you that breakfast time at my house is a wonderful, peaceful time, but to be honest, it’s a little less than tranquil.

We aren’t exactly morning people around here so if you were to take a peek into our morning, you would see lots of squinty eyes and even hear a few grumbles. We don’t like to wake up and when we do finally get to that point, we have so much to do that we rush out the door like mad people!

However, simply mention the word coffee and I will perk right up.

I’m a big fan of breakfast as well. I really love your typical breakfast items like eggs and bacon. Biscuits are cool too. Donuts and cinnamon rolls. Cereal and yogurt. It’s all good in this breakfast hood.

They say that breakfast is the most important meal of the day. It’s what gets us going in the mornings when we don’t feel like going anywhere. I am working really hard to make sure that I make it a priority among all the other tasks I have to get done in the craziness of the mornings. 

You know what I really enjoy, but sometimes forget about? Oatmeal! Big fan of oatmeal. Since we don’t always have time to make oatmeal, I was really excited to hear about a new and innovative product that makes oatmeal so much easier to make in the mornings.

You can literally brew your breakfast in your brewing machine! Yep, I’m for real. This is breakfast simplified and a great way to help you to “pop up” in the morning!

I was so excited to find out that I can use my brewing machine to make oatmeal. How simple is that?

I’m already making myself coffee, why not grab some oatmeal while I’m at it! Such a cool product. Nature Valley Bistro Cups make breakfast easy!

You can choose from two different flavors:

  • Apple Cinnamon Almond
  • Brown Sugar Pecan

Nature Valley Oatmeal

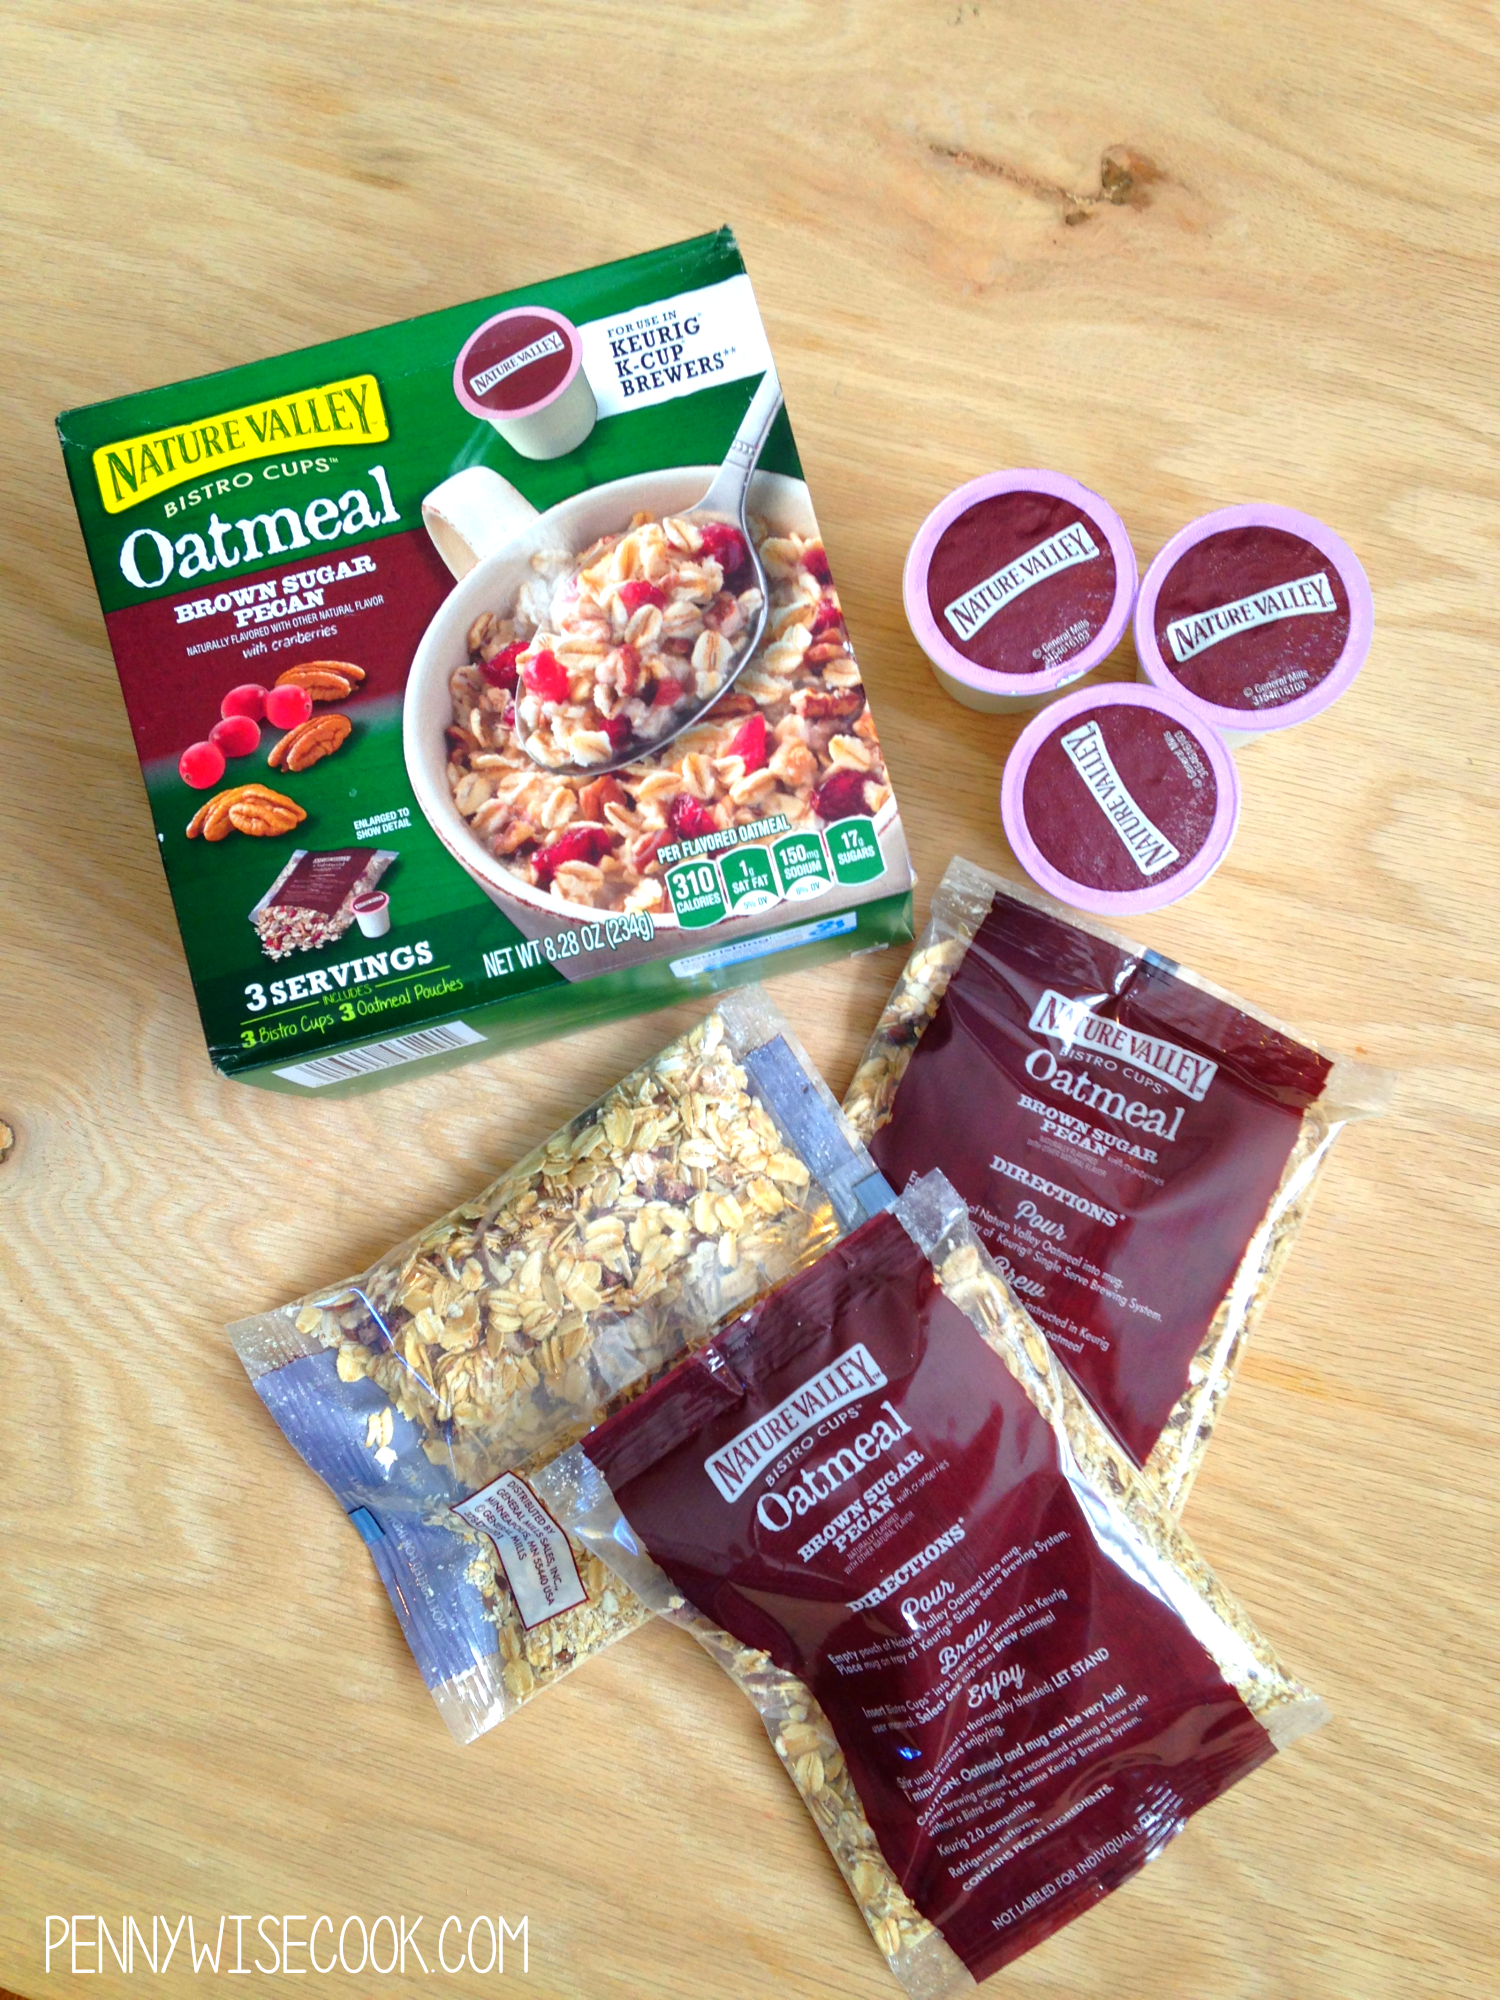
I was excited to get the Brown Sugar Pecan flavor. It also has cranberries in it!

Nature Valley Oatmeal 1

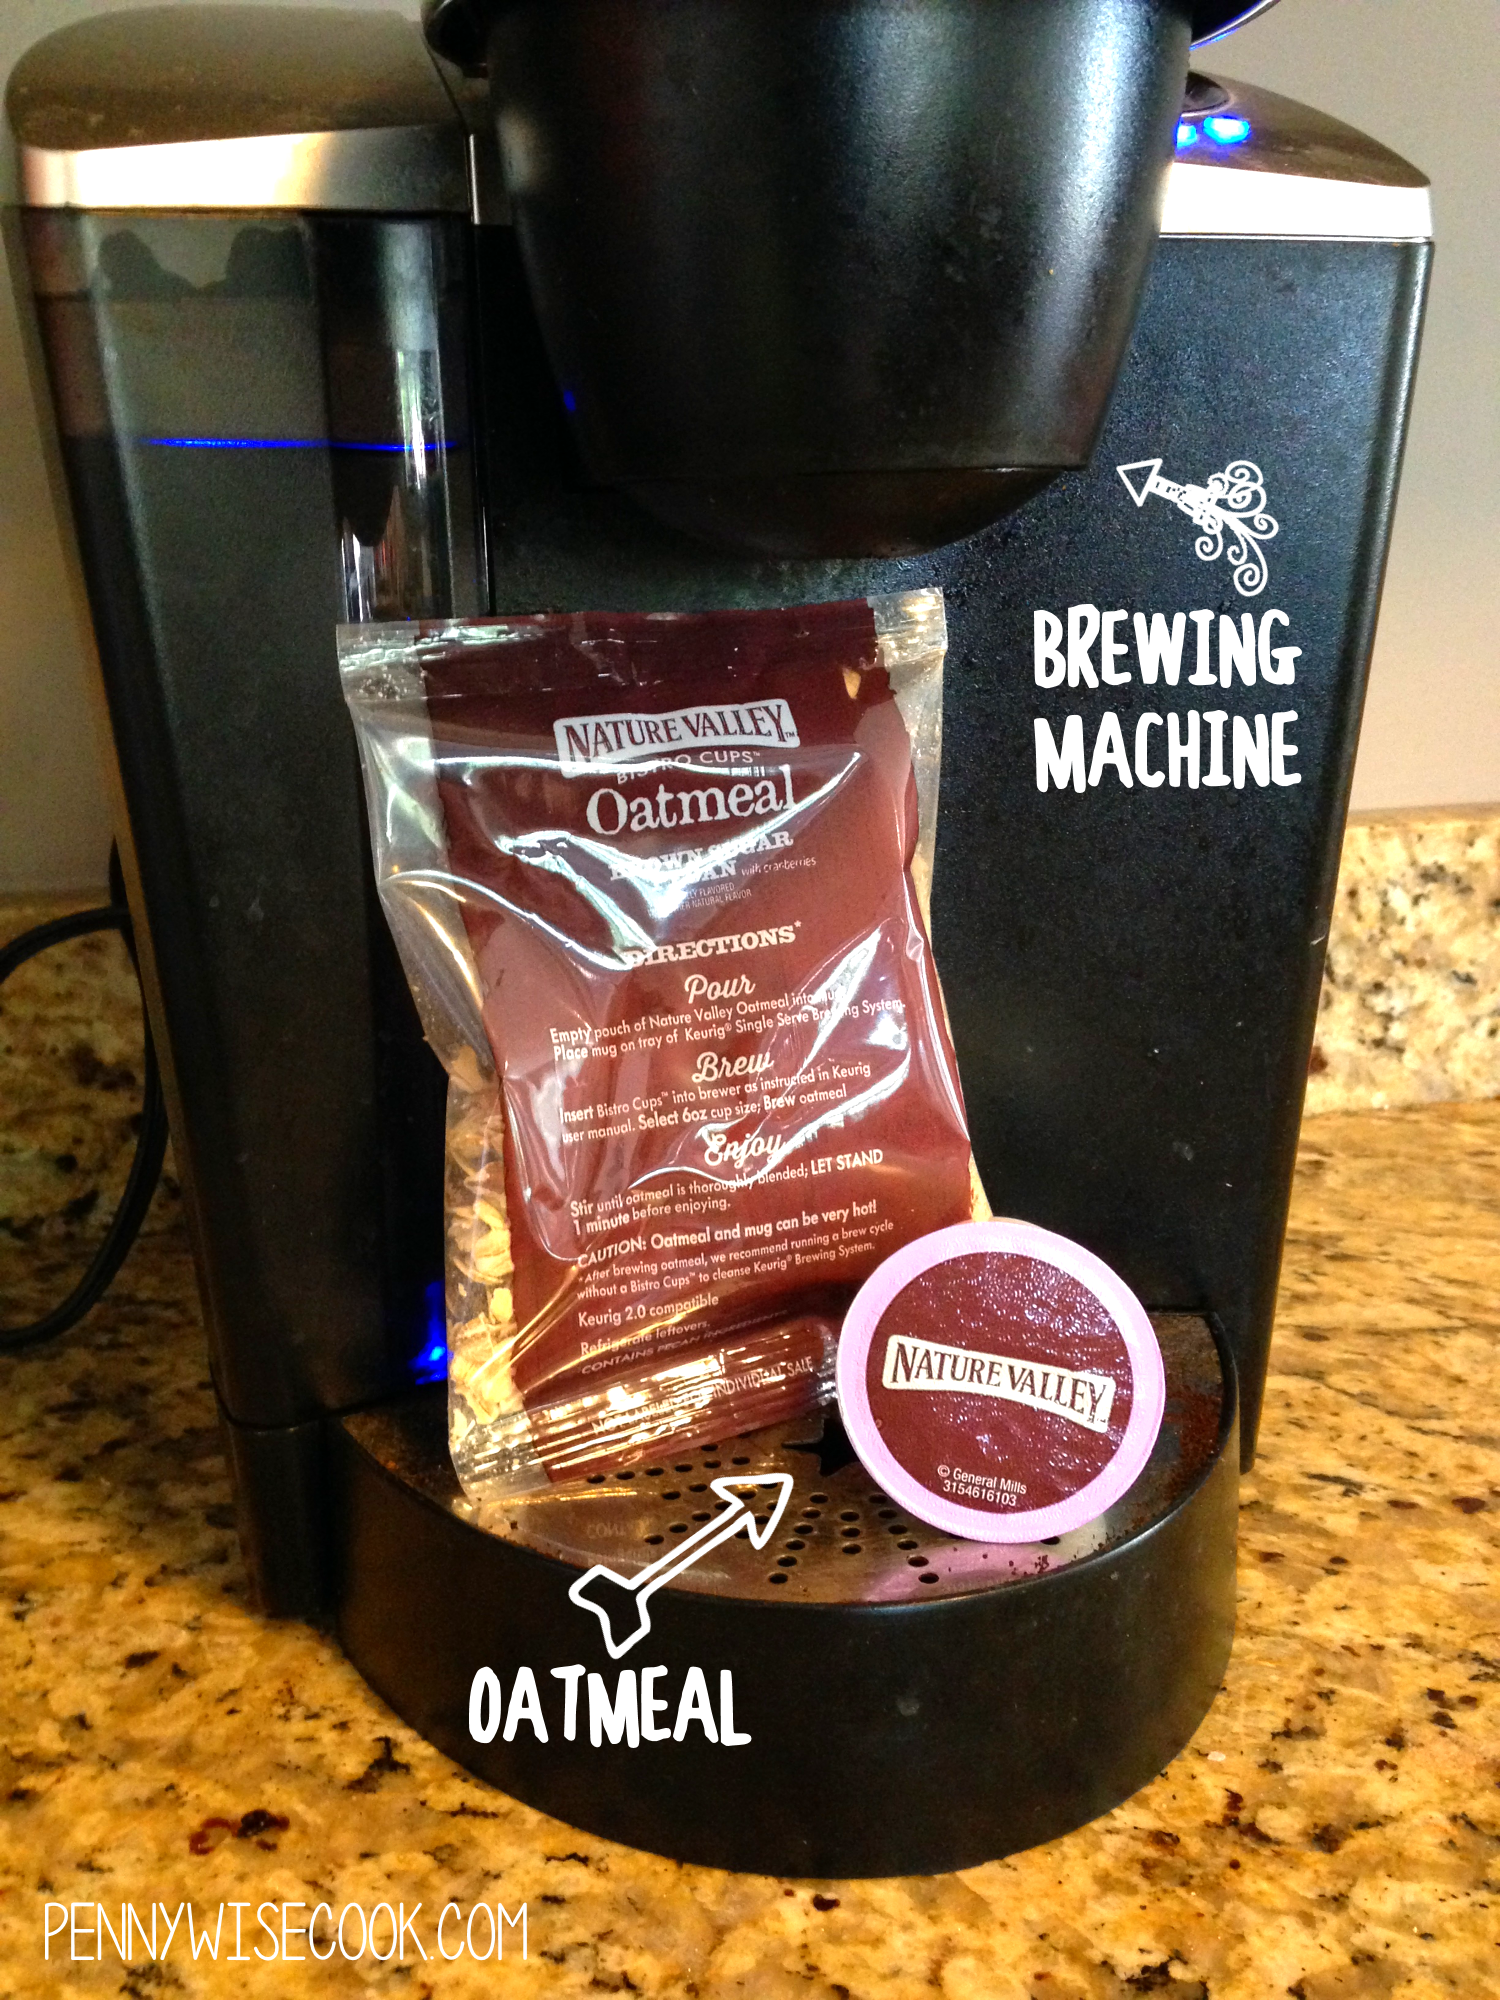
You make it in your brewing machine! It doesn’t get any simpler than that.

Nature Valley Oatmeal 2

You start by pouring the oatmeal into your favorite mug. I love eating food in a mug!

Nature Valley Oatmeal 3

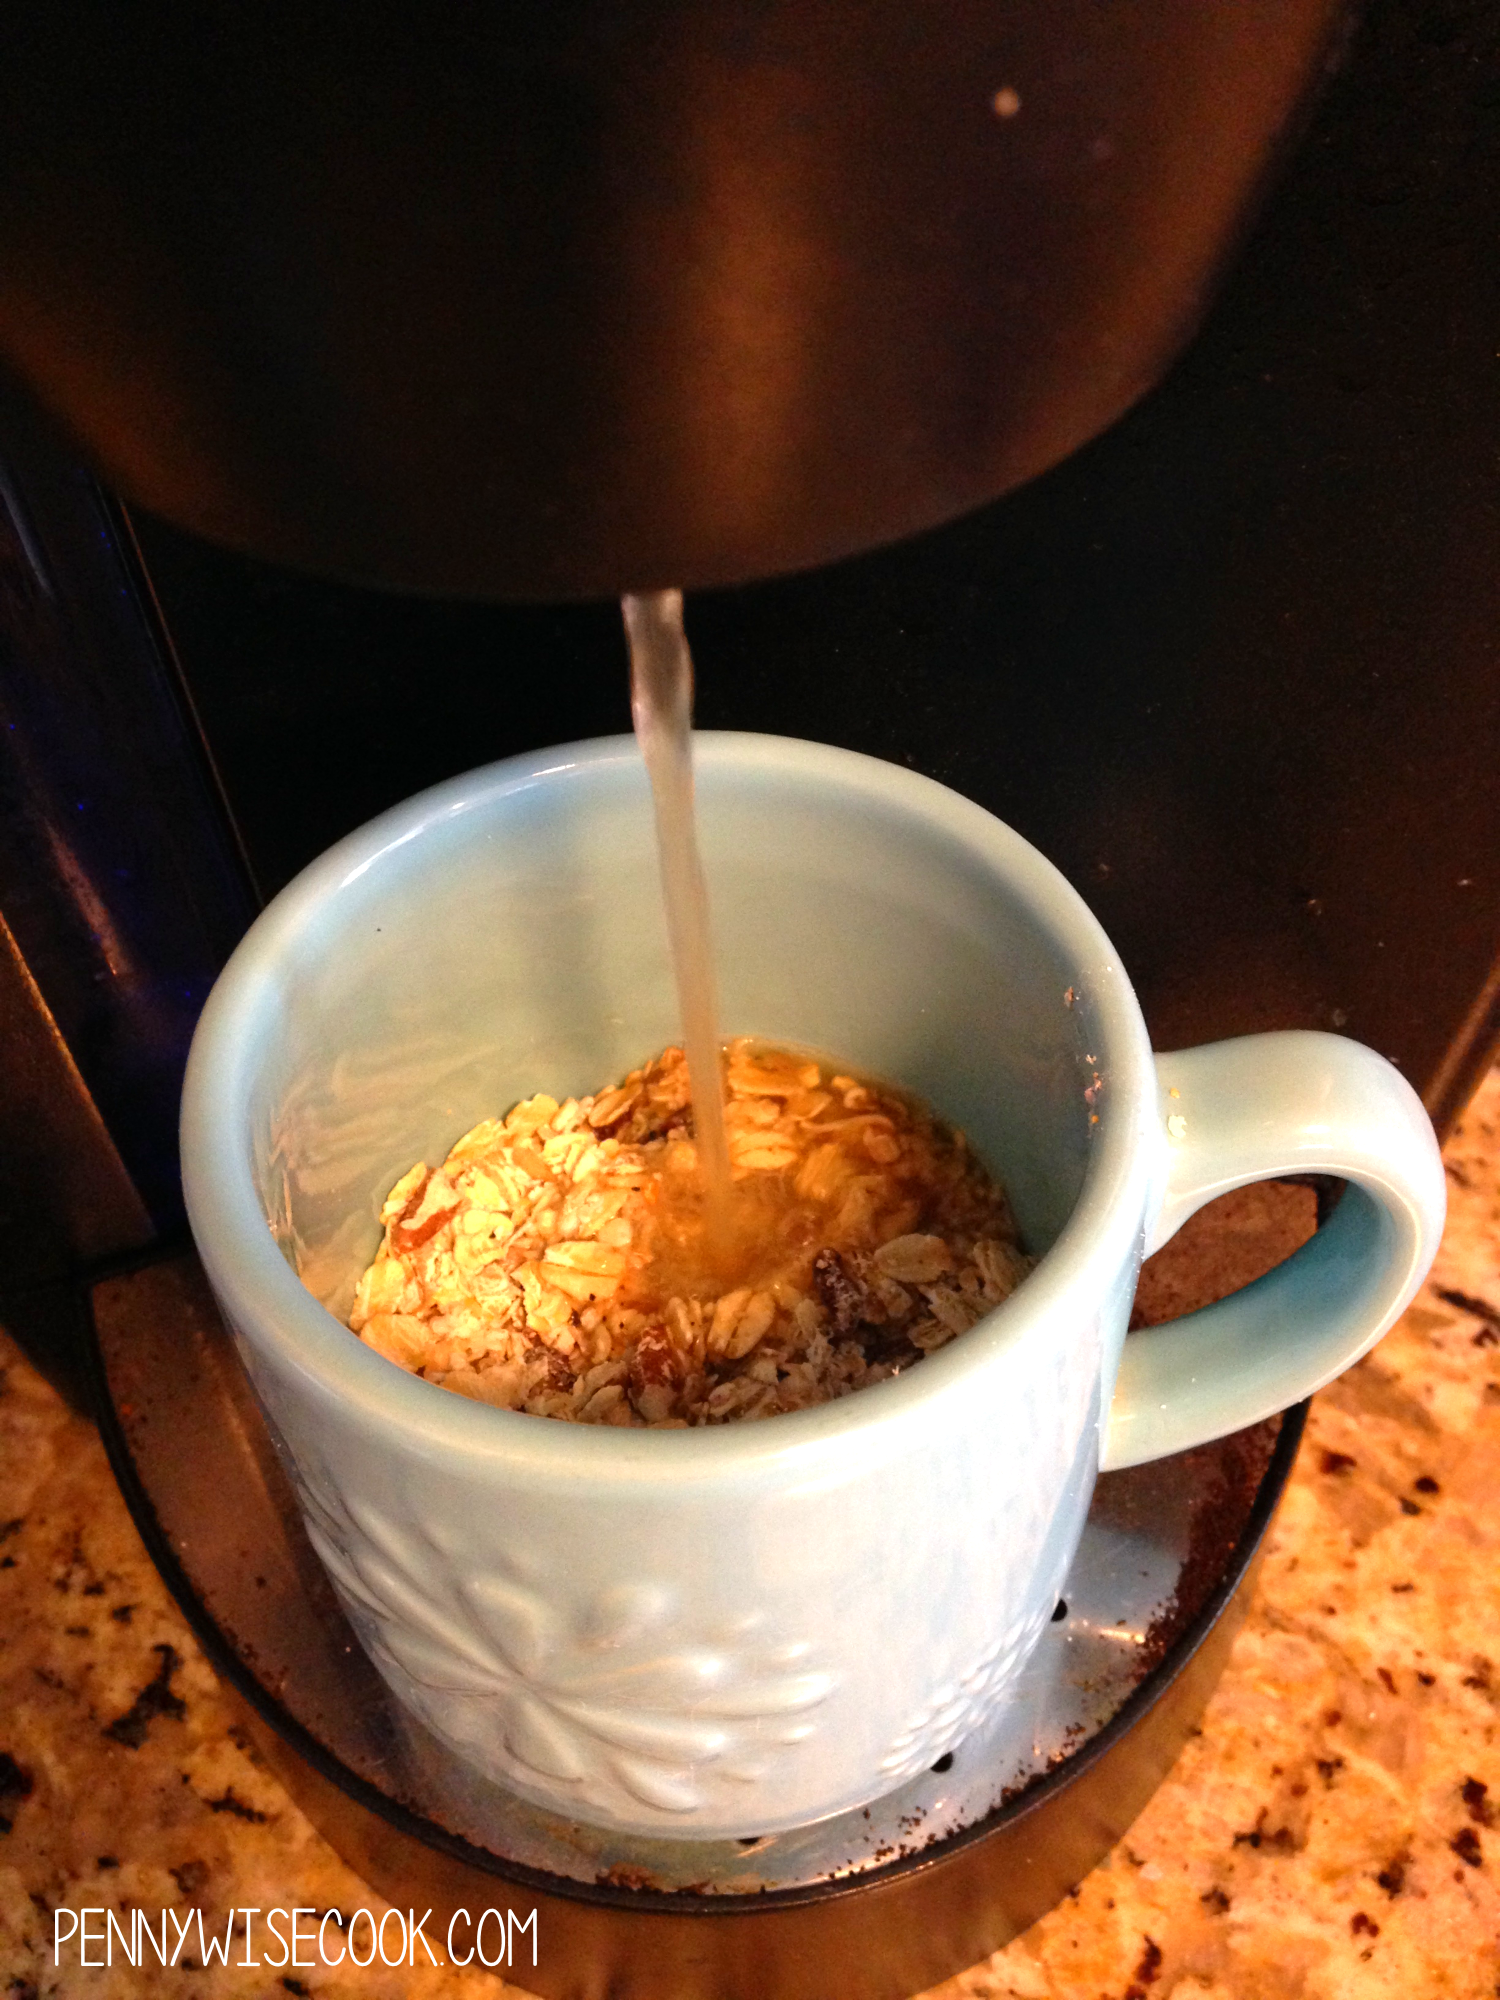
Pop the brewing cup into your machine and using the 6 oz option, brew it into your mug of oatmeal!

Give it a stir and then let sit for about a minute.

Nature Valley Oatmeal 4

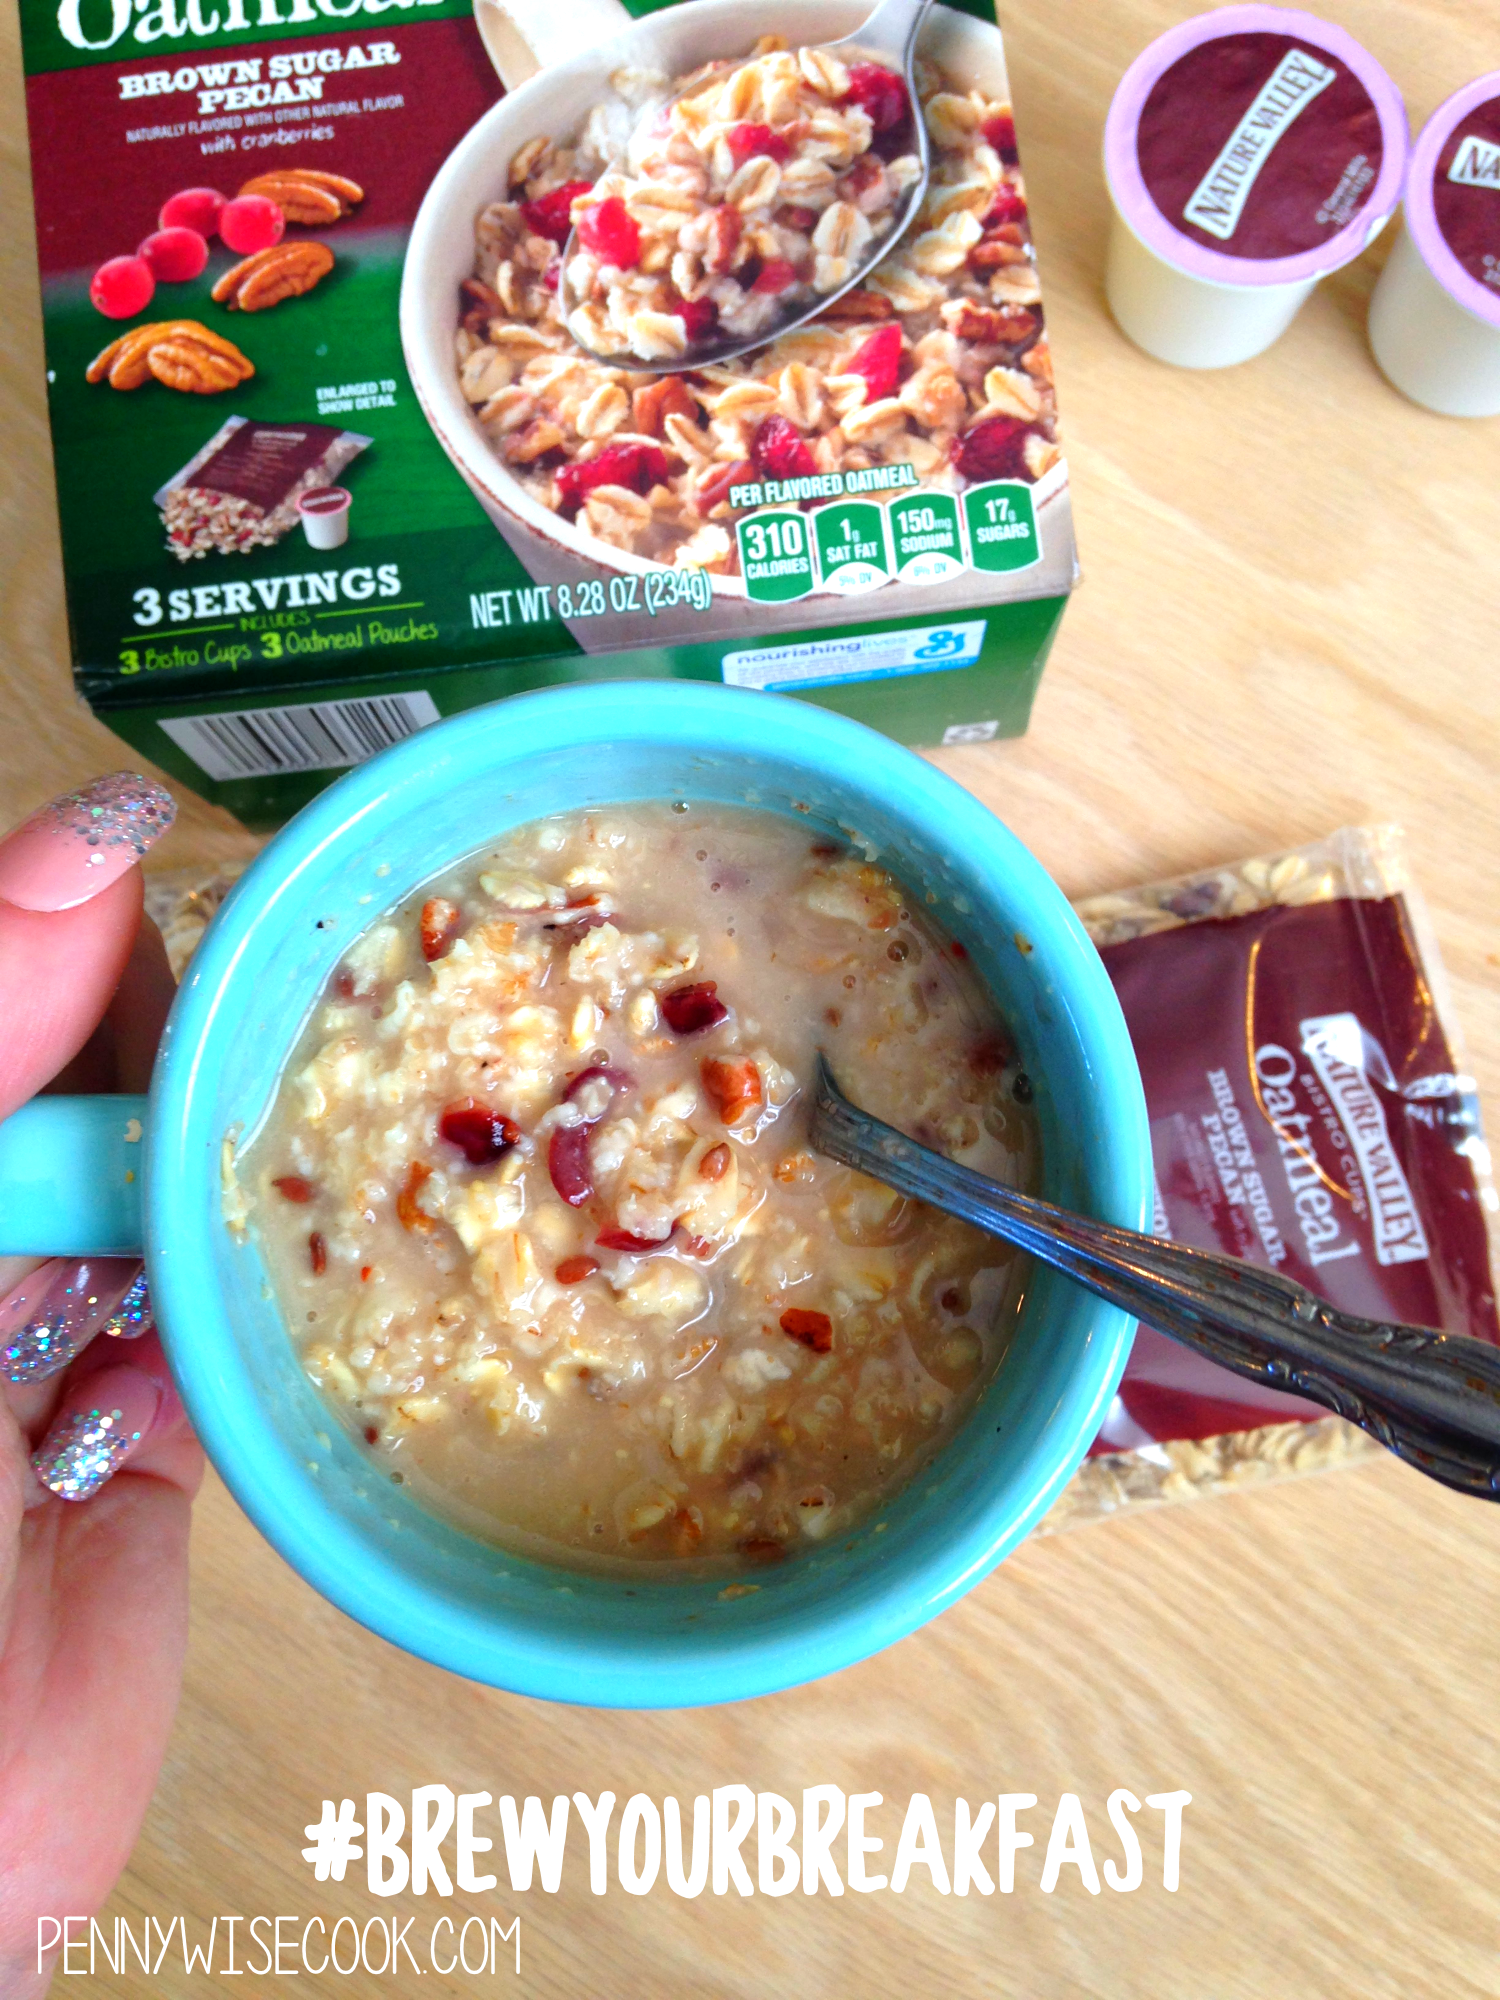
That’s it! Goodness in a mug to kick your morning off right! Even if you are in a busy whirlwind in the mornings, you probably have a couple minutes to prepare an easy oatmeal like this.

Want to try this out for yourself! Grab a COUPON for Nature Valley Bistro Cups! Here’s how:

1. Head over to the Publix coupon page here.
2. Select your store using either your zip code, city and state, or store number.
3. In the search bar under “This Week’s Savings,” type “Nature Valley”
4. Hit print and enjoy!
 
And if a good coupon isn’t enough to get you excited, I’m giving away $10 bucks! Enter below!
 
$10 Paypal Cash Giveaway

$10 Paypal Cash Giveaway


This giveaway will end on October 5th at 11:59pm CT. I will contact the winner on Tuesday, October 6th and they will have 24 hours to respond. If I have not heard from them, I will name a new winner.


Like this post? SHARE it!

Related Posts Plugin for WordPress, Blogger...

Effortless Back to School Meals

Pizza and DrPepper

 I love to cook. A good old fashioned meal made with love, straight from scratch is one of my most favorite things to create. It sometimes can even relieve stress from my day. As long as no one is up in my kool-aid if you know what I mean. And if you don’t, it really just means- up in my kitchen. I gotsta have an empty and fairly clean kitchen to cook in y’all!

Around here, school just kicked off the first few days. All the moms rejoice! It’s been a fairly short summer it seems. Though the last two weeks have been a bickerfest at our house so that made it feel like a very looooong summer.

You know it’s time for school to start when you pray that your children do not cause each other bodily harm!

The school year can be all over the place for us. There are weeks when we have it all together and I cook those fantasy family meals like I described above and there are weeks when I’m really doing good to lovingly create a peanut butter and jelly sandwich. More the latter than the former…

If we’ve got a lot of church events or practices, chances are that we’ll eat things quick and easy. I’ve partnered with The Coca-Cola Company to talk about Effortless Meals at Walmart. It’s nice when I’m in a pinch for dinner to be able to grab a meal like the picture above to rescue me from peanut butter and jelly.

If you are a My Coke Rewards member, you can unlock bonus points for picking up Effortless Meals at Walmart! They’re effortless and affordable really. My pizza meal was less than $10.

  • Head over to My Coke Rewards and login.
  • Have your UPC and My Coke Rewards code ready.
  • Enter them to unlock bonus points for purchasing an Effortless Meal bundle at Walmart!

Chips Coke Sub

I grabbed this Effortless Meal for a quick lunch for hubby. Even though I didn’t make him an old fashioned, from scratch lunch, he is much obliged at the offer of an Italian Hero Sub. What man would turn that down?

Sub Eating

 Their rotisserie chicken Effortless Meals make any weeknight a breeze. Or heck, if you need something to bring to a get together, they’re the perfect save.

The next time you’re in need of a quick weeknight (or weekend meal, hey no judging here), consider checking out the Effortless Meals at Walmart and be sure to unlock your bonus points at My Coke Rewards!

Thanks to the Coca-Cola Company for providing compensation for this post. All opinions expressed are 100% mine.


Like this post? SHARE it!

Related Posts Plugin for WordPress, Blogger...

Have You Tried Your Milk Frothed?

Milk Frother 2


I went through a phase recently where I couldn’t drink my coffee from home. I got so used to McDonald’s coffee and how it tasted that not even Starbucks could come close. So I found myself at the drive-thru each morning. As you can imagine, my inner frugalness was screaming at me.

Then my mom introduced me to this amazing invention: a milk frother. I’ve always heard of them and thought why in the world would frothy milk even be something that was desirable. But after she made a couple of lattes for me with her new one, I was sold. I got me one the next week and haven’t been back to McDonald’s since!

Milk Frother


I picked this Aroma AFR-120B Hot X-press Milk Frother and have been making myself lattes. It’s cheaper than most out there. It seems like a splurge item, but I figure that since I’m not making my way to McDonald’s each morning that I’m saving money in the end. Ok maybe it is a splurge item.

There’s a bunch more frothers here.

Want to know my favorite recipe for a latte?

Easy Sweet Cream and Caramel Latte
Recipe Type: Drink, Beverage
Author: Pennywise Cook
Ingredients
  • 4 tbsp Italian Sweet Cream Creamer, frothed
  • 1 cup of coffee strongly brewed (smallest setting on Keurig)
  • 2 tbsp Caramel flavoring syrup (sugar-free)
Instructions
  1. Brew the cup of coffee.
  2. Add 2 tbsp caramel syrup and mix well.
  3. Pour frothed creamer on top of coffee.
  4. Ta-da!


Like this post? SHARE it!

Related Posts Plugin for WordPress, Blogger...

Easy Homemade Croutons

Happy Veteran’s Day! I am so very thankful for the men and women who served our country to give us our freedom. I don’t think that we show this enough all year. It’s a huge sacrifice to put your life on the line for people all around the country that you don’t even know and I am eternally grateful for those who have done so!

I’m a bit of a crazy salad person. I have been ever since high school. I love the crunch of crisp lettuce mixed with creamy dressing and other tasty components that go along with a salad. When we’re picking out a place to eat, my daughter will judge if I will like a restaurant by if they serve salad or not. And then she’ll say “Mom, you’ll love this place. They have salad!”. Thanks darling…

While I do like my salad, I also really like croutons. Like, really really like croutons. They are kinda like potato chips to me. Once I start, I can’t stop.

Do you have kiddos who don’t like the crust on their sandwiches? Or perhaps you make things that require you to cut off the crusts.

For instance:
Grilled Cheese Rollups
3-Ingredient Lady Fingers
White Bread Cinnamon Rolls

It’s recycling in a way. You can even freeze the crusts and make croutons later if you don’t have time right away. Just thaw them out before preparing to make croutons. How awesome is that?

Try to line them up and then just cut them into smaller pieces like above. They already look just like croutons don’t they? And in minutes they will be! Preheat the oven to 400°.

Spread them quite evenly onto a cookie sheet. Spray them well with olive oil cooking spray or butter cooking spray like me. Sprinkle with seasonings of your choice. I used italian seasoning and garlic powder.

Bake for about 4-8 minutes depending on your oven and you’re done. Store them in an airtight container and pop them out when you’re ready to eat a salad.

Or just eat handfuls of croutons…

….I don’t do that.

…Ok, maybe I do. Don’t judge.

Easy Homemade Croutons
Recipe Type: Salad Topping, Snack
Author: Pennywise Cook
Prep time:
Cook time:
Total time:
Here’s a double duty tip when you have leftover bread crusts. Make up a batch of healthy and homemade croutons!
Ingredients
  • Crusts cut off the bread of your choice
  • Seasonings of your choice (1 tsp italian seasoning and 1/2 tsp garlic powder are great!)
  • Cooking Spray
Instructions
  1. Preheat oven to 400°.
  2. Cut crusts into smaller square pieces or desired size.
  3. Spread evenly onto a cookie sheet.
  4. Sprinkle with seasonings.
  5. Bake for 4-8 minutes watching during baking to make sure they don’t burn. Mine took about 8 minutes.


Like this post? SHARE it!

Related Posts Plugin for WordPress, Blogger...

2-Ingredient Homemade Magic Shell

Ever since I can remember, I have been in love with the dipped cones from Sonic. I remember as a kid, we’d be coming home from church or school and I’d close my eyes and imagine that my parents’ blinker would come on once we got to Sonic. Oh the joy that would come when I’d hear that click click click. And if we did stop, sometimes that joy would be crushed by my dad eating the tip off my dipped cone. I still have a complex about that to this day…

I also adore that Magic Shell liquid that you pour over your ice cream. You know the stuff. It starts as a liquid, but the minute that it hits your ice cream it starts to harden and forms a shell. It’s basically the same thing as the dipped cones from Sonic. No wonder I love the stuff.

It was only recently that I found out how extremely SIMPLE it is to make magic shell. You can pay around $3 bucks for a bottle of it at the store. After you read this recipe, you may never purchase it ever again. I know I won’t.

There’s something about the fun of starting off with a liquid and watching it turn to a solid. Brings me back to high school when we would do science lab. I was usually pretty bored until we did the hands-on experiments.

You see the TWO ingredients that are used to make this lovely, tasty, and sweet ice cream topping combine together to make your own little science experiment each time that you eat a bowl of ice cream. Coconut oil is the ingredient that essentially causes the hardening with contact to the cold. And then of course, you have your chocolate chips that mix with the coconut oil to create the “shell”.

Therefore, you end up with a liquid that becomes a chocolatey, yummy, shell on top of your creamy ice cream. And to think that this recipe only contains two ingredients that takes only seconds to make. You’ll never go back to store-bought, I promise…

 You can use your favorite flavor of chips to make this. Use butterscotch chips, white chocolate, dark chocolate, milk, or semi-sweet. I store mine in an old chocolate syrup bottle. With the coconut oil as an ingredient, it tends to harden in the bottle after a while at room temp. Simply pop it in the microwave for about 30 seconds and it’ll be back to liquid and ready to create a chocolate shell over your ice cream.

Recipe courtesy of I Wash, You Dry.

2-Ingredient Homemade Magic Shell
 
Recipe Type: Dessert
Author: I Wash, You Dry

With just 2 ingredients, you can create your own magic shell without a trip to the store!
Ingredients
  • 1/2 c. Coconut Oil
  • 12 oz. Semi-sweet Chocolate Chips (or your choice)
Instructions
  1. In a large microwavable bowl, combine the coconut oil and chocolate chips.
  2. Microwave at intervals of 30 seconds at 50% power, stirring between intervals.
  3. Pour over ice cream and allow to dry and harden.
  4. Store in an airtight container at ROOM TEMPERATURE.
 
Notes

If your magic shell hardens in the bottle, microwave it for about 30 seconds to get it back to a liquid again.


Like this post? SHARE it!

Related Posts Plugin for WordPress, Blogger...

Chocolate Chip Banana Bread Gift Jars

I’ve recently gotten the nickname “Becky Homecky” from my mom. Had you asked me 5 years ago if I would be creating recipes, crafts, and projects then I probably would have said absolutely not. Not just because I was working at the time, but also because I never really had the urge to do anything so Betty Crocker-ish. These days I find these things to be completely stress-relieving and better yet, fun.

Whodathunkit?

Every Christmas for the past 5 years, I’ve said I’m going to make homemade Christmas gifts to save money and to put a little thought into my gifts. And almost every year, I get down to the wire and never get around to it. This year, I’m determined to make it happen.

I’m starting with these gift jars. There are about a million combinations for gift jars these days. You name it, you can gift it in a jar. My daughter suggested that we try Banana Bread Gift Jars the other night. I told her that I wasn’t sure that you could do that because bananas can’t rightly be put in a jar and keep.

Then I came across this recipe at Recipe Goldmine for Chocolate Chip Banana Bread in a Jar. Never having made mixes in a jar like this, I wanted to go with a tried and true recipe before branching out into experimentation. I found it interesting that using dried banana chips for the banana part actually ended up tasting like regular bananas.

And the chocolate, come on. YUM is the only word to describe chocolate and bananas.

I got my jars at Walmart for around $8 for 12 of them including tops. I used some fabrics pieces that I already had along with some red string to dress the jars up a bit. I printed out the instructions for making the bread and glued it to a piece of scrapbook paper. Then punched a hole and tied it to the jar.

Aren’t they adorable?

These make such great gifts for teachers and coworkers. And they are inexpensive too. My favorite part!

Recipe courtesy of Recipe Goldmine.

Chocolate Chip Banana Bread Gift Jars
Recipe Type: Gift, Bread, Snack
Author: Reipe Goldmine
Easily create homemade gift jars for yummy Chocolate Chip Banana Bread!
Ingredients
  • 1/2 cup chocolate chips
  • 1/2 cup dried bananas, finely chopped
  • 1/2 cup granulated sugar
  • 2 1/2 cups Bisquick
  • 1 teaspoon baking powder
  • 1/4 teaspoon salt
Instructions
  1. Layer all ingredients in a quart-size jar in order they are given. Press the layers down firmly before adding next layer.
  2. Attach gift tag with these instructions:
  3. In a large bowl, place the contents of this jar. Make a well in the center. Mix 1 1/4 cups milk, 1 teaspoon vanilla extract, 2 eggs (slightly beaten) and 1/2 cup butter or margarine (softened) into dry mixture. Stir until completely blended. Spoon the batter into a large loaf pan that is well greased with wax paper in the bottom. Bake for 1 hour or until knife inserted in the center comes out clean. Cool in the pan on a wire rack before removing.

Like this post? SHARE it!

Related Posts Plugin for WordPress, Blogger...

Ridiculously Easy Brown Bag Popcorn

I wish I had a dime for all of the “duh” moments that I’ve had in my life. I will not go into any specifics with you, but just know that sometimes I’m not the brightest crayon in the box. 🙂

Now that I’ve thoroughly dissed myself, we’ll move on to this awesome new revelation that I’ve made! It’s been a long time, but a friend of mine guest posted on Saving with Amy about how to make your own popcorn. I remember reading it and thinking oh that’s neat and looks really easy. And then I just moved on with my life to never try it out for myself.

Not sure why I didn’t because I am HOOKED on this stuff now!

You see, to make about 8 or 9 cups of your very own popcorn, all you need is a brown bag like this one. You can get 50 of them at Dollar Tree for a buck! And you need 1/3 cup of unpopped kernels. You can also get these at Dollar Tree for a buck!

For $2, you’ll have popcorn coming out of your ears…

Have you ever looked inside one of those prepackaged bags of popcorn? There are all sorts of things in there that are pretty much unnecessary. Sure it’s nice to have salt or butter flavor, but with all the added fat too? This easy brown bag method makes it easy to make pure popped corn without adding any extra nonsense. In fact, I actually like it plain just like this. No butter or salt needed!

Just try it once and you’ll be hooked like me. It’s too incredibly simple not to.

Ridiculously Easy Brown Bag Popcorn
Recipe Type: Snack
Author: Pennywise Cook
A brown paper sack and popcorn kernels are all you need to make your very own popcorn!
Ingredients
  • 1 Brown Paper Bag
  • 1/3 c. Unpopped Kernels
Instructions
  1. Pour to kernels into the brown bag. Fold the top down about 2 times.
  2. Place in microwave and heat on full power for 1:45- 2 minutes. This will depend on your microwave, but 2 minutes is about right for mine. Just stop it once there is about 2-3 seconds between kernel pops.

Like this post? SHARE it!

Related Posts Plugin for WordPress, Blogger...

Incredibly Easy Homemade Peanut Butter

How was your weekend? Mine was FABULOUS! Yes, for once I have to say that every single moment was enjoyable. Friday was an impromptu family night which consisted of homemade tacos (mommy didn’t have to “cook”), settling in to watch The Lorax (highly recommended!), and finished off with sundaes complete with cherries on top. Saturday was pretty leisurely. We went to the pet shop to see the animals (cheap entertainment for sure) and ended at Chick-fil-A where we used coupons for FREE Icedreams and played in the playplace. Does a frugal family weekend get any better?

And of course, church on Sunday morning. Which I might have an update on our search coming up so be sure to look for that. Months of searching may have led us right back where we began. Funny how God works, isn’t it?

I was excited to find a deal on peanuts recently as part of the Publix BOGO sale recently. One thing on my list to try and make was peanut butter. It’s seriously been on my list for like months. Now that I’ve made it, I feel like an imbecile because of how simple it is. I would have been making my own peanut butter for months had I known how easy it really is.

THIS is all you need to make it. Peanuts (DUH), a little bit of oil (whatever kind you have: peanut, canola, vegetable, it really doesn’t matter) and a dash of salt which didn’t make it in my picture. Other optional ingredients include cocoa powder, honey, sugar, brown sugar.

You’ll also want to have a food processor and something to store your homemade peanut butter in.

See what I’m saying? Simplicity at it’s finest here folks.

I stored mine in some pint-size mason jars that I had. It’s worked out well. 1 jar of peanuts made me 2 of these jars of peanut butter.

My girls are in absolute love with this peanut butter. I even overheard Addie saying to her daddy yesterday that “I really love momma’s peanut butter. It’s goooooooooood.” I was glowing from the other room y’all. I hardly ever get compliments like that. The only criticism that I received from the hubby was that it might need just a tad bit more salt. I was holding off on too much in case it became too salty. But I know to add just a tad more next time.

Storage: Your peanut butter isn’t equipped with shelf stabilizing ingredients so it will need to be refrigerated. It will last in the refrigerator for up to 4 weeks. (If your family lets it last that long!) You can also FREEZE it! Place it in an airtight container and freeze for up to 6 months. Just be sure to let it thaw before you use it again.

Are you ready to impress your family with your own homemade peanut butter?

Incredibly Easy Homemade Peanut Butter
Recipe Type: Sauce, Condiment
Author: Pennywise Cook
You’ll never believe how simple it really is to create your own peanut butter at home!
Ingredients
  • 2 Cups Unsalted, Dry-Roasted Peanuts
  • 1 Tsp Oil (peanut, canola, etc.)
  • Dash Salt
Instructions
  1. In a food processor, combine peanuts, oil, and salt. Process until desired consistency and smooth.
Notes

It may take a couple of minutes for the peanuts to come to a desirable consistency. They first get chopped, then they begin to really form a paste and then butter.

The oil is completely optional as well. If you’re going for a more natural peanut butter, the peanuts actually have their own oil so it’s not absolutely necessary to add the oil. Just makes for a smoother butter.


Like this post? SHARE it!

Related Posts Plugin for WordPress, Blogger...

DIY Coffee Mug Holder

One thing that you may not know about me is that I have an obsession with mugs. No, not with faces, but with the ceramic formations that hold the most incredible substance that keeps me going every day, coffee. I only started to drink coffee about a year and a 1/2 ago and yet it sucked me in so fast that I didn’t even know what was happening!

I now enjoy scouring flea markets, thrift stores, and any other places finding the most unique and eclectic mugs that I can. I’d call it a “hobby”, but that would be giving in and I’m afraid that my obsession would deepen so I’m just going to pretend that it’s just something that I do. 🙂

When I noticed that there wasn’t any place to put regular glasses in my cabinet, I decided that something need to be done.

I needed a place just for mugs. After all, they are worthy.

So I thought up this mug holder idea and got to work. I knew that I wanted it to be inexpensive and semi-simple to make since I’m no carpenter. Brace yourself, I took a lot of photos for this one…

I started with cheap board from Lowes. I had them cut it to 2 feet so that it would fit on the side of my cabinet. I didn’t want anything too thick, but I wanted it thick enough to hold screw hooks well. I believe this board is 1 inch thick which turned out just right. I painted the board with a light blue before lightly painting over it with an off-white. Then I sanded it a bit to distress it.

And in the process I got paint on the garage floor. It needed some color anyways.

I found this fantastic technique for transferring text onto wood at Elm Street Life. It doesn’t get any simpler than your printer, a pencil, and a pen.

Print off the text of your choice from your printer. No need for reversing the text or anything. Cut out most of the white surrounding the text. Then using a lead pencil, color the back of each letter like the picture above. The need for a cheetah print pencil is not necessary, but it helps to make you feel awesome.

I may have gone a bit overkill, but here’s what it will look like on the back.

Tape your words lightly to your wood so it won’t try coming up on you. Using a pen, trace around each letter firmly. The lead will transfer to the wood and you’ll be left with an outline of your words.

Like this! Then you can use a brush (if you’re brave) or a paint pen to fill in the outline. They actually make an assortment of paint pens these days which is nice.  Just remember that it doesn’t have to be perfect. You can always sand it a little and if you’re going for a vintage feel anyways, it wouldn’t look perfect either.

Use your paint pen to go around the letters and then fill them in. When buying your paint pens, be sure to look at what kind of tip you are getting. Some are made for calligraphy and others for painting. I don’t suggest the calligraphy tips for this.

Tah dah! We have a board. We have text on the board. now we just need hooks and mugs for our mug holder!

You may have seen my post on Toilet Paper Roll Art. It’s quite genius and is so simple and fun. I used a paper towel roll to create this flower and then dipped it into some of my favorite aqua paint.

I gave the board a little detail with my flowers and I even added an orange one on top to give it some more color.

I let it dry and then screwed in the hooks in an unexpected way. Or at least it was unexpected to my husband. He thought I would have made it a little more uniform, but as I started hooking them in, it seemed to make more room with them being offset this way.

UPDATE: We hung this by screwing screws directly through the backside of the cabinet into the board itself. We used 4 screws total and it holds just fine.

And there you have it! A simple yet cute way to display your coffee mug obsession (if you have one) and to give your cabinets a little more room.

It’s not just functional, but it looks really cool too. We’re going to make one for my husband’s mugs for the other side too.

Happy DIYing!


Like this post? SHARE it!

Related Posts Plugin for WordPress, Blogger...

Slow Cooker Corn on the Cob

So I told you how I’ve been keeping things on the easy side the last few weeks. With Addie starting kindergarten and with family in town off and on these last couple weeks, the cooking has been a little out of routine. Out of routine meaning that I didn’t want to bore my guests with my food portraiture and involvement with my food. So I opted for easy yet tasty.

The other day I was talking to my mom about the Crockpot Baked Potatoes when she mentioned that she had also used her Crockpot to make up some corn on the cob. We usually just pop our corn on the grill when we’re grilling out, but it’s been so hot lately that we haven’t wanted to be outside for more than 10 minutes. Though, it’s FINALLY beginning to cool down just a bit around here. So to save a little propane and heat from the stove or oven, I decided to throw some ears in my slow cooker.

I seasoned them up with a little mayo concoction that I put together, then rolled them up in foil and placed them straight down into the slow cooker. I didn’t add water, I didn’t put anything inside to raise them away from the sides. I didn’t do anything at all, but just let them go. It worked great! The steam from the moisture in the corn is what cooks it.

With sweet corn being so cheap (in places not affected by the droughts), it’s an easy and tasty side dish for just about anything. Plus you can use corn on the cob to make up creamed corn, corn bread or muffins, and more. If you need cooked corn for a recipe and want it fresh, throw some ears into your slow cooker overnight and in the morning you’ll be ready with slow cooked and perfect corn!

Slow Cooker Corn on the Cob
Recipe Type: Side Dish, Crockpot
Author: Pennywise Cook (and Momma!)
Another shortcut idea that makes corn as simple as 1,2, 3 to make!
Ingredients
  • 4 Ears Corn on the Cob
  • 2 Tbsp Reduced Fat Mayonnaise
  • 1/4 Tsp Garlic Powder
  • 1/4 Tsp Onion Powder
  • Dash Salt and Pepper
Instructions
  1. Whip ingredients together and rub 1/4 mixture onto each ear of corn. Wrap in foil and place in slow cooker. Cook on lowest setting for 4-6 hours.
Notes

I used the low setting on my slow cooker, but if you have a “warm” you might consider using that for longer cook times.


Like this post? SHARE it!

Related Posts Plugin for WordPress, Blogger...