Chocolate Ice Box Pie {4 Ingredients}

Chocolate Icebox Pie 5

I’m not sure that the weather realizes that it’s almost November. Somebody really oughta tell it that it’s a little late this year. We are just now seeing the leaves change. And the temp? We haven’t had many cold snaps and just the other day it was close to 90 again. Welcome to good ole Tennessee!

I’m mostly ready for the bugs to leave us alone. I’ve had to set up one of my Fruit Fly Traps. After seeing about five of them near the sink I told the hubby that it’s time to get one made up and set out. After a couple of hours we counted them to find out that the five we thought we had was really closer to 50. Um, ew!


I’m sorry y’all. It appears that our family has a thing for desserts. You might have noticed that by my last three recipes. I’ve said it before and I’ll say it again- dessert is my best bribing tool. Why wouldn’t I make it?! Though sometimes I find it hard to keep up with demand. Trying to get better at it since I’ve discovered its power. 

This pie has quickly become a hubby favorite. Requested many times and made just as many times because of how easy it truly is. Y’all know me and my few ingredient recipes. This one?

Just four ingredients.

Chocolate Icebox Pie 1

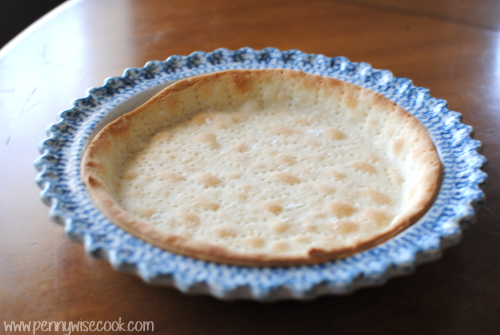
The first is none other than a pie crust. Easy to make yourself if you’re in the mood. Easier to purchase at the store when you’re not in the mood.

Chocolate Icebox Pie 2

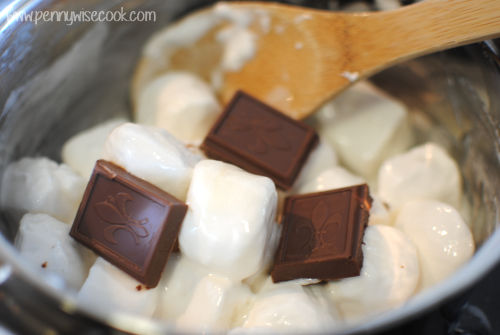
The next two ingredients include some very tasty staples that totally make me want a s’more right now. An 8 ounce chocolate bar and pile of jumbo marshmallows. You melt them down until they are good and combined. The original recipe didn’t call for anything to help them along, but I have been using a tablespoon or so of milk.

Chocolate Icebox Pie 3

After they combine, they look like this. Ooey, gooey, yummy goodness.

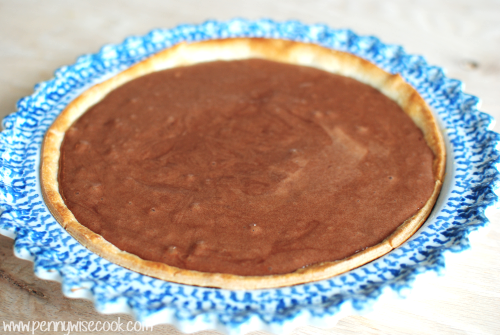
You let this mixture cool a little and then fold in a tub of whipped cream. Pour this mixture into your pre-baked pie crust and refrigerate a little while.

Chocolate Icebox Pie 4

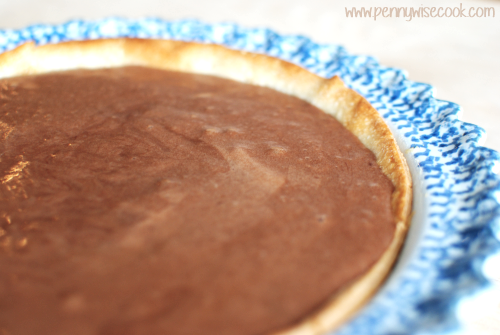
Oh goodness y’all. It’s sooooo good.

I think a lot of its charm comes from how easy it is. Do you feel that way? When things are easier all of the sudden they are that much more amazing? It’s like getting things free. You give me something FREE, I’m going to be uber excited about that thang.
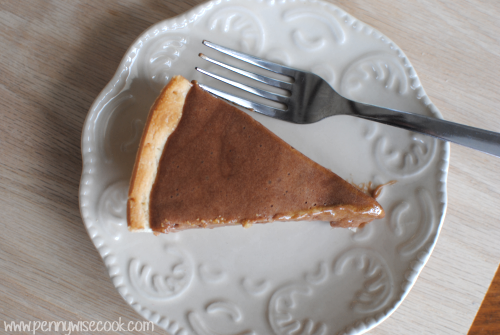
Chocolate Icebox Pie 6

You have to try it.

You just do.

Chocolate Icebox Pie
Write a review
Print
Ingredients
  1. Pie crust (pre-baked)
  2. 20 large marshmallows
  3. 1 (8 oz) chocolate bar
  4. 1 (8 oz) tub whipped topping
  5. 1 tbsp (or so) milk
Instructions
  1. Melt marshmallows and chocolate bar with milk over low heat or in a double boiler. Cool partially.
  2. Fold in whipped topping.
  3. Place in pie shell.
  4. Chill.
Adapted from The Four Ingredient Cookbook
Pennywise Cook http://www.pennywisecook.com/

Like this post? SHARE it!

Related Posts Plugin for WordPress, Blogger...

4-Ingredient Fudge Cookies

It has been cookie mania at my house for the last month or so. It could be that Christmas is coming up. It could be that we’ve had a lot of parties to make them for.

…Or it could just be that we really like cookies.

Whatever the case, we’ve made a LOT of cookies lately. One of my most favorite that I’ve made are these Fudge Cookies. Not only are they incredibly fudgy and tasty, but they are also super easy. Only 4 ingredients!

And here are Pennywise Cook, we really like recipes that call for little ingredients don’t we? That means that there is little moolah involved and that keeps smiles on our little cookie-making faces. I think I spent about $2.50 to make these because I already had eggs and oil on-hand.

Fudge Cookies 4


The dough is made from devil’s food cake mix, 2 eggs, 1/2 cup oil, and 1 cup of chocolate chips. After mixing all the ingredients together it becomes very thick and easy to roll into balls. So when you’re making these, don’t be concerned when your mixer starts to slow down and the mixture is very thick.

The stiffer that the dough, the better!

Fudge Cookies 3

Hey, who knows. Santa may just like to have these Fudge Cookies this year.

I can tell you that this Santa is making Rice Krispie Treats this year, because this Santa may just be cookied out! 😉

4-Ingredient Fudge Cookies
Recipe Type: Cookies, Dessert
Author: The 4-Ingredient Cookbook
Homemade cookies don’t have to be hard! These fudge cookies are simple and taste great!
Ingredients
  • 1 pkg devil’s food cake mix
  • 2 eggs
  • 1/2 c. oil
  • 1 c. semi-sweet chocolate chips
Instructions
  1. Preheat oven to 350°.
  2. Mix Cake mix, eggs, and oil until combined. Stir in chocolate chips. Mixture will be stiff.
  3. Shape dough into small balls and place 2 inches apart on a cookie sheet.
  4. Bake 10-12 minutes. Let cool on a wire cooling rack.


Like this post? SHARE it!

Related Posts Plugin for WordPress, Blogger...

P.F. Chang’s For The Holidays

This is a Sponsored post written by me on behalf of P.F. Changs for SocialSpark. All opinions are 100% mine.

 photo 542c2e8c-e075-468c-9373-d329061a09a1_zps72d91a85.jpg

How many times is it date night and you have absolutely no idea where to go? For us, it’s many. And no matter how many times we have gone on a date, there is always the conversation that goes a little something like this:

Says the hubby, “So where would you like to go?”

Myself in reply, “I don’t care, wherever you would like to go”.

And then just imagine that very conversation happening in repeat for about 20 times. It wouldn’t be date night without  the endless cycle of no one making a choice!

If you’re ever in the same boat, especially this holiday season, you might want to check out P.F. Chang’s! Not only do they have their incredibly famous lettuce wraps (yum!), but did you realize they have some awesome desserts and holiday drinks, too? The picture above is over their new Peppermint Mocha Cappucino and Vanilla Bean Milkshake. Oh heavens they look amazing!

 photo d3f7af4a-3858-4175-a9d5-7e42e8ad35ae_zps70fdfd3f.jpg

Or check out these handmade Sweet Vanilla Cheese Wontons! Woah. They also offer Chocolate Raspnerry Wontons as well. You know, in case you’re a chocolate fan. Who isn’t?

I’ve always considered P.F. Chang’s for the lettuce wraps and Asian-American inspired dishes, but seeing these desserts gets my sweet tooth excited!

Have a date night planned or just want to take a break from holiday cooking? You might just check out P.F. Chang’s and their new fall menu and holiday items. You can Follow @pfchangs and also Follow P.F. Chang’s on Pinterest to keep up to date with them!

So which new menu item are you most excited about trying? Leave me a comment!

Visit Sponsor's Site


Like this post? SHARE it!

Related Posts Plugin for WordPress, Blogger...

Triple Thick Banana Cranberry Smoothie

This is a Sponsored post written by me on behalf of Carton Smart for SocialSpark. All opinions are 100% mine.

One of the forgotten ingredients around the holidays that can tend to get a bad rep is of course, the cranberry sauce. Typically at the family gatherings that I attend, someone always buys it "just in case" and then it never makes it to the table. However, this all changed last year when my oldest realized that she is in love with such cranberry sauce.

Now it is simply a requirement. 

Don't get me wrong, I like cranberry sauce. I'll even eat the kind out of the can. Although sometimes it can have a tinny taste to it depending on the brand. I got to try out some pretty cool products from Tetra Pak that are packaged in cartons, not cans! How perfect is that? No tinny taste and not only that, but they use 1/3 less packaging compared to cans.

 photo 62adf36b-e1dc-4d93-98c1-aa80d97a468d_zps600d562e.jpg

Tetra Pak doesn't just package cranberry sauce either. You can find a variety of products for making your upcoming holiday meals!

 photo 1898ca76-3272-4baf-a8df-07abf60e15e3_zps1bf425e9.jpg

The products that I got to try out seemed so much more compact in their little cartons. I love the fact that they make less waste than your regular everyday food packaging.

 photo d1d52bb8-c150-4f19-9a7c-b8c9ab3c8df3_zpsac6b75dd.jpg

 photo 795e421d-1ec8-414e-b1b8-dde8f5f23ded_zps62983f0a.jpg

Here are the beauties I got to try out. Look at that cranberry sauce. You can even enjoy a different shape than the famous can circle when you get it from a carton.

I think what I loved most about the carton was how easy it was to open

I used some of my cranberry sauce to surprise my daughter with as an afterschool snack. We found out that my youngest is also a very big fan of cranberry sauce now too. Had to break up a sibling fight over it!

How can you be Carton Smart this holiday season? Well, you could make something up like I did! I some of the cranberry sauce to whip up a quick smoothie for my hubby while he was working. You know me and my experimentations. I threw this together in about 5 minutes and it was really good! A great way to use up leftoever cranberry sauce if you ever need to. 

Triple Thick Banana Cranberry Smoothie

Ingredients

1 whole banana, frozen
1/4 c. cranberry sauce
1/4 c. water

Directions

Blend all ingredients in a blender until smooth. Viola! 

In the meantime, you should Become Carton Smart and check out the other products that you can get in a carton. It makes a difference, it really does!

You can also follow them here:

Tweet @CartonSmart and Follow #CartonSmart on Pinterest

Visit Sponsor's Site


Like this post? SHARE it!

Related Posts Plugin for WordPress, Blogger...

Candy Cane Brownies

Candy Cane Brownies 1

The following post is brought to you by McCormick! All opinions expressed are 100% mine.

Christmas reminds me of so many things. The birth of Jesus Christ, Santa, presents, stockings, family, and so much more. And I can almost taste the flavors of Christmas when I start to imagine it each year. You have your cinnamon and apple, gingersnaps, chocolate from Santa’s chocolate chip cookies, and then there’s peppermint.

It’s not Christmas until I’ve seen a candy cane y’all!

I’ve never been a diehard peppermint fan. I wouldn’t even say that I eat even 1 candy cane per Christmas season. But I will say that when you have severe coffee breathe, peppermints are your best friend!

I am a fan of peppermint ice cream, peppermint and white chocolate, and any other creamy combination like those. I just love how it can be complemented by something that will take it’s sting away a little. You know what I’m talking about?

Last Christmas, I made homemade peppermint marshmallows. They were soooo good! I used extract to give it the flavor so no crunching from the peppermints was necessary.

Candy Cane Brownies 3

McCormick makes a good pure peppermint extract perfect for capturing that Christmas flavor this year. I cannot WAIT to share this next recipe with you. It is one of those recipes that your friends and family will probably request that you make for them over and over every year.

I’ve only made it once and it has already been requested a second time!

Let me start off by saying that I saw a picture of these taken by the talented folks at McCormick and I thought wow those look tasty. Mine will never look like that, but maybe they’ll at least taste like them! You know those recipes that are impossible to actually make look as appealing as they do in the original presentations. Well, I can attest that these will look very close to the original if you follow all the directions correctly! You’ll be famous for these!

Candy Cane Brownies 2

And trust me, they aren’t as difficult to make as they look. They take a little bit of time, but you can just catch-up on your face book or watch a Christmas movie while you’re slaving away.

Candy Cane Brownies
Recipe Type: Dessert, Treat
Author: McCormick
Ingredients
  • 1 pkg (family size) Fudge Brownie Mix
  • 2 and ½ c Powdered Sugar
  • ½ c butter (1 stick) + 7 tbsp, divided
  • 1 and ½ tbsp heavy cream
  • 1 tsp McCormick Pure Peppermint Extract
  • 12 oz Semi-Sweet Baking Chocolate (I used choco chips)
  • Crushed Peppermint Candies, optional
Instructions
  1. Preheat oven to 350°. Prepare brownie mix as directed on package. Spread into greased foil-lined 15x10x1 dish. (I used a 9×13 pan)
  2. Bake 15 min or until a toothpick comes out clean. (I baked mine for more like 26 minutes.) Cool on wire rack.
  3. Meanwhile, beat powdered sugar, 7 tbsp butter (melted), cream, and peppermint extract in a large bowl on medium speed until well-blended. (this mixture will be extremely thick, sorta like a peppermint patty middle) Spread evenly over cooled brownies. (You might need to use your hands to press it down evenly among the brownies. I also had to take a little from thicker spots and add it to the thinner places) Refrigerate for 30 minutes.
  4. Microwave chocolate and remaining ½ c butter (melted) in a large microwave safe bowl on HIGH for 2 minutes or until the butter is melted. (You may need to adjust the time depending on your microwave) Stir until the chocolate is completely melted. Spread over chilled brownies. Sprinkle with crushed peppermint candy, if desired. (I refrigerated mine again at this point to harden the ganache on top)
  5. Cut into 36 squares and serve!

You can find the original recipe where they like to call these Peppermint Bars over at McCormick!


Like this post? SHARE it!

Related Posts Plugin for WordPress, Blogger...

Krispy Oreo Cookie Balls


I remember the very Christmas that I was introduced to what was called “Oreo Balls”. The most wonderful and decadent morsels made of crushed Oreo cookies and cream cheese all contained within a crust of white chocolate.

It does not get any better than that.

I must have made them 5 times that Christmas for different functions. And they have become a go-to treat ever since. While some desserts and treats can end up so stressful over the holidays, it’s always nice to have something like these Oreo Cookie Balls to fall back on since they are so easy! And not to mention that they taste amazing.

The best part is that you can practically make them festive for any holiday. Christmas is especially fun because they easily look like little snowman heads. Or simply add some red or green glitz and glam with sprinkles while they are still wet. Put them on a stick or serve them in a bowl!

You can find some super fun ideas for creating your own festive Oreo Cookie Balls HERE. There’s everything from penguins to Nutter Butter Cookie Ball ideas there. I also think that the pretzel idea for reindeer antlers is genius! You can also follow @Oreo on twitter for more cookie ball inspiration.

I made this last batch a little more on the simple side when it came to decoration. My coloring didn’t exactly work out for turning red, so I settled on pink which didn’t really matter because they were just going to get eaten anyways.

The biggest change that I made this time around was a complete experiment. I attempted to merge 2 of my favorite treats into one: Oreo Balls and Rice Krispy Treats. I decided to make them both as normal and then simply stir them together and finish off the cookie ball recipe as normal. Hence the name Krispy Oreo Cookie Balls. While the first day that I made them they were Krispy, I must confess that they lost that “krispiness” after the next day or so. That cereal tends to become soggy after a while so it didn’t surprise me. But I will say that I liked the way that the Rice Krispy Treat made the Oreo Balls lighter and not as rich. I also used Almond Bark instead of regular semi-sweet chocolate chips.

We enjoyed them!

Pure bliss in every bite. They are addicting and sure to be a hit at any holiday gathering! I’ll give you the original recipe and also the recipe that I made in case you want to try it out.

Original Oreo Cookie Balls
Ingredients
  • 1 pkg (8 oz) Cream cheese, softened
  • 36 Oreos, finely crushed (about 3 cups)
  • 4 pkgs (4 oz) semi-sweet baking chocolate, melted
Instructions
  1. Mix cream cheese and cookie crumbs until blended.
  2. Shape into 48 (1-inch) balls. Freeze 10 min. Dip balls into melted chocolate; place in a single layer on a pan covered in wax paper.
  3. Customize how you’d like!
  4. Refrigerate an hour or so until set.
  5. Enjoy!


Krispy Oreo Cookie Balls

1 pkg (8oz) cream cheese, softened
36 Oreos finely crushed (about 3 cups)
1 pkg Almond Bark, Melted

Mix cream cheese and cookie crumbs until blended.
Meanwhile heat 3 tbsp milk in a sauce pan over low heat. Add 10 oz bag mini marshmallows and stir until melted.
In a large bowl, add 6 cups Rice Krispies to melted marshmallows. Combine well.
Stir together Rice Krispies Mixture with Oreo Mixture until well-combined.
Shape into 48 (1-inch) balls. Freeze 10 min. Dip balls into melted almond bark; place in a single layer on a pan covered in wax paper.
Customize how you’d like!
Refrigerate an hour or so until set.
Enjoy!

This is a sponsored post written by me, made possible by Yummly, on behalf of Oreo. All opinions expressed are 100% my own. For more information, review my disclosure policy.


Like this post? SHARE it!

Related Posts Plugin for WordPress, Blogger...

Eclair Cake- It’s So Stinkin’ Good

Let me begin by apologizing for the lower-than-normal quality pictures. You have to understand that I’ve made this cake a few times in the past few weeks and it was brought to my attention that I had to share it with you and therefore, I haven’t gotten a chance to take better pictures. Not to mention that each time I make it, the entire cake is gone before I can come close to taking pictures.

It’s that good y’all…

My mom had a recipe in her collection from years and years ago for Eclair Cake and she just raved about it. She used to have it all the time, but hadn’t made it in a long time. I recently came across a recipe that seemed similar and decided to make it for a family that we were taking a meal to. I knew my family wasn’t going to be happy with me if I left them out so I made one for us too.

Man oh man was this cake a hit! But I should’ve known because this cake is awfully similar to the Strawberry Icebox Cake that I make. There is just something about graham crackers and pudding in the refrigerator.

I think that the best part about this cake (aside from how amazingly tasty it is) is how easy it is to make! 5 ingredients, 10 minutes, and BOOM I’m mom and wife of the year.

And to think, you didn’t even have to turn on the oven!

Make this cake. This is an order. You will not be upset. I promise.

The only difference in my mom’s recipe and this one is basically the frosting part. Her’s had a bunch of ingredients and required extra refrigeration. I’m sure it tasted amazing, but I really like the use of frosting and according to my husband and girls, it’s the very best part!

Eclair Cake- It’s So Stinkin’ Good

Recipe Type: Dessert

Author: Pennywise Cook

This no-bake Eclair cake will be gone in no time!

Ingredients

  • 1 Package Honey Graham Crackers
  • 2 Packages Instant French Vanilla Pudding
  • 3 c. Cold Milk
  • 1 (8 oz) Tub Whipped Cream
  • 1 tub Chocolate Frosting

Instructions

  1. In a mixing bowl, combine 2 packages french vanilla pudding and milk. Mix until completely dissolved, about 1-2 minutes. Fold in whipped cream until combined well.
  2. Meanwhile, line a 9×13 dish with graham crackers.
  3. Pour half of the pudding mixture over the graham crackers and spread evenly.
  4. Place another layer of graham crackers. Pour the rest of the pudding mixture over the top of the second layer and spread evenly.
  5. Place another layer of graham crackers on top.
  6. Take the top off the frosting and remove the foil cover. Place the tub in the microwave for 40 seconds or until melted.
  7. Pour over the last graham cracker layer and spread evenly.
  8. Place in the refrigerator for 1-2 hours and serve!

I could not find where I originally found this recipe (so sorry!), but the same one is found at All Recipes.


Like this post? SHARE it!

Related Posts Plugin for WordPress, Blogger...

2-Ingredient Oreo Bark

How did your family do with the time change? Everyone enjoy their extra hour of sleep at your place? With 2 girls under 5, there was no extra hour of sleep here. They just don’t cherish that hour like we do. I even had a conversation with my 5 year old the other night about how mommy and daddy like sleep. She just couldn’t grasp why we would enjoy wasting so much time with our eyes closed. That whole conversation was a lost cause. It never really went anywhere and contained no resolution for her.

Sometimes it’s better to just not try and explain things to a 5 year old, huh?

Last week, I had a hankering for something Oreo. I can’t ever bring myself to actually indulge in eating oreos, but I do like to make things containing them. Go figure. I had a package of white chocolate chips in the pantry and some individual packages of Oreos.

Can you say simple? That’s all that I needed to make this incredibly tasty candy bark. It took literally minutes to make and satisfied my Oreo hankering times 2.

I found myself eating so much of it that I sent it to work with the hubby. That’s my secret weapon, y’all. You notice sometimes I don’t always make “healthy” things. Those are usually the ones that I try to send away to a friend or to work with hubby.

It all starts with a cookie sheet covered in wax paper. Crumble up about 12 or so Oreos and lay them around the cookie sheet. Melt up your white chocolate chips and pour them over the Oreos. Smooth out and place in the freezer for about 10 minutes or so and YOU’RE DONE.

Does it get any easier?

This, my friends, would make a fantastic food gift for Christmas! Simple wrap it up in a fancy tin or treat bag and tie with a Christmas bow and you have one cheap and cheerful gift!

Who wouldn’t enjoy Oreo Bark?

2-Ingredient Oreo Bark
Recipe Type: Dessert, Snack
Author: Pennywise Cook
With only 2 simple ingredients, you can make a Christmas gift or tasty snack within minutes!
Ingredients
  • 12 or so Oreos (Crumbled)
  • 1 (12 oz) Package White Chocolate Chips
Instructions
  1. Line a cookie sheet with wax paper. Spread the crumbled Oreos around the sheet.
  2. Melt entire bag of white chocolate chips according to the package or in a double boiler.
  3. Once melted pour over the Oreo pieces and smooth out. Place cookie sheet in freezer for about 10 minutes and then break into pieces.
Notes

If you don’t have a double boiler to melt your chocolate chips, just use two sauce pans. Place hot water in the bottom one and the chocolate chips in the top. Bring the water to a rolling boil and melt the chips.


Like this post? SHARE it!

Related Posts Plugin for WordPress, Blogger...

No-Bake S’mores Pie

Fall is here! On our trip these past couple of weekends I noticed the trees a changin’ and they are just beautiful. It was especially beautiful driving through the mountains in Chattanooga. I love looking down on huge valleys just covered in autumn-colored fall trees. Makes the drive more enjoyable for sure!

Along with the leaves falling and cooler weather, campfires are sure to follow! In fact, we’re thinking about having a family night this weekend around our fire pit. The feel of cool, crisp air mixed with a crackling fire and marshmallows just can’t be beat in the fall. And you can bet that some fall treats will be eaten! S’mores are my all-time favorite campfire food. I enjoy a roasted hot dog every now and then. And popcorn in those foil packages are fun, but s’mores are the real deal.

Even before the weather even pretended to cool off, I got a hankerin’ for a s’more. Somehow, instead of creating just 1 s’more, I ended up creating this pie. That’s ok. I’d rather have an entire pie than 1 s’more anyways.

So this pie is super simple. I wanted to make it a little better for you, so instead of using creams, I opted for a nonfat yogurt. Of course after using an entire bag of chocolate chips, it doesn’t really matter. But hey, at least I make the effort right?

All the prettiness on the top is completely optional. I had just bought the ingredients for my s’more so I had them and thought why not make the pie look pretty? So depending on how pretty you make yours look, you’re talking between 4 and 6 ingredients. Most of which are highly inexpensive and easy to work with. This pie would be a GREAT thing to bring to a cookout get together.

The one thing that I will point out is that the yogurt does give the chocolate filling a bit of a tang. Clearly this was my sacrifice for making something better for you. My daughter noticed this immediately, but it didn’t bother my husband. If you think you might not like that, try using heavy cream instead. Should taste great and give the same type consistency.

Here’s how to make it:

No-Bake S’mores Pie
Recipe Type: Dessert
Author: Pennywise Cook
You don’t have to make a fire to have s’mores! Try this easy pie to satisfy your craving!
Ingredients
  • 1 Graham Cracker Crust (reduced fat)
  • 1 Bag Semi-Sweet Chocolate Chips (12 oz)
  • 1 c. Plain, Nonfat Yogurt (or heavy cream)
  • 1 tub Marshmallow Cream
  • 2 c. Mini-marshmallows- Optional
  • 5 Graham Crackers for Topping- Optional
  • 1 Hershey Bar for Topping- Optional
Instructions
  1. In a large microwavable bowl, place the chocolate chips and 1 cup yogurt. Microwave on 50% power for 5 minutes. Remove and jiggle the bowl getting the chocolate chips to move around without stirring. Return to microwave and heat on 100% powder in 15-30 second increments until the chips begin to melt. Stir until smooth. Place in the refrigerator for at least 1 hour- 2 hours.
  2. Chocolate mixture should be cold. Place in a mixing bowl and whip until the chocolate turns a light brown color. Whip for about 5 minutes on high. Pour into graham cracker crust.
  3. Top with marshmallow cream (though you may not need the entire tub). Top with chocolate pieces and graham crackers if you wish and line the outside with mini marshmallows.

Like this post? SHARE it!

Related Posts Plugin for WordPress, Blogger...

Homemade 3 Musketeers Bars

Oh man, I’m still on a sugar high from all of this week’s candybars. When you have bowls of fillings and melted chocolate in front of you, it’s impossible to resist. I’m just sayin’.

We’re going to go a bit lighter today on our candy bars and talk about how to make Homemade 3 Musketeers Bars. Once again, the simplicity of this recipe stunned me. There are once again just 3 ingredients in this one and it’s as simple as pie to make. Well, maybe not apple pie. It’s really not that easy to make apple pie from scratch is it?

I digress…

The main ingredient in the filling for these candybars is whipped cream. You don’t get much fluffier than that, huh. I think that’s why it’s so much lower in fat than most other candybars. It also explains it’s lighter than air texture.

You simply melt up 2 cups of chocolate chips. I used semi-sweet this time around, but I won’t be using those next time.

UPDATE- I tried the nougat part with milk chocolate and it made it WAY too runny, so I do not advise using the milk chocolate chips.

Anywho, melt those up in the microwave or double boiler (I prefer this method) and then give them a good whippin’ with your mixer. Beat in an 8 ounce container of cool whip just until combined and fluffy.

Pour into a lined square dish and freeze. The longer, the better. At least 30 minutes, but overnight is great!

Sorry this picture is so dark. I got these put together at night and the lighting was just horrible. But you get the idea don’t you?

Once frozen, cut it into bite-size squares and dip into your melted chocolate wafers. I used a fork to turn and coat them well. These were a little more difficult to work with than the Butterfingers. These didn’t turn out as pretty for me, but they were still tasty!

Recipe from Monster Mama.

Homemade 3 Musketeers Bars
Recipe Type: Dessert, Candy, Snack
Author: Adapted from Monster Mama
Ingredients
  • 2 c. Milk Chocolate Chips
  • 1 8 oz Tub Cool Whip (You can even use sugar-free or fat-free!)
  • 2 c. Chocolate Melting Wafers
Instructions
  1. Melt chocolate chips in microwave or using a double boiler (I use this method). If you do use the microwave, it’s best to melt them on 50% power in 30 second intervals, stirring between each spurt.
  2. Beat your melted chocolate chips with a mixer for about a minute. Add in the cool whip and beat just until combined and fluffy.
  3. Pour into a lined 8×8 baking dish and freeze for at least 30 minutes. The longer, the better!
  4. Take out and cut into bite-size squares.
  5. When frozen, melt chocolate wafers according the package directions and using a couple forks, roll the squares until coated. Place on a wax-paper lined baking sheet. Place in the freezer to set.

Like this post? SHARE it!

Related Posts Plugin for WordPress, Blogger...