Simple & Sweet Chili Mac

Simple and Sweet Chili Mac


In our penny-wise minds, there are few dishes that scream frugal more than macaroni and cheese. Don’t you agree? Some nights there just isn’t enough energy or even time to give to a full-on, oven-baked, gourmet dinner. And some nights you just bust out a box of the mac.

It’s ok. I promise, I do it too.

And if you aren’t one of us closet macaroni makers, then you are way ahead of the game and I need you to teach me your ways!

tradish_logo_300x300

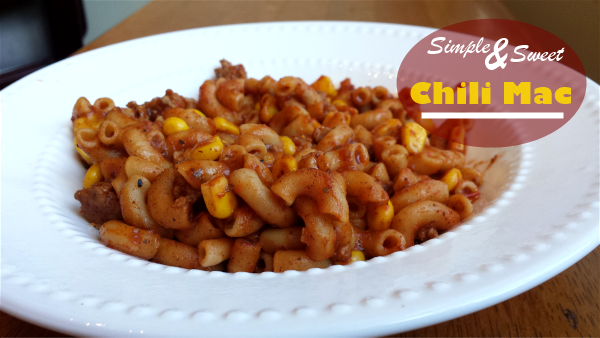
I’m a big fan of taking simple recipes and throwing in a little of this or a little of that to make them a little bit different. You can call me inventive if you’d like. One of my recent inventive meals was a little twist on Ragu’s Family Favorite Chili Mac. It honestly is already so yummy like it is, but a big favorite with my girls is corn sometimes in our chili so I thought why not add a little sweetness?

This entire recipe has only 5 ingredients and can be whipped up before you can say Bob’s your uncle.

Ragu Old World Sauce

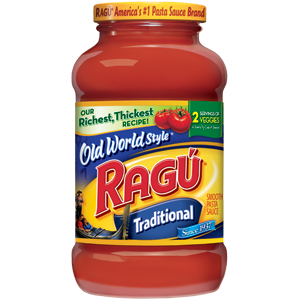
It’s really easy to use Ragu Old World Style Traditional Sauce to create the base for the mac. You simply season it to create whatever flavor you going for and in this case, it’s chili mac!

Each jar of Ragú® Old World Style® Traditional Sauce is made with 11 juicy tomatoes making it its richest,  thickest recipe. Ragú® has the Authentic Italian taste American family’s love and a variety of great tasting, quick and easy to make family favorite recipes.

Chili Mac 1


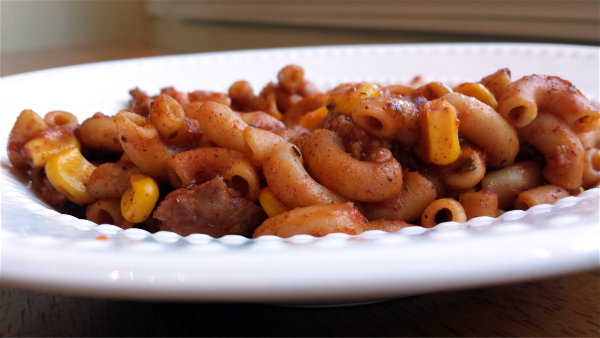
And of course if you aren’t a huge fan of corn in your chili then you can leave that out. But I really like the sweetness that it adds to the kick of the chili powder!

You can visit Ragu’s facebook for additional quick, easy and delicious recipe ideas too. And be sure to enter the Ragú Better and Better Sweepstakes for a chance to win great Authentic Italian themed prizes and a grand prize trip to Venice for a family of four!

Simple & Sweet Chili Mac
Recipe Type: Main Dish, Pasta
Cuisine: American
Author: Adapted from Ragu’s Recipe
As easy as macaroni and cheese, this chili mac takes the cake!
Ingredients
  • 1 lb lean ground turkey or beef
  • 1 jar (1 lb 8 oz) Ragu Old World Style Pasta Sauce
  • 1 and 1/2 tbsp chili powder
  • 8 oz elbow macaroni, cooked and drained
  • 1 can (15 oz) whole kernel corn, drained
Instructions
  1. Cook ground meat in a large skillet over medium-high heat until browned.
  2. Stir in pasta sauce and chili powder. Bring to a boil over high heat. Reduce heat and simmer about 10 minutes.
  3. Stir in macaroni and can of corn and heat through.
  4. Serve with shredded cheese and sour cream, if desired!

Abbreviated Sweepstakes Rules: NO PURCHASE NECESSARY.  Legal residents of the 50 United States (D.C.) 18 years and older.  Ends 5/6/14.  To enter and for Official Rules, including odds, alternate method of entry, and prize descriptions, visit www.RaguSweeps.com.  Void where prohibited.

This is a sponsored post written by me on behalf of Ragu brought to you by Yummly. All of the opinions expressed are 100% my own.


Like this post? SHARE it!

Related Posts Plugin for WordPress, Blogger...

Easy Spasagna

Spasagna

 It’s been an awfully crazy last few months here in the Pennywise Cook household. You may have noticed by my lack of posts. I’ll catch you up soon.

In the meantime, I have managed to create a really tasty spin on an original Ragu recipe that I wanted to share with you guys. I made a few changes to this recipe for Ragu No Boiling Lasagna that was a huge hit at our house. At one of our favorite restaurants around here, they have this dish that is a mix of lasagna and spaghetti and it is absolutely to die for. It has something to do with the way the noodles are mixed with the cheesy goodness that makes it so amazing.

You know me. I like a challenge.

Spasagna


If we’re being honest here, and I’m not ashamed of honesty, I kinda made it up as I went. And you never know if things like this will actually be edible so it was a 50/50 situation. This one made it in our Hall of Fame for yummy dishes!

Side story: As I’m preparing to take pictures of this tasty dish (and trying my darnedest not to eat it),  there wasn’t enough light inside so I took my Spasagna outside on the balcony to take pictures. My 2 year-old comes outside and shoots a very inquisitive look my way. Then in a very puzzled tone says, “Momma, why are you taking pictures of macaroni?”. I died laughing!

You know you’re a food blogger when….your 2 year-old asks why you’re taking pictures of macaroni! I won’t even get into the conversation I had with her informing her it wasn’t macaroni, but “spasagna”. Talk about a really confused toddler.

Ragu Tra-dish

 Back to the recipe! This one is SUPER easy. It uses Ragu Old World Style Traditional Sauce so you know it has to be simple. I love that stuff. I used the meat flavored kind since I didn’t plan to add any meat. Each jar of Ragú® Old World Style® Traditional Sauce is made with 11 juicy tomatoes making it its richest,  thickest recipe. It’s affordable (especially with coupons, y’all!), tastes great, and makes any recipe a breeze. Ragú® has the Authentic Italian taste American family’s love and a variety of great tasting, quick and easy to make family favorite recipes.

Besides that, there are just 4 other ingredients in this recipe. And it isn’t very time consuming either. That’s a big thing for us these days. My girls have no patience and neither do I!

Spasgna

You can visit Ragu’s facebook for additional quick, easy and delicious recipe ideas too. And be sure to enter the Ragú Better and Better Sweepstakes for a chance to win great Authentic Italian themed prizes and a grand prize trip to Venice for a family of four!

Easy Spasagna
Recipe Type: Main Dish
Author: Pennywise Cook
Spaghetti never tastes so much like lasagna! This twist on a traditional lasagna is an easy go-to meal for the family.
Ingredients
  • 1 package whole wheat spaghetti noodles
  • 1 jar Ragu Old World style Pasta sauce
  • 1 15 oz Ricotta Cheese
  • 1 and 1/2 c mozzarella cheese
  • 2 eggs
Instructions
  1. Preheat oven to 375°.
  2. Prepare 1 package whole wheat spaghetti noodles according to package directions.Be sure to season the water with a little salt before dropping your pasta!
  3. Once cooked, let cook in strainer.
  4. Meanwhile, in a large bowl, combine tub of ricotta cheese, 2 eggs, and 1 cup mozzarella cheese.
  5. Mix cheese mixture with cooled noodles and flatten into a greased baking dish.
  6. Sprinkle with 1/2 c. mozzarella cheese. Bake 10 minutes.
  7. Remove from oven and pour entire jar of Ragu over noodles. Bake an additional 10 minutes.
  8. Cut into squares and serve!
Notes
You can use regular noodles, but I prefer whole wheat for added nutrition!

Abbreviated Sweepstakes Rules: NO PURCHASE NECESSARY.  Legal residents of the 50 United States (D.C.) 18 years and older.  Ends 5/6/14.  To enter and for Official Rules, including odds, alternate method of entry, and prize descriptions, visit www.RaguSweeps.com.  Void where prohibited.

This is a sponsored post written by me on behalf of Ragu brought to you by Yummly. All of the opinions expressed are 100% my own.


Like this post? SHARE it!

Related Posts Plugin for WordPress, Blogger...

4-Ingredient Fudge Cookies

It has been cookie mania at my house for the last month or so. It could be that Christmas is coming up. It could be that we’ve had a lot of parties to make them for.

…Or it could just be that we really like cookies.

Whatever the case, we’ve made a LOT of cookies lately. One of my most favorite that I’ve made are these Fudge Cookies. Not only are they incredibly fudgy and tasty, but they are also super easy. Only 4 ingredients!

And here are Pennywise Cook, we really like recipes that call for little ingredients don’t we? That means that there is little moolah involved and that keeps smiles on our little cookie-making faces. I think I spent about $2.50 to make these because I already had eggs and oil on-hand.

Fudge Cookies 4


The dough is made from devil’s food cake mix, 2 eggs, 1/2 cup oil, and 1 cup of chocolate chips. After mixing all the ingredients together it becomes very thick and easy to roll into balls. So when you’re making these, don’t be concerned when your mixer starts to slow down and the mixture is very thick.

The stiffer that the dough, the better!

Fudge Cookies 3

Hey, who knows. Santa may just like to have these Fudge Cookies this year.

I can tell you that this Santa is making Rice Krispie Treats this year, because this Santa may just be cookied out! 😉

4-Ingredient Fudge Cookies
Recipe Type: Cookies, Dessert
Author: The 4-Ingredient Cookbook
Homemade cookies don’t have to be hard! These fudge cookies are simple and taste great!
Ingredients
  • 1 pkg devil’s food cake mix
  • 2 eggs
  • 1/2 c. oil
  • 1 c. semi-sweet chocolate chips
Instructions
  1. Preheat oven to 350°.
  2. Mix Cake mix, eggs, and oil until combined. Stir in chocolate chips. Mixture will be stiff.
  3. Shape dough into small balls and place 2 inches apart on a cookie sheet.
  4. Bake 10-12 minutes. Let cool on a wire cooling rack.


Like this post? SHARE it!

Related Posts Plugin for WordPress, Blogger...

P.F. Chang’s For The Holidays

This is a Sponsored post written by me on behalf of P.F. Changs for SocialSpark. All opinions are 100% mine.

 photo 542c2e8c-e075-468c-9373-d329061a09a1_zps72d91a85.jpg

How many times is it date night and you have absolutely no idea where to go? For us, it’s many. And no matter how many times we have gone on a date, there is always the conversation that goes a little something like this:

Says the hubby, “So where would you like to go?”

Myself in reply, “I don’t care, wherever you would like to go”.

And then just imagine that very conversation happening in repeat for about 20 times. It wouldn’t be date night without  the endless cycle of no one making a choice!

If you’re ever in the same boat, especially this holiday season, you might want to check out P.F. Chang’s! Not only do they have their incredibly famous lettuce wraps (yum!), but did you realize they have some awesome desserts and holiday drinks, too? The picture above is over their new Peppermint Mocha Cappucino and Vanilla Bean Milkshake. Oh heavens they look amazing!

 photo d3f7af4a-3858-4175-a9d5-7e42e8ad35ae_zps70fdfd3f.jpg

Or check out these handmade Sweet Vanilla Cheese Wontons! Woah. They also offer Chocolate Raspnerry Wontons as well. You know, in case you’re a chocolate fan. Who isn’t?

I’ve always considered P.F. Chang’s for the lettuce wraps and Asian-American inspired dishes, but seeing these desserts gets my sweet tooth excited!

Have a date night planned or just want to take a break from holiday cooking? You might just check out P.F. Chang’s and their new fall menu and holiday items. You can Follow @pfchangs and also Follow P.F. Chang’s on Pinterest to keep up to date with them!

So which new menu item are you most excited about trying? Leave me a comment!

Visit Sponsor's Site


Like this post? SHARE it!

Related Posts Plugin for WordPress, Blogger...

DIY Personalized Gift Mugs

DIY Gift Mugs

Have you finished all your Christmas shopping yet? No? Shame on you! HA!

Totally just kidding you. I haven’t gotten anywhere close. This year has been a whirlwind and I’ve felt about a month behind each holiday as they come. So if you’re like me, then you’ll really enjoy this last-minute gift idea that takes no time at all and comes straight from your heart.

I can’t take the credit for this one, I came across it the other day at Happy Go Lucky and thought I have got to do this! I had seen the idea of it on Pinterest before, but wasn’t sure that it worked. So I was glad to have found proof that it does.

DIY Mugs Before


To try this out for myself, I didn’t want to spend a bundle on mugs. Even Dollar Tree is a bit expensive per mug for me. So I ran into Goodwill where there were a ton of white mugs. Whodathunkit? It was meant to be! $.49 per mug and you just can’t beat that, even with a stick.

It’s as simple as using a permanent marker to write, draw, or color on your mugs and then pop them into a preheated oven for 30 minutes. That’s 350° in the oven to be exact. When they come out, the marker has been baked, sealing it to the mug!

UPDATE PLEASE READ: I mentioned this in the comments, but DO NOT PUT THESE IN THE DISHWASHER. Using regular sharpies, it will come off. Hand washing is fine. When I gave these out, I wrote a little poem to go with that said please hand wash. I know many of you have had issues with this.

DIY Mugs After


So easy and yet so thoughtful. Even the kiddos can make their own. Get creative and have fun! You can make these for any occasion as well. Add a heart for Valentine’s Day or an egg for Easter. Whatever suits your fancy.

In the meantime, Merry Christmas!

Once again: do not put these through the dishwasher unless you use a more permanent type of marker made for ceramic. The Sharpie works fine if hand washed.


Like this post? SHARE it!

Related Posts Plugin for WordPress, Blogger...

Triple Thick Banana Cranberry Smoothie

This is a Sponsored post written by me on behalf of Carton Smart for SocialSpark. All opinions are 100% mine.

One of the forgotten ingredients around the holidays that can tend to get a bad rep is of course, the cranberry sauce. Typically at the family gatherings that I attend, someone always buys it "just in case" and then it never makes it to the table. However, this all changed last year when my oldest realized that she is in love with such cranberry sauce.

Now it is simply a requirement. 

Don't get me wrong, I like cranberry sauce. I'll even eat the kind out of the can. Although sometimes it can have a tinny taste to it depending on the brand. I got to try out some pretty cool products from Tetra Pak that are packaged in cartons, not cans! How perfect is that? No tinny taste and not only that, but they use 1/3 less packaging compared to cans.

 photo 62adf36b-e1dc-4d93-98c1-aa80d97a468d_zps600d562e.jpg

Tetra Pak doesn't just package cranberry sauce either. You can find a variety of products for making your upcoming holiday meals!

 photo 1898ca76-3272-4baf-a8df-07abf60e15e3_zps1bf425e9.jpg

The products that I got to try out seemed so much more compact in their little cartons. I love the fact that they make less waste than your regular everyday food packaging.

 photo d1d52bb8-c150-4f19-9a7c-b8c9ab3c8df3_zpsac6b75dd.jpg

 photo 795e421d-1ec8-414e-b1b8-dde8f5f23ded_zps62983f0a.jpg

Here are the beauties I got to try out. Look at that cranberry sauce. You can even enjoy a different shape than the famous can circle when you get it from a carton.

I think what I loved most about the carton was how easy it was to open

I used some of my cranberry sauce to surprise my daughter with as an afterschool snack. We found out that my youngest is also a very big fan of cranberry sauce now too. Had to break up a sibling fight over it!

How can you be Carton Smart this holiday season? Well, you could make something up like I did! I some of the cranberry sauce to whip up a quick smoothie for my hubby while he was working. You know me and my experimentations. I threw this together in about 5 minutes and it was really good! A great way to use up leftoever cranberry sauce if you ever need to. 

Triple Thick Banana Cranberry Smoothie

Ingredients

1 whole banana, frozen
1/4 c. cranberry sauce
1/4 c. water

Directions

Blend all ingredients in a blender until smooth. Viola! 

In the meantime, you should Become Carton Smart and check out the other products that you can get in a carton. It makes a difference, it really does!

You can also follow them here:

Tweet @CartonSmart and Follow #CartonSmart on Pinterest

Visit Sponsor's Site


Like this post? SHARE it!

Related Posts Plugin for WordPress, Blogger...

Candy Cane Brownies

Candy Cane Brownies 1

The following post is brought to you by McCormick! All opinions expressed are 100% mine.

Christmas reminds me of so many things. The birth of Jesus Christ, Santa, presents, stockings, family, and so much more. And I can almost taste the flavors of Christmas when I start to imagine it each year. You have your cinnamon and apple, gingersnaps, chocolate from Santa’s chocolate chip cookies, and then there’s peppermint.

It’s not Christmas until I’ve seen a candy cane y’all!

I’ve never been a diehard peppermint fan. I wouldn’t even say that I eat even 1 candy cane per Christmas season. But I will say that when you have severe coffee breathe, peppermints are your best friend!

I am a fan of peppermint ice cream, peppermint and white chocolate, and any other creamy combination like those. I just love how it can be complemented by something that will take it’s sting away a little. You know what I’m talking about?

Last Christmas, I made homemade peppermint marshmallows. They were soooo good! I used extract to give it the flavor so no crunching from the peppermints was necessary.

Candy Cane Brownies 3

McCormick makes a good pure peppermint extract perfect for capturing that Christmas flavor this year. I cannot WAIT to share this next recipe with you. It is one of those recipes that your friends and family will probably request that you make for them over and over every year.

I’ve only made it once and it has already been requested a second time!

Let me start off by saying that I saw a picture of these taken by the talented folks at McCormick and I thought wow those look tasty. Mine will never look like that, but maybe they’ll at least taste like them! You know those recipes that are impossible to actually make look as appealing as they do in the original presentations. Well, I can attest that these will look very close to the original if you follow all the directions correctly! You’ll be famous for these!

Candy Cane Brownies 2

And trust me, they aren’t as difficult to make as they look. They take a little bit of time, but you can just catch-up on your face book or watch a Christmas movie while you’re slaving away.

Candy Cane Brownies
Recipe Type: Dessert, Treat
Author: McCormick
Ingredients
  • 1 pkg (family size) Fudge Brownie Mix
  • 2 and ½ c Powdered Sugar
  • ½ c butter (1 stick) + 7 tbsp, divided
  • 1 and ½ tbsp heavy cream
  • 1 tsp McCormick Pure Peppermint Extract
  • 12 oz Semi-Sweet Baking Chocolate (I used choco chips)
  • Crushed Peppermint Candies, optional
Instructions
  1. Preheat oven to 350°. Prepare brownie mix as directed on package. Spread into greased foil-lined 15x10x1 dish. (I used a 9×13 pan)
  2. Bake 15 min or until a toothpick comes out clean. (I baked mine for more like 26 minutes.) Cool on wire rack.
  3. Meanwhile, beat powdered sugar, 7 tbsp butter (melted), cream, and peppermint extract in a large bowl on medium speed until well-blended. (this mixture will be extremely thick, sorta like a peppermint patty middle) Spread evenly over cooled brownies. (You might need to use your hands to press it down evenly among the brownies. I also had to take a little from thicker spots and add it to the thinner places) Refrigerate for 30 minutes.
  4. Microwave chocolate and remaining ½ c butter (melted) in a large microwave safe bowl on HIGH for 2 minutes or until the butter is melted. (You may need to adjust the time depending on your microwave) Stir until the chocolate is completely melted. Spread over chilled brownies. Sprinkle with crushed peppermint candy, if desired. (I refrigerated mine again at this point to harden the ganache on top)
  5. Cut into 36 squares and serve!

You can find the original recipe where they like to call these Peppermint Bars over at McCormick!


Like this post? SHARE it!

Related Posts Plugin for WordPress, Blogger...

Free LEGO Minifig Holiday Card

This post brought to you by LEGO. All opinions are 100% mine.

Each year there are tons of cute little ways to personal holiday cards over the web. I'm sure you've seen the Elf Yourself thing that goes around each year. I still have our previous years saved and I watch them every now and then. I get a big giggle out of seeing a video of my 2 year old dressed in an elf suit and break dancing like a hip hop star.

Here's a new idea that was very timely this year. Addie has discovered that she loves LEGOs as of recently. We have even been going to LEGO club at our local library. I always expected LEGOs to be a boy thing, but Addie has proved that to be untrue. She absolutely loves creating little scenes with LEGOs. 

I came across this holiday card offer where you can make your very own family into a LEGO family and then send it around all of your social media pages to share with family and friends. I had a blast creating ours. You can choose everything from skin color to facial expressions and even the outfit. I played around with the facial expressions a bit until I found the ones just right for each of us. 

What do you think of my card? Pretty cute huh? The best part is that it's FREE!

You can head over and make your own LEGO Minifigure Family and share it with your friends and family this Christmas!


Visit Sponsor's Site


Like this post? SHARE it!

Related Posts Plugin for WordPress, Blogger...

Krispy Oreo Cookie Balls


I remember the very Christmas that I was introduced to what was called “Oreo Balls”. The most wonderful and decadent morsels made of crushed Oreo cookies and cream cheese all contained within a crust of white chocolate.

It does not get any better than that.

I must have made them 5 times that Christmas for different functions. And they have become a go-to treat ever since. While some desserts and treats can end up so stressful over the holidays, it’s always nice to have something like these Oreo Cookie Balls to fall back on since they are so easy! And not to mention that they taste amazing.

The best part is that you can practically make them festive for any holiday. Christmas is especially fun because they easily look like little snowman heads. Or simply add some red or green glitz and glam with sprinkles while they are still wet. Put them on a stick or serve them in a bowl!

You can find some super fun ideas for creating your own festive Oreo Cookie Balls HERE. There’s everything from penguins to Nutter Butter Cookie Ball ideas there. I also think that the pretzel idea for reindeer antlers is genius! You can also follow @Oreo on twitter for more cookie ball inspiration.

I made this last batch a little more on the simple side when it came to decoration. My coloring didn’t exactly work out for turning red, so I settled on pink which didn’t really matter because they were just going to get eaten anyways.

The biggest change that I made this time around was a complete experiment. I attempted to merge 2 of my favorite treats into one: Oreo Balls and Rice Krispy Treats. I decided to make them both as normal and then simply stir them together and finish off the cookie ball recipe as normal. Hence the name Krispy Oreo Cookie Balls. While the first day that I made them they were Krispy, I must confess that they lost that “krispiness” after the next day or so. That cereal tends to become soggy after a while so it didn’t surprise me. But I will say that I liked the way that the Rice Krispy Treat made the Oreo Balls lighter and not as rich. I also used Almond Bark instead of regular semi-sweet chocolate chips.

We enjoyed them!

Pure bliss in every bite. They are addicting and sure to be a hit at any holiday gathering! I’ll give you the original recipe and also the recipe that I made in case you want to try it out.

Original Oreo Cookie Balls
Ingredients
  • 1 pkg (8 oz) Cream cheese, softened
  • 36 Oreos, finely crushed (about 3 cups)
  • 4 pkgs (4 oz) semi-sweet baking chocolate, melted
Instructions
  1. Mix cream cheese and cookie crumbs until blended.
  2. Shape into 48 (1-inch) balls. Freeze 10 min. Dip balls into melted chocolate; place in a single layer on a pan covered in wax paper.
  3. Customize how you’d like!
  4. Refrigerate an hour or so until set.
  5. Enjoy!


Krispy Oreo Cookie Balls

1 pkg (8oz) cream cheese, softened
36 Oreos finely crushed (about 3 cups)
1 pkg Almond Bark, Melted

Mix cream cheese and cookie crumbs until blended.
Meanwhile heat 3 tbsp milk in a sauce pan over low heat. Add 10 oz bag mini marshmallows and stir until melted.
In a large bowl, add 6 cups Rice Krispies to melted marshmallows. Combine well.
Stir together Rice Krispies Mixture with Oreo Mixture until well-combined.
Shape into 48 (1-inch) balls. Freeze 10 min. Dip balls into melted almond bark; place in a single layer on a pan covered in wax paper.
Customize how you’d like!
Refrigerate an hour or so until set.
Enjoy!

This is a sponsored post written by me, made possible by Yummly, on behalf of Oreo. All opinions expressed are 100% my own. For more information, review my disclosure policy.


Like this post? SHARE it!

Related Posts Plugin for WordPress, Blogger...

Easy Homemade Croutons

Happy Veteran’s Day! I am so very thankful for the men and women who served our country to give us our freedom. I don’t think that we show this enough all year. It’s a huge sacrifice to put your life on the line for people all around the country that you don’t even know and I am eternally grateful for those who have done so!

I’m a bit of a crazy salad person. I have been ever since high school. I love the crunch of crisp lettuce mixed with creamy dressing and other tasty components that go along with a salad. When we’re picking out a place to eat, my daughter will judge if I will like a restaurant by if they serve salad or not. And then she’ll say “Mom, you’ll love this place. They have salad!”. Thanks darling…

While I do like my salad, I also really like croutons. Like, really really like croutons. They are kinda like potato chips to me. Once I start, I can’t stop.

Do you have kiddos who don’t like the crust on their sandwiches? Or perhaps you make things that require you to cut off the crusts.

For instance:
Grilled Cheese Rollups
3-Ingredient Lady Fingers
White Bread Cinnamon Rolls

It’s recycling in a way. You can even freeze the crusts and make croutons later if you don’t have time right away. Just thaw them out before preparing to make croutons. How awesome is that?

Try to line them up and then just cut them into smaller pieces like above. They already look just like croutons don’t they? And in minutes they will be! Preheat the oven to 400°.

Spread them quite evenly onto a cookie sheet. Spray them well with olive oil cooking spray or butter cooking spray like me. Sprinkle with seasonings of your choice. I used italian seasoning and garlic powder.

Bake for about 4-8 minutes depending on your oven and you’re done. Store them in an airtight container and pop them out when you’re ready to eat a salad.

Or just eat handfuls of croutons…

….I don’t do that.

…Ok, maybe I do. Don’t judge.

Easy Homemade Croutons
Recipe Type: Salad Topping, Snack
Author: Pennywise Cook
Prep time:
Cook time:
Total time:
Here’s a double duty tip when you have leftover bread crusts. Make up a batch of healthy and homemade croutons!
Ingredients
  • Crusts cut off the bread of your choice
  • Seasonings of your choice (1 tsp italian seasoning and 1/2 tsp garlic powder are great!)
  • Cooking Spray
Instructions
  1. Preheat oven to 400°.
  2. Cut crusts into smaller square pieces or desired size.
  3. Spread evenly onto a cookie sheet.
  4. Sprinkle with seasonings.
  5. Bake for 4-8 minutes watching during baking to make sure they don’t burn. Mine took about 8 minutes.


Like this post? SHARE it!

Related Posts Plugin for WordPress, Blogger...