Mini Thin Crust Pizzas

Mini Pizzas 9

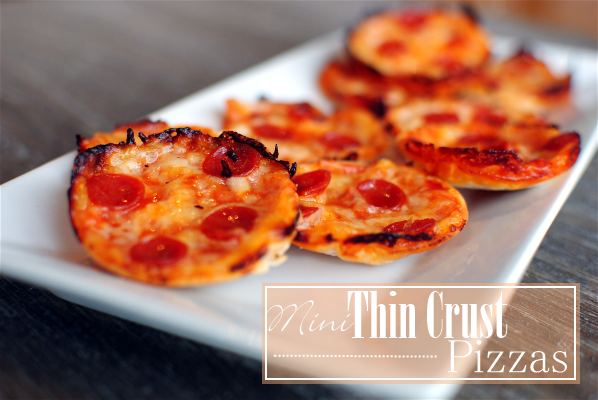
 A little over a year ago, I did a post on an Affordable Mickey Party. It was very popular post, but the most popular thing inside that post was the “Minnie” Pizzas that I did. When I was making them, I had no idea how tasty they would end up and since then they have become one of my family’s favorite appetizers. 

And after a year, it’s about time that I shared it with you, right?

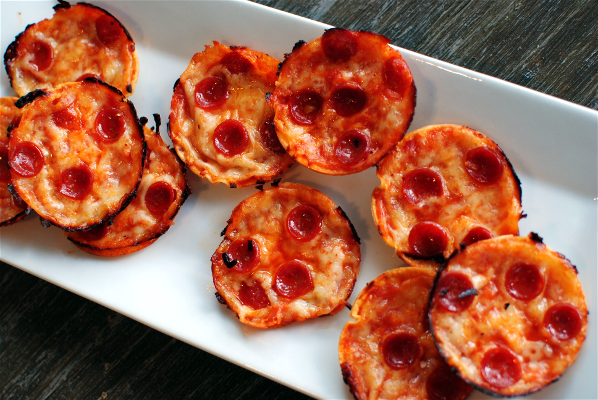
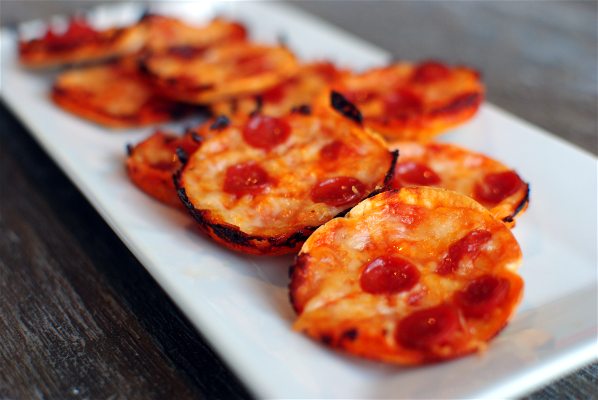
My oldest wanted to help out and she made such a fantastic little cooking assistant and picture model! She had a lot of fun helping me whip these up for lunch today. And of all 24 of these, only 4 were left. 

I don’t expect those to make it to the evening…

Mini Pizzas 8

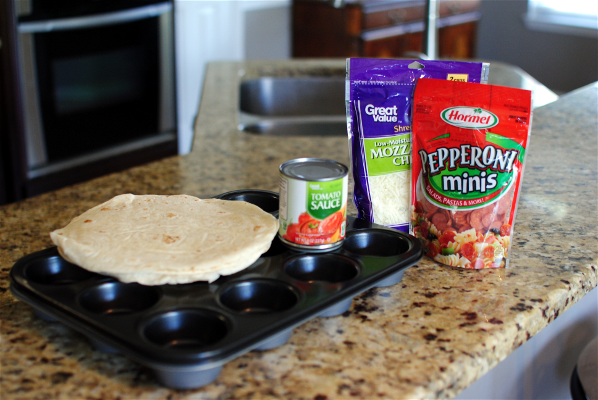
 This is what you’ll need for these. Off brand, on brand, whatever you can find on sale will work. You will need two muffin tins or you can make a pan at a time.

Mini Pizzas 7

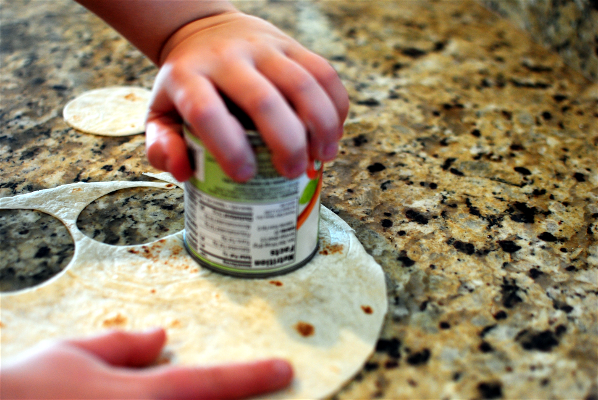
 Start by using your tomato sauce can to cut out the perfect size circles for these. Remember, you’ll need 24 circles in all. And if your can isn’t doing the job, grab a similar size cookie cutter.

Mini Pizzas 6

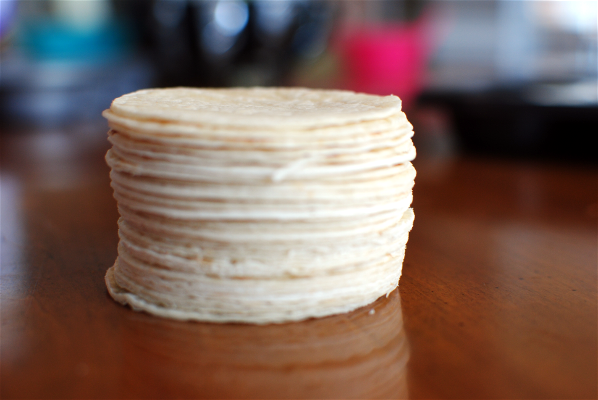
 My OCD enjoyed lining these up. And then of course, I had to take a pic.

Mini Pizzas 5

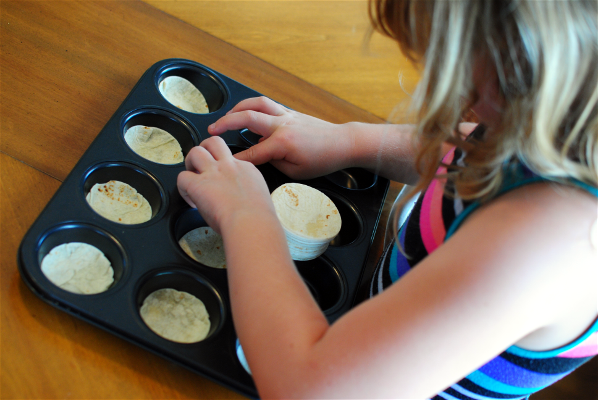
 Then push each little circle into the bottom of the muffin tin. My lovely assistant did a fabulous job at this!

Mini Pizzas 4

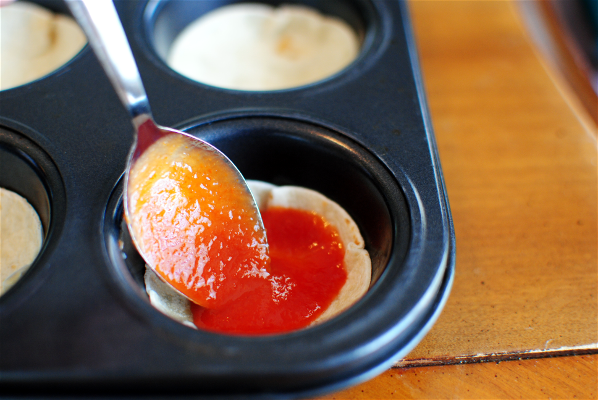
 On each little crust, drop about a teaspoon of tomato sauce on top. Spread it out a little.

Mini Pizzas 3

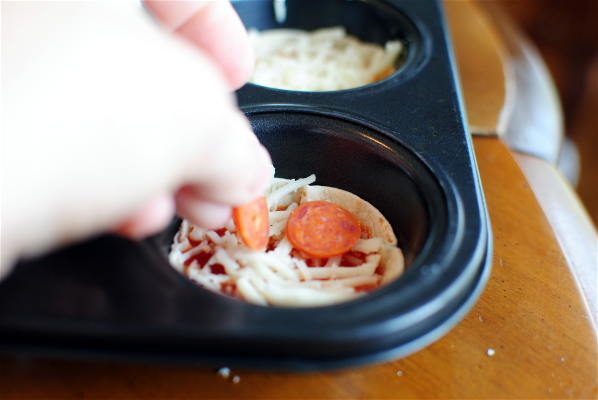
 Top that with a tablespoon of cheese and then some mini pepperoni.

Mini Pizzas 2

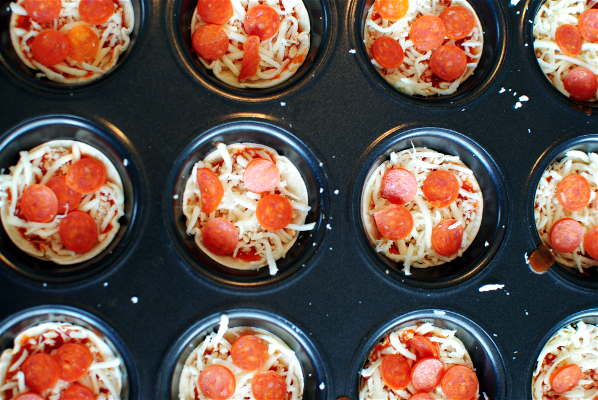
 MMmmmmmm, MMMmmmmmmm. They are ready for the oven! 

The waiting is the hardest part.

Mini Pizzas

Mini Thin Crust Pizzas
Serves 4
A simple way to present pizza as finger food!
Write a review
Print
Prep Time
10 min
Cook Time
15 min
Total Time
25 min
Prep Time
10 min
Cook Time
15 min
Total Time
25 min
Ingredients
  1. 5-6 flour tortillas
  2. 1 8 oz can tomato sauce
  3. 1 and 1/2 c shredded mozzarella cheese
  4. 1 pkg mini pepperoni
Instructions
  1. Preheat oven to 350°.
  2. Using the edge of the tomato sauce can, cut out 24 circles for the crusts.
  3. Push them into the bottoms of 2 muffins tins making slightly curved.
  4. Drop about 1 tsp of tomato sauce onto each mini crust.
  5. Sprinkle 1 tbsp of mozzarella cheese on top of each crust.
  6. Place 4-5 mini pepperoni onto each crust.
  7. Place in oven and bake for 10-15 minutes depending on your oven. (See notes)
Notes
  1. The sauce can doesn't always cut it. (pun intended) You can always use a similar sized cookie cutter instead.
  2. When baking, I found that the crunchier they are the better. They are easier to get out and are easier for handling as appetizers. I had to cook mine close to 15 or 18 minutes to get them completely done. Though your oven may take less time, be sure to watch them after 10-12 minutes. The cheese may seem completely melted, but the crust may not be done.
Pennywise Cook http://www.pennywisecook.com/

Like this post? SHARE it!

Related Posts Plugin for WordPress, Blogger...

Triple Thick Banana Cranberry Smoothie

This is a Sponsored post written by me on behalf of Carton Smart for SocialSpark. All opinions are 100% mine.

One of the forgotten ingredients around the holidays that can tend to get a bad rep is of course, the cranberry sauce. Typically at the family gatherings that I attend, someone always buys it "just in case" and then it never makes it to the table. However, this all changed last year when my oldest realized that she is in love with such cranberry sauce.

Now it is simply a requirement. 

Don't get me wrong, I like cranberry sauce. I'll even eat the kind out of the can. Although sometimes it can have a tinny taste to it depending on the brand. I got to try out some pretty cool products from Tetra Pak that are packaged in cartons, not cans! How perfect is that? No tinny taste and not only that, but they use 1/3 less packaging compared to cans.

 photo 62adf36b-e1dc-4d93-98c1-aa80d97a468d_zps600d562e.jpg

Tetra Pak doesn't just package cranberry sauce either. You can find a variety of products for making your upcoming holiday meals!

 photo 1898ca76-3272-4baf-a8df-07abf60e15e3_zps1bf425e9.jpg

The products that I got to try out seemed so much more compact in their little cartons. I love the fact that they make less waste than your regular everyday food packaging.

 photo d1d52bb8-c150-4f19-9a7c-b8c9ab3c8df3_zpsac6b75dd.jpg

 photo 795e421d-1ec8-414e-b1b8-dde8f5f23ded_zps62983f0a.jpg

Here are the beauties I got to try out. Look at that cranberry sauce. You can even enjoy a different shape than the famous can circle when you get it from a carton.

I think what I loved most about the carton was how easy it was to open

I used some of my cranberry sauce to surprise my daughter with as an afterschool snack. We found out that my youngest is also a very big fan of cranberry sauce now too. Had to break up a sibling fight over it!

How can you be Carton Smart this holiday season? Well, you could make something up like I did! I some of the cranberry sauce to whip up a quick smoothie for my hubby while he was working. You know me and my experimentations. I threw this together in about 5 minutes and it was really good! A great way to use up leftoever cranberry sauce if you ever need to. 

Triple Thick Banana Cranberry Smoothie

Ingredients

1 whole banana, frozen
1/4 c. cranberry sauce
1/4 c. water

Directions

Blend all ingredients in a blender until smooth. Viola! 

In the meantime, you should Become Carton Smart and check out the other products that you can get in a carton. It makes a difference, it really does!

You can also follow them here:

Tweet @CartonSmart and Follow #CartonSmart on Pinterest

Visit Sponsor's Site


Like this post? SHARE it!

Related Posts Plugin for WordPress, Blogger...

Krispy Oreo Cookie Balls


I remember the very Christmas that I was introduced to what was called “Oreo Balls”. The most wonderful and decadent morsels made of crushed Oreo cookies and cream cheese all contained within a crust of white chocolate.

It does not get any better than that.

I must have made them 5 times that Christmas for different functions. And they have become a go-to treat ever since. While some desserts and treats can end up so stressful over the holidays, it’s always nice to have something like these Oreo Cookie Balls to fall back on since they are so easy! And not to mention that they taste amazing.

The best part is that you can practically make them festive for any holiday. Christmas is especially fun because they easily look like little snowman heads. Or simply add some red or green glitz and glam with sprinkles while they are still wet. Put them on a stick or serve them in a bowl!

You can find some super fun ideas for creating your own festive Oreo Cookie Balls HERE. There’s everything from penguins to Nutter Butter Cookie Ball ideas there. I also think that the pretzel idea for reindeer antlers is genius! You can also follow @Oreo on twitter for more cookie ball inspiration.

I made this last batch a little more on the simple side when it came to decoration. My coloring didn’t exactly work out for turning red, so I settled on pink which didn’t really matter because they were just going to get eaten anyways.

The biggest change that I made this time around was a complete experiment. I attempted to merge 2 of my favorite treats into one: Oreo Balls and Rice Krispy Treats. I decided to make them both as normal and then simply stir them together and finish off the cookie ball recipe as normal. Hence the name Krispy Oreo Cookie Balls. While the first day that I made them they were Krispy, I must confess that they lost that “krispiness” after the next day or so. That cereal tends to become soggy after a while so it didn’t surprise me. But I will say that I liked the way that the Rice Krispy Treat made the Oreo Balls lighter and not as rich. I also used Almond Bark instead of regular semi-sweet chocolate chips.

We enjoyed them!

Pure bliss in every bite. They are addicting and sure to be a hit at any holiday gathering! I’ll give you the original recipe and also the recipe that I made in case you want to try it out.

Original Oreo Cookie Balls
Ingredients
  • 1 pkg (8 oz) Cream cheese, softened
  • 36 Oreos, finely crushed (about 3 cups)
  • 4 pkgs (4 oz) semi-sweet baking chocolate, melted
Instructions
  1. Mix cream cheese and cookie crumbs until blended.
  2. Shape into 48 (1-inch) balls. Freeze 10 min. Dip balls into melted chocolate; place in a single layer on a pan covered in wax paper.
  3. Customize how you’d like!
  4. Refrigerate an hour or so until set.
  5. Enjoy!


Krispy Oreo Cookie Balls

1 pkg (8oz) cream cheese, softened
36 Oreos finely crushed (about 3 cups)
1 pkg Almond Bark, Melted

Mix cream cheese and cookie crumbs until blended.
Meanwhile heat 3 tbsp milk in a sauce pan over low heat. Add 10 oz bag mini marshmallows and stir until melted.
In a large bowl, add 6 cups Rice Krispies to melted marshmallows. Combine well.
Stir together Rice Krispies Mixture with Oreo Mixture until well-combined.
Shape into 48 (1-inch) balls. Freeze 10 min. Dip balls into melted almond bark; place in a single layer on a pan covered in wax paper.
Customize how you’d like!
Refrigerate an hour or so until set.
Enjoy!

This is a sponsored post written by me, made possible by Yummly, on behalf of Oreo. All opinions expressed are 100% my own. For more information, review my disclosure policy.


Like this post? SHARE it!

Related Posts Plugin for WordPress, Blogger...

Easy Homemade Croutons

Happy Veteran’s Day! I am so very thankful for the men and women who served our country to give us our freedom. I don’t think that we show this enough all year. It’s a huge sacrifice to put your life on the line for people all around the country that you don’t even know and I am eternally grateful for those who have done so!

I’m a bit of a crazy salad person. I have been ever since high school. I love the crunch of crisp lettuce mixed with creamy dressing and other tasty components that go along with a salad. When we’re picking out a place to eat, my daughter will judge if I will like a restaurant by if they serve salad or not. And then she’ll say “Mom, you’ll love this place. They have salad!”. Thanks darling…

While I do like my salad, I also really like croutons. Like, really really like croutons. They are kinda like potato chips to me. Once I start, I can’t stop.

Do you have kiddos who don’t like the crust on their sandwiches? Or perhaps you make things that require you to cut off the crusts.

For instance:
Grilled Cheese Rollups
3-Ingredient Lady Fingers
White Bread Cinnamon Rolls

It’s recycling in a way. You can even freeze the crusts and make croutons later if you don’t have time right away. Just thaw them out before preparing to make croutons. How awesome is that?

Try to line them up and then just cut them into smaller pieces like above. They already look just like croutons don’t they? And in minutes they will be! Preheat the oven to 400°.

Spread them quite evenly onto a cookie sheet. Spray them well with olive oil cooking spray or butter cooking spray like me. Sprinkle with seasonings of your choice. I used italian seasoning and garlic powder.

Bake for about 4-8 minutes depending on your oven and you’re done. Store them in an airtight container and pop them out when you’re ready to eat a salad.

Or just eat handfuls of croutons…

….I don’t do that.

…Ok, maybe I do. Don’t judge.

Easy Homemade Croutons
Recipe Type: Salad Topping, Snack
Author: Pennywise Cook
Prep time:
Cook time:
Total time:
Here’s a double duty tip when you have leftover bread crusts. Make up a batch of healthy and homemade croutons!
Ingredients
  • Crusts cut off the bread of your choice
  • Seasonings of your choice (1 tsp italian seasoning and 1/2 tsp garlic powder are great!)
  • Cooking Spray
Instructions
  1. Preheat oven to 400°.
  2. Cut crusts into smaller square pieces or desired size.
  3. Spread evenly onto a cookie sheet.
  4. Sprinkle with seasonings.
  5. Bake for 4-8 minutes watching during baking to make sure they don’t burn. Mine took about 8 minutes.


Like this post? SHARE it!

Related Posts Plugin for WordPress, Blogger...

Ideas for the Lunchbox: Grilled Cheese Rollups

The budget cuts aren’t just for the US government these days. Here at our house, we’re working on a new budget with the intent to save as much as humanly possible! I’ve always considered us a money-minded and frugal family, but we are working to try and be even more watchful about unnecessary spending.

Man, I really do sound like the US government now.

What is more frugal than a grilled cheese sandwich? Hmmm, I wonder if grilled cheese could be the answer to the US’s debt crisis?! Maybe if all the lawmakers up in Washington would agree to eat them, then we could start saving some REAL money around here. They could put them in their lunchboxes. Now THAT would be a sight!

I saw this idea over at Chin Deep as I was preparing some ideas for Addie’s lunchbox. I can’t claim I came up with these gems, but I knew I had to make them as she has recently found a deep love for grilled cheese. She gets that from her father. I hated them as a kid!

It all starts with some plain and simple sandwich bread. Whatever you can find or afford. Cut off all of the crust leaving as much of the meat of the bread as you can. You’ll also need the sliced cheese of your choice. I cut mine in half and then cut those halves 2 more times to equal about 8 small pieces from each slice.

It’s a pretty simple process. I spared you most of the step by step pictures as to not insult your intelligence. Place a piece of cheese on the very end. Roll. Add another little piece. Roll. And continue in this manner until you’ve come to the end of the bread. I used about 4 pieces for each of mine. Yours may differ depending on the size of your bread.

You can use a little bit of water on the end to help attach it and close it up for frying.

Heat up 2 tbsp of butter over medium heat.

This is where things get hot. The butter absorbs, the cheese melts, and the bread browns! It’s heavenly. It’s around 2 minutes or less on each side. You’ll just need to watch it and determine your favorite color of brown. 🙂

As a side note: you may need more butter depending on how many of these you are planning to make. The butter does absorb pretty quick so it’s possible you’ll have to refill a few times.

Voila! These are so simple and tasty. They would be great for eating with my Homemade Tomato Soup! These would also make a great finger food for a kid’s party.

UPDATE: After seeing how these fared in her lunchbox, we have decided that putting them in the microwave for a few seconds before placing them in the lunchbox helps. My Addie doesn’t prefer them to be cold, but room temp is fine. We’re going to keep trying and figure out a way to make them work. And if you have any ideas, they are surely welcome!

Ideas for the Lunchbox: Grilled Cheese Rollups

Recipe Type: Snack, Lunchbox

Cuisine: American

Author: Adapted a little from Chin Deep

A new way to enjoy grilled cheese and the perfect idea for the lunchbox!

Ingredients

  • 6 pieces white bread
  • 3 pieces sliced cheese of your choice
  • 2 tbsp butter
  • Tomato soup or marina sauce for dipping (optional)

Instructions

  1. Remove the crusts from your bread leaving as much as you possibly can.
  2. Roll them flat with a rolling pin or with your preferred method of flattening.
  3. Cut your slices of cheese into smaller little slits. I was able to get about 8 out of each of my slices.
  4. Heat 2 tbsp butter in a skillet over medium heat.
  5. Layout your bread and place a piece of cheese longways on the edge of the bread. Roll inward. Place another piece of cheese and then roll inward again. Until you’ve come to the end of your bread. Using a little bit of water, try to crimp the end so it attaches and closes up the rollup. It doesn’t have to be perfect, it just helps the frying process.
  6. Place the rollups in the skillet and fry each side for about 2 minutes or until desired brownness.
  7. Let cool on paper towels and serve with tomato soup or marina sauce!


Like this post? SHARE it!

Related Posts Plugin for WordPress, Blogger...

2-Ingredient Pumpkin Muffins

Alright, fess up all you pumpkin junkies. I see you everywhere drinking your Starbucks Pumpkin Spice Lattes and  swirling your Pumpkin Spice coffee creamer and eating your Pumpkin Pie ice cream. We are only 9 days into the month of September and you’re  already in full swing.

If only seeing a pumpkin meant that the weather automatically got cooler!

Now, I think one of the smartest inventions was pumpkin in a can. Gone are the days of needing to cut open a pumpkin and scrape all of the insides to create a puree for recipes.

Your can of pumpkin is one of only TWO ingredients that you’ll need to make these Pumpkin Muffins!

I also wanted to mention, for you healthy folks like myself, there are only about 140 calories per muffin! Because you’re not adding a lot of extra calories with oil and eggs, these are actually pretty healthy!

The other ingredient is cake mix. Can you say cheap? I think I paid a total of $2.25 for these muffins. My kinda treat, cheap and sweet.

It takes a whirl in the mixer or about 50 strokes by hand to whip the muffin batter up.

Put your muffins in the oven!

These are probably some of the fluffiest most light and airy muffins that I make.

And heavens, if you crack one open when it’s still warm and slather it with butter, you will be in heaven y’all.

Pumpkin heaven…

Pumpkin or cinnamon cream cheese would be so incredible with these I’m sure. I enjoyed warming them up with butter and sprinkling a little cinnamon on them!

Though you don’t exactly need much instruction because these are so dang easy, here’s the recipe.

2-Ingredient Pumpkin Muffins
Recipe Type: Breakfast, Snack
2 simple ingredients come together to make the ultimate fall snack- Pumpkin Muffins.
Ingredients
  • 1 Box Yellow Cake Mix
  • 1 (standard) Can Pumpkin Puree
Instructions
  1. Preheat oven to 350°.
  2. Grease a couple muffin pans.
  3. Mix cake mix and pumpkin puree together.
  4. Fill muffin cup about 2/3 the way full. (Should make about 15 regular size muffins)
  5. Bake for 15-18 minutes.
  6. Allow to cool and eat!
Serving size: 1 Calories: 140
Notes

These would be super tasty with the addition of 1/2 cup chocolate chips!

Recipe courtesy of Melissa at This Girl’s Life Blog.


Like this post? SHARE it!

Related Posts Plugin for WordPress, Blogger...

Homemade Tortilla Chips: 3 Ways

First of all, just let me say HELLO THERE! I’ve been just a little preoccupied lately with some personal things and have neglected you. I know…bad blogger, bad. But I’m going to work real hard to make it up to you…I promise.

I thought I’d start this back-to-school season with a simple recipe for something that everyone likes, tortilla chips! The reason that I ever made these in the first place can be credited to my husband. Bless his heart, he almost never gets an urge to cook anything. So when he came to me and said he wanted to “cook up” some homemade tortilla chips, I was ON IT!

There could not be a simpler thing to make that tastes so very close to what you buy in the store. And they are so much cheaper this way as well. One big bag of corn tortillas will run you between $1- $2, but will make the equivalent to probably 2-3 bags of tortilla chips from the store.

Plus, YOU get to take the credit for calling them homemade!

Here are 3 different ways to make your crunchy corn tortilla beauties. I’ll tell you my favorite when we’re done…

As you can probably imagine, this is the quickest and easiest method for making your chips. No preheating, no baking sheet, no chips, and no oil. Are you paying attention? Of course you need chips, you silly head. Get it together!

Just making sure you’re paying attention…

You’re going to need to make these in batches, a tortilla or two at a time.

1) Cut the tortillas into desired chip size.

2) Place tortilla pieces evenly (not overlapping) on a large microwave-safe plate.

3) Heat 45 seconds. Remove and flip. Heat another 45 seconds.

4) Remove from microwave, salt (if desired) and let sit for a minute or two. They will crisp even more!

Voila! It’s simple. Each microwave is different, so your microwave may need less or perhaps more cooking time to get them just right. You want the chips to brown, but not burn so be sure to keep your eye on the batches as you make them.

Ok, I said I was going to wait until the end to tell you my favorite method, but I’m sure by now that you realize I have no patience. And if you didn’t know that, you do now! This was my favorite method. The perfect crispness with a light and airy feel. These taste most like what you buy at the store. To me anyways..

Let’s do this:

1) Preheat oven to 350°.

2) Cut your tortillas into desired size.

3) Place pieces evenly over baking sheet. No need to grease it.

4) Bake for 6-8 minutes. Flip chips over and bake for another 6-8 minutes until golden and crispy.

5) Remove from oven. Season and serve! They will crisp a little more as they cool.

Once again, you’ll want to be sure to keep an eye on them. If they are turning dark brown, they are close to burning. You want them golden, not brown.


The last method is from your skillet or fryer! This is still a really simple way to make them. It’s also fairly quick. It’s just not as healthy as the other methods. My husband liked these the best!

1) Cut tortillas into desired size pieces. Place a few paper towels on a large plate to dry the chips when they finish frying.

2) Pour enough oil of choice (I used vegetable oil) into skillet that it goes 2/3 the way to the top. You need enough for the chips to swim in. Heat to medium-high. I didn’t check the temperature of my oil, I just made sure that the oil bubbled when I placed my wooden spoon in it.

3) Place 4-5 chips at a time into the oil. You don’t want to overcrowd, so make sure they aren’t overlapping. Fry them for approximately 2 minutes flipping them over to brown both sides if desired. I did this at first, but got lazy and quit flipping eventually. The chips lived.

4) Place on paper towels and continue frying in batches.

Voila!

All of these methods can be adjusted based on your microwave, oven, and oil temperature. You may even come up with tricks and techniques to make them better. This is just a good starting point for making your own homemade tortilla chips.

Let me know what you think about these in the comments below! 🙂


Like this post? SHARE it!

Related Posts Plugin for WordPress, Blogger...

Affordable Mickey Mouse Party

My youngest turned 2 not too long ago and we decided on a Mickey theme for her party. It took me some time to figure out what theme to go with because she’s not at the age where she drools over certain characters and has a fit because she wants the latest and greatest of a certain toy collection. I’m thankful for that, but it created some difficulty when deciding on a party theme.

Then it hit me one morning…

She brought me the remote and said “turn on Mickey Mouse Howhouse” (That’s what she calls it). She does this almost every morning. How could I have not thought of this before? That’s all it took and I began to run with the theme idea. It’s the most fun I’ve  had planning a party in a while.

Sure, she may not remember any of it, but I’ll have pictures to remind her. 😉 I put the entire thing together on a budget. I’m almost always on a budget so most store-bought party items aren’t really an option. Plus, isn’t it always better to have one-of-a-kind things? I think so anyways.

I’ll share my ideas and give you a general idea of what I did. If there are more questions, I may end up doing separate posts for those items. Here we go!

These super simple tissue pom poms cost me a whopping $3! I bought each color separately at different stores in packs of 8 or 10 sheets. The 10-sheet packages make better poms poms, but they are harder to find. For a buck, you can create a nice hanging decoration for above your table!

This could be the decor that I was most proud of. I found much inspiration for ideas on Pinterest and ended up going with this design. I bought the straw wreath at Goodwill and the red ribbon at Walmart for around $1. The black is actually an old t-shirt that I cut up and wrapped around. The buttons were $1.

The ears are circles that I cut out of a cardboard box and covered with more t-shirt. I then pinned them to the wreath.

And of course the little signs are just printed up and taped to scrapbook paper to spiff it all up!

Scrapbook paper and fancy Disney font make a cute little sign as guests exit.

A cardboard box I had on-hand made a great goodie bag container. I just printed up a cute note and attached some Mickeys that I cut out of construction paper!

The flags are simply pieces of cut out scrapbook paper. I punched holes in each of them to run some ribbon through and hung them on top of a table cloth. The big 2 you see is (believe it or not) a 2 that I cut out of cardboard and then glued CUPCAKE WRAPPERS to! Hung with a cute little ribbon over the Mickey treats and it made for a cute party backdrop.

With scrapbook paper, I cut out little Mickey heads and punched holes in them to make Mickey Garland! I hung this all over the house including the chandelier. It doesn’t get any easier (or cheaper!) than that!

No party would be complete without snacks! If you know a lot about Mickey Mouse Clubhouse, than you’ve probably seen them fishing for Gooey Fish. Swedish Fish make great substitutes for those. Using scrapbook paper, I was able to create cute little name signs for all the food.

As a side note- if you haven’t heard of Gooey Fish from Mickey Mouse Clubhouse, don’t feel bad. Apparently I know WAY too much about the show! lol

Pigs in a blanket make the perfect Hot Diggity Dogs and snack for hungry kiddos at your Mickey party! Once again, this is a cheap snack that everyone will loves. Especially kids!

I threw some Bugles in a bowl and called them Oh Toodles! Bugles.

Getting a little more creative with the names of the foods, these are Meeska Mouska Marshmallow Treats. AKA Strawberry Rice Krispie Treats. Tasty!

The name of this snack wasn’t as creative, but the popcorn was DE-lish! Birthday Cake popcorn made with actual cake mix. It’s divine and costs pennies to make!

I had only just learned of the PB&J Sushi when I was gathering my menu for this party. I just had to include these. They were a HUGE hit. I found the recipe here. They were so easy, but seemed like they took a lot of work. I love those type of snacks!

These “Minnie” Pizzas were also a big hit. I started making each of them with a big pepperoni and 2 small ones on the top, but it became a little tedious and my time was running thin. I’m glad I opted out of making them all that way. They weren’t around long enough to admire!

I had these super cool milk jugs from a local dairy to put chocolate milk in. We called it Clarabelle’s Moooooooo Milk!

Whowouldathunk (yes, this is totally a word y’all) that grapes could make such a pretty presentation? Skewers did the trick to make these just right for individual servings. Must I say it? They were a hit!

The cupcakes were Cookies ‘N Cream Cupcakes and they were really tasty. Different size Oreos made for cute little Mickey heads as toppers. I hid a Oreo and a dollop of marshmallow cream inside each cupcake, too!

I printed off the little sign and attached it to one of my construction paper Mickey heads. The cupcake holder was $1 at Michael’s. Love that store.

Pluto’s Pineapple Punch was nothing more than Ginger Ale and Pineapple Juice and ice. So easy and tasty at the same time.

Mickey party success! What do you think?

Are you planning a Mickey party soon? I’d love to hear your ideas or suggestions!


Like this post? SHARE it!

Related Posts Plugin for WordPress, Blogger...

Strawberry Rice Krispie Treats

It’s only the first week out of school and I’m finding my snack stash to be a little on the low side. Sure I’ve bought the same as usual like I’ve always done throughout the year, but then it dawned on me….she’s home now.

When Addie would have been learning to spell small words, she is now asking for a Pop-Tart. When she would have been learning to add simple addition problems, she is now asking for a peanut butter and jelly sandwich. And when Addie would have been out burning off energy on the playground, she is now asking for a piece of candy or popsicle. It’s a never-ending viscous cycle.

She comes to me and asks for something to eat.

I say no.

She comes back 3 minutes later.

I say no.

And the process continues. Am I the only one experiencing this? I feel bad sometimes, like I’m depriving her of her basic needs! But I have to remind myself that she just ate lunch 15 minutes ago and that her main reason for snacking is boredom. I, myself, have that same issue so I can relate. But do as I say, not as I do!

So as I’m telling you all of this, I’m realizing that it’s not exactly a great way to relate my life to these super tasty treats. But I digress and will now tell you about this awesome new discovery that I made!

So I told you earlier this week that I put together a super cool Mickey Mouse party for my now 2 year old. I had so much fun planning this party, it’s ridiculous. This idea came to me when I was figuring out the color scheme.

I wanted RED Rice Krispie Treats. I was thinking what can make things red? Food coloring? Yes, but it’s weird sometimes when things are an unexpected color, but don’t taste any different. (Anybody remember the green ketchup years ago?) Kool-Aid? Maybe. J-ELLO! That’s it!

The rest is history y’all. I whipped up a batch of the original Rice Krispie Treats, but added a box of sugar-free Strawberry J-ELLO to the melted marshmallows before adding them to the Rice Krispies! They turned out delish. They remind me of the Crunch Berries in Cap ‘N Crunch cereal!

You should have seen me when I realized the possibilities. You can make them any flavor that you’d like! Simply add the box of J-ELLO to your melted marshmallows before mixing them with the Rice Krispies. Done deal.

And for the record, I was a teensy bit saddened that they didn’t end up red. I should’ve known that red and white make pink, DUH. Either way, I was very happy with the way they turned out.

Strawberry Rice Krispie Treats
Recipe Type: Snack, Dessert
Author: Pennywise Cook
This simple trick can get you several different tasty flavors of marshmallow treats!
Ingredients
  • 3 Tbsp Butter
  • 4 Cups Mini Marshmallows
  • 6 Cups Krispy Rice Cereal
  • 1 Pkg Sugar-Free Strawberry J-ELLO Mix (or any flavor you like)
Instructions
  1. In a large saucepan, melt butter over low heat. Stir in marshmallows and until melted.
  2. Add package of J-ELLO and mix until disolved. Remove from heat.
  3. Add the Rice Krispies and stir until well coated.
  4. Place into a well-greased jellyroll pan or casserole dish and let set.
  5. Cut into squares and enjoy!


Like this post? SHARE it!

Related Posts Plugin for WordPress, Blogger...

Hot Boiled Peanuts: It’s a Southern Thang

Sometimes you feel like a nut…

And sometimes you feel like a boiled nut.

My husband and I are doing the Daniel Fast right now. We’re on day 11 of 21 right now. If you’re not familiar with the Daniel Fast, I’ll sum it up by telling you some of the guidelines.

  • No meat, dairy, sugar or artificial sweeteners, leavened bread, or caffeine
  • You can have all vegetables, fruits, nuts, beans, and whole grains
  • No fried foods
  • Only water to drink
  • It’s based on the book of Daniel in the Bible and 2 of his fasting experiences
  • It’s not only physical, but meant to be a spiritual experience

The first time that Daniel did this fast was for 10 days. The second time was for 21 days. We’ve done the 10-day before without issue so we’ve challenged ourselves to try the 21-day. It’s gone really well so far. Considering that my husband is a cheeseburger and french fry kinda guy, it’s VERY surprising how he gets along with this type of fast. Praise God!

And me? What do I do about my sweets you say? Well let’s just say that bananas and raisins are my best friend these days. Remember my Peanut Butter Choco-Banana Ice Cream? I can actually eat that on this fast! But I have to eat it out of a bowl instead of a cone. Darn…

But I digress…

We’ve also been eating a lot of nuts lately. Almonds and peanuts mostly. You can get these HUGE, I mean HUGE bags of salted and roasted peanuts (in-shell) at Sam’s Club for around $5. It’s amazing how much peanuts will fill you up while providing you with energy.

If you’re from the south or have visited the south before, you’ve probably heard of folks offering Boiled Peanuts. There are signs just about everywhere once you get into Alabamer (yes, Alabamer) and Misippi (yes, Misippi). No need to pronounce words correctly around here, we’re too busy enjoying our boiled peanuts. I wish I could insert an audio clip of how I say boiled for y’all. Words like coil, boil, toilet all come out of my mouth a little on the Paula Deen side. Oh who am I kidding? It sounds a LOT like Paula Deen says boil. 🙂

So with all the nuts we’ve been eating, I wanted a little change in the nut department. So I though why not boil them?

Since the Hamptom Farms peanuts that I bought were already salted, I knew I didn’t need to salt them again. And I didn’t want them swimming in a bunch of oil (once again, just imagine a little Paula Deen accent). So I used water!

1 big pot full of water, a huge amount of salted and roasted peanuts, and 5 hours later you have hot boiled peanuts good enough to make you slap yo mama! It honestly didn’t get any easier than that.

And we didn’t even have to make a trip down to Alabamer!

Hot Boiled Peanuts: It’s a Southern Thang
 
Recipe Type: Snack, Appetizer
Author: Pennywise Cook

There is nothing to making hot boiled peanuts just like they make on those road-side stands in the south!
Ingredients
  • Any amount of in-shell roasted and salted peanuts
  • Water- to cover the entire amount of peanuts
Instructions
  1. Place the amount of desired peanuts into a large pot.
  2. Cover with water.
  3. Bring to a boil, then lower the temp to a simmer.
  4. Cover and let simmer for 4-5 hours or until the shells begin to give a little and the peanuts inside are soft.
 
Notes

You can of course get peanuts that aren’t salted already, just be sure to salt your water when boiling them.
Your water will evaporate throughout the boiling process, be sure to continue adding more hot water in order to keep the peanuts covered.


Like this post? SHARE it!

Related Posts Plugin for WordPress, Blogger...